| |
|||||
Workbench:
|
 |
First Peter, then Hector... maybe others? This Workbench motivational therapy is really good for your sinuses. Well, I would like to bang on the drum with these chaps if they let me. With such a company who wouldn't want to join the band?
As it happens, I am currently working on one Lavochkin La-7 in 1:48 scale from Gavia. After deciding to work on this kit I e-mailed Erik for help on interpreting many crossed signals about Kozhedub's "White 27". In Hollywood they would call it Serendipity, in India they would say Karma, but Erik replied that he was just working on the topic. Not much later I was granted a sneak peak in his article called: "Lost in Time... The Misadventures of Ivan Kozhedub's Famous "White 27". After reading it, I was set for subject of this kit.
The Kit
 Gavia's
La-7 release was widely hailed across plastic-modelers planet, and I had to
join the rejoicing, as La-5/7 family is one of my favorites too. However, everybody
must have been a little too high on lacquer fumes, when they announced that
the kit is accurate. Looking at the finished models on the web and playing with
parts from the box, and then comparing that to photographs of the real plane,
it seamed to me that something is astray. But I just couldn't put my finger
on it. When I scanned line drawings from "Soviet Air Force Fighter Colours,
1941-45" book, enlarged them to 1:48 scale, and then started measuring,
it became clear. The biggest problem is that the fuselage spine behind the cockpit
is far too narrow. The back glazing of the cockpit is some 25% under-scaled
in its width!
Gavia's
La-7 release was widely hailed across plastic-modelers planet, and I had to
join the rejoicing, as La-5/7 family is one of my favorites too. However, everybody
must have been a little too high on lacquer fumes, when they announced that
the kit is accurate. Looking at the finished models on the web and playing with
parts from the box, and then comparing that to photographs of the real plane,
it seamed to me that something is astray. But I just couldn't put my finger
on it. When I scanned line drawings from "Soviet Air Force Fighter Colours,
1941-45" book, enlarged them to 1:48 scale, and then started measuring,
it became clear. The biggest problem is that the fuselage spine behind the cockpit
is far too narrow. The back glazing of the cockpit is some 25% under-scaled
in its width!
This can be also clearly seen if one compares Gavia and Hobbycraft La-7 fuselages. Hobbycraft is accurate in this respect. Depth of Gavia's fuselage from the profile view is also a bit too shy, and there are contour problems with the vertical fin as well. I don't really care about actual dimensions as long as it looks right, but in this case it doesn't. To me, it makes La-7 look too "spitfireish". Another quirk is that wing's leading edge in the plan view doesn't have pronounced enough angle between the inner and outer sections. I wonder if all these flaws were neatly scaled down to the new Eduard La-7?
So, I had to decide on what I could live with, and what will have to yield to the scalpel. The thorn in my eye was that narrow fuselage. I could also easily sand on the vertical fin, and correct the contour somewhat, but I decided to leave the wing leading edge alone, as it would require a lot of work with diminishing returns.
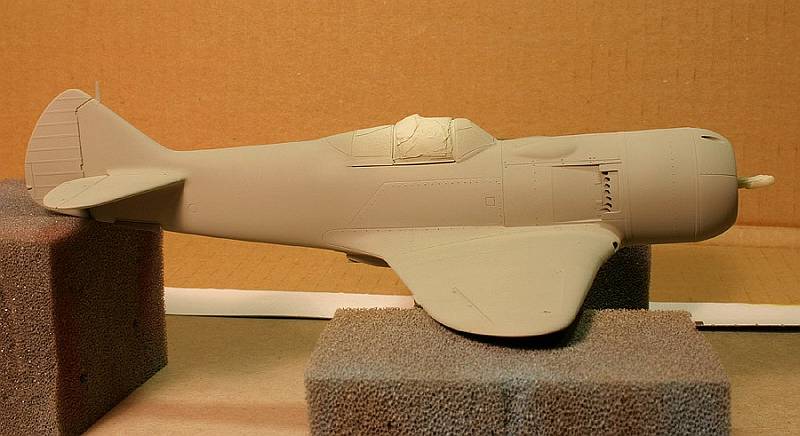
I contemplated on hacking the front end of Gavia's kit and matting it to the back end of Hobbycraft La-7, but finally decided against it. I am going to use very flexible Gaiva plastic to my advantage. I want to make a styrene insert (a wedge), which would widen upper fuselage behind the cockpit, and then taper it down to zero at the foot of the vertical tail. At the same time, all other segments of the fuselage are to be press-fitted into submission, including the bottom fuselage seam, from the wing all the way to the tail. As a consequence, I will not be able to use kit's glazing, inner wall behind the pilot's seat, or the radio deck on the back of the fuselage. Falcon's excellent vacu-form canopy is made for the Hobbycraft La-7 kit, and in theory should fit this hybrid of mine just perfectly. The other bits I will have to scratch-build.
Fuselage
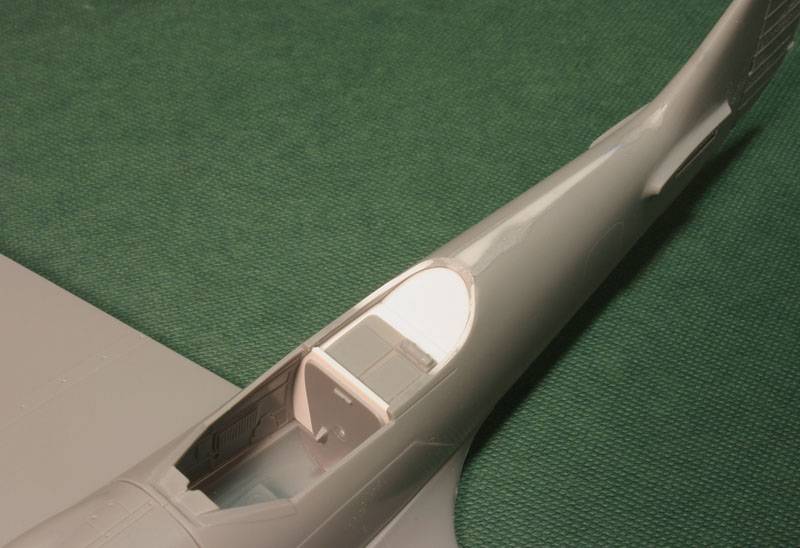
To solve the problem I have to break with convention, and start with fuselage
halves, leaving the cockpit to be installed and painted later, through the wing
opening at the bottom. I made a long plastic wedge from styrene stock, and then
took it though several dry-fitting iterations until I could place it flush between
the fuselage halves (during this process I actively wished that a third arm
would grow from my side). I also tried to sand down the contour of the vertical
tail at this point. The 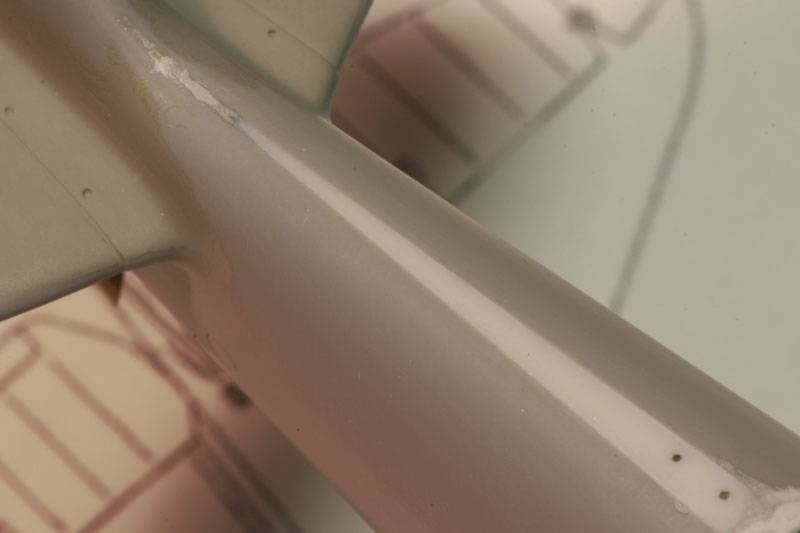
 main
thing is to try and reduce cord-length of the ruder and make it look little
blunter and round. I achieved partial success at this. Gavia kit has only few
locating pins, which actually makes it easy to put the fuselage halves sunny
side up on a sheet of sandpaper, and sand away. This will bring back sharp trailing
edge of the vertical tail, lost while correcting the contour.
main
thing is to try and reduce cord-length of the ruder and make it look little
blunter and round. I achieved partial success at this. Gavia kit has only few
locating pins, which actually makes it easy to put the fuselage halves sunny
side up on a sheet of sandpaper, and sand away. This will bring back sharp trailing
edge of the vertical tail, lost while correcting the contour.
Then I started welding together two fuselage halves, part by part, without the insert that I previously made. I used liquid cement, and started from the front end, then bottom, leaving the top seam behind the cockpit free. I left the whole thing dry over night. After this was done, it was relatively easy to drive plastic wedge between free ends of fuselage halves, stretching the width at the top, but keeping everything else tight and secure. Another flood of liquid welder along the seams from inside of the fuselage secured the contract. Now I could breathe again.
Cockpit
 Kit
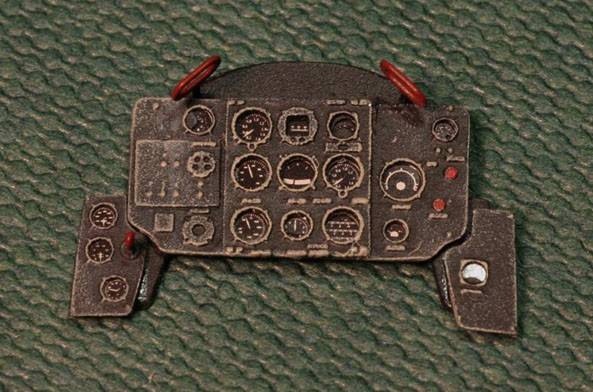
cockpit is relatively sparse, but has everything in its place. I wanted some
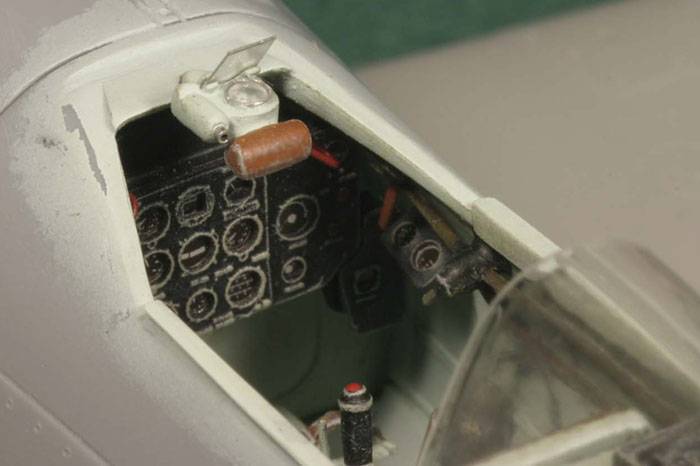
more detail. "Part" set for La-7 provides number of photo-etched
improvements inside and out. In pilot's office it gives new instrument face,
harness, pedals, and myriad of small wheels and levers.
Kit
cockpit is relatively sparse, but has everything in its place. I wanted some
more detail. "Part" set for La-7 provides number of photo-etched
improvements inside and out. In pilot's office it gives new instrument face,
harness, pedals, and myriad of small wheels and levers.
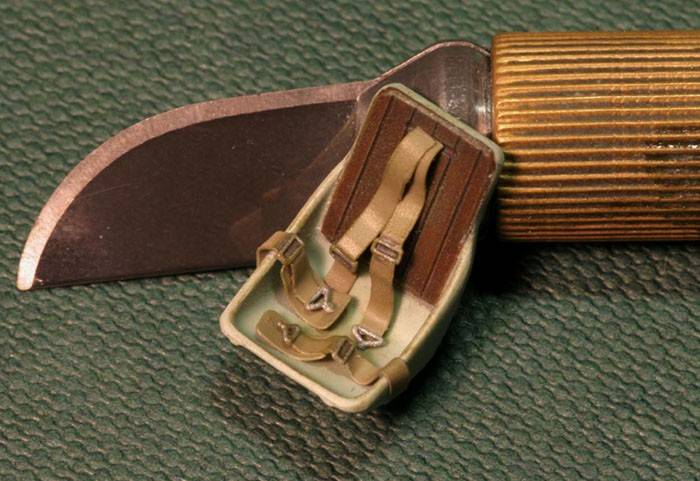
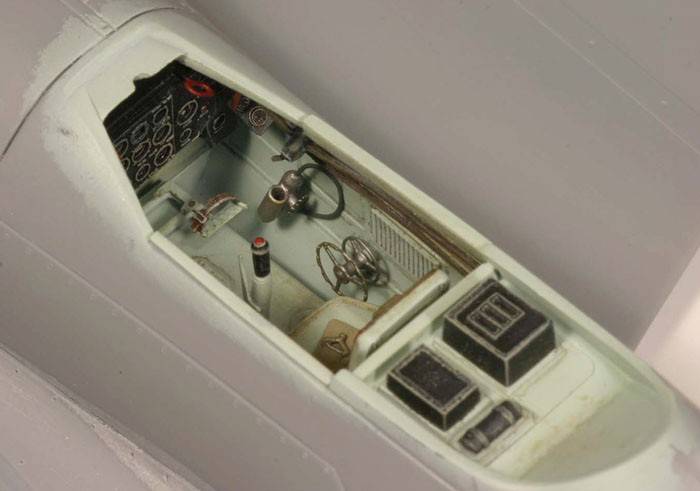
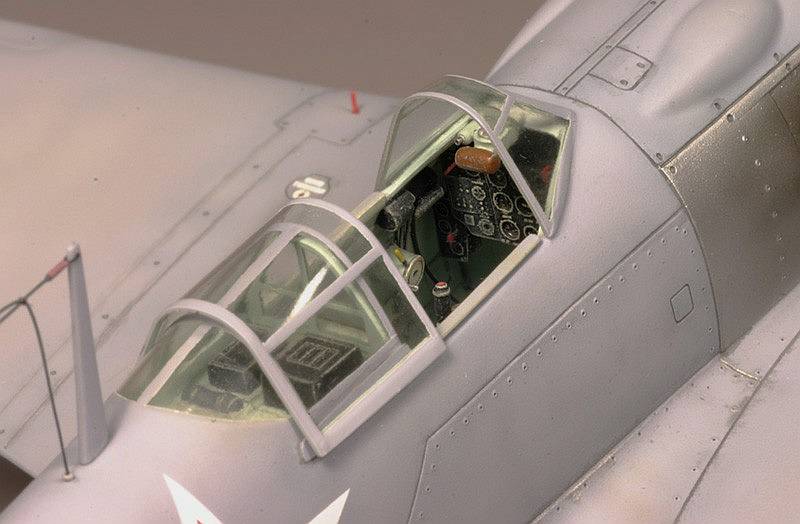
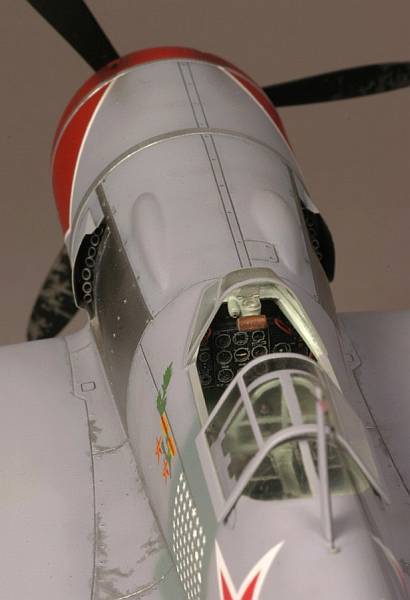
I added some scratch-build details, including back decking and wall behind the seat, canopy sliding rails, as well as fuel lines and oxygen pump (I think) on the right wall. Gun sight is very basic from the box, so I decided to rebuild it, and it ended up being a fiddly assembly of some 10 parts. At the end of this process I was rewarded with the convincingly looking cockpit.
I used ALG-5 primer as the cockpit color. This is from new line of "White Ensign" paints. These pigments are very fine, but they also take a very long time to cure. My cockpit was dry after 48 hours. I expect other enamels from this line to act similarly.
 |
 |
 |
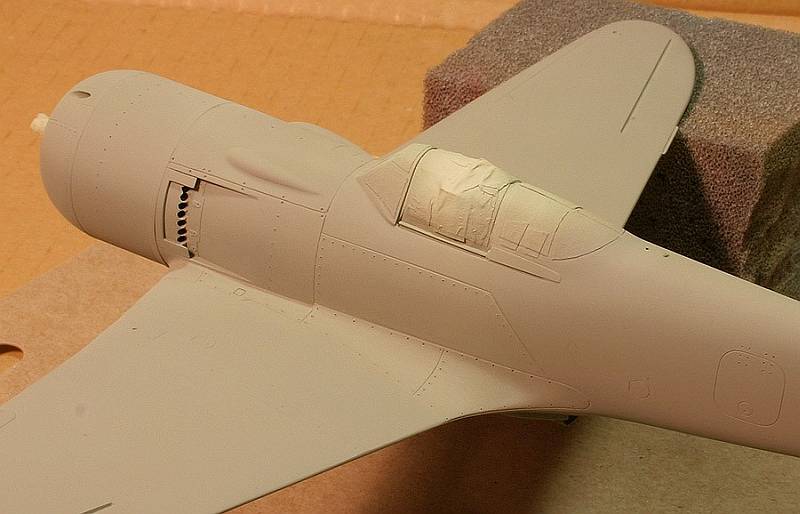
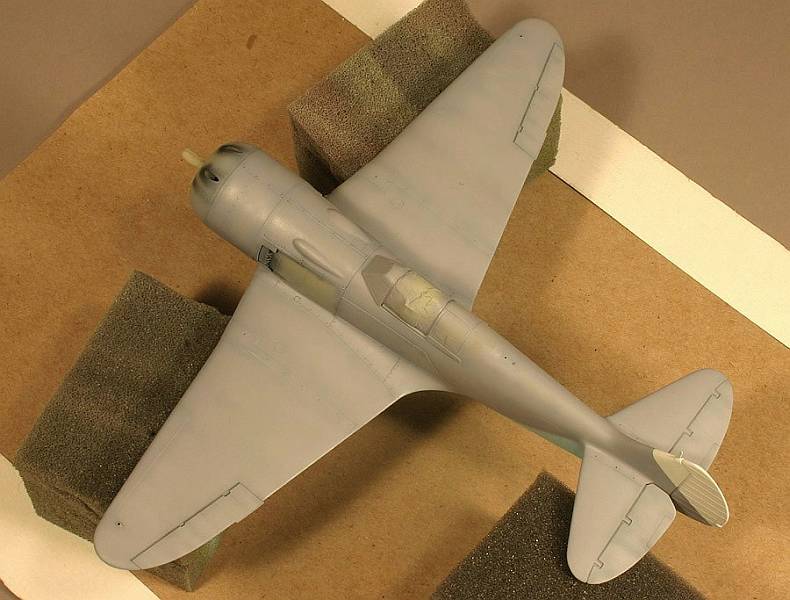
Surface Details
 After
finishing with cockpit, I could join the wing with the fuselage. Widened back
of the fuselage inevitably produced problems with this joint. Fuselage was progressively
wider than the wing fillet, so it was time for putty. I stopped counting after
third putty application and consecutive sanding, but after sufficient time,
this complex joint finally looked smooth. Then I starting re-scribing all lost
panel details. As the luck has it, wing-root is exactly the place where La-7
has some compound panel curves. I had to cut out some brass templates to lead
the tool around curved panels (one can also use tin from Coke/beer cans for
this purpose).
After
finishing with cockpit, I could join the wing with the fuselage. Widened back
of the fuselage inevitably produced problems with this joint. Fuselage was progressively
wider than the wing fillet, so it was time for putty. I stopped counting after
third putty application and consecutive sanding, but after sufficient time,
this complex joint finally looked smooth. Then I starting re-scribing all lost
panel details. As the luck has it, wing-root is exactly the place where La-7
has some compound panel curves. I had to cut out some brass templates to lead
the tool around curved panels (one can also use tin from Coke/beer cans for
this purpose).
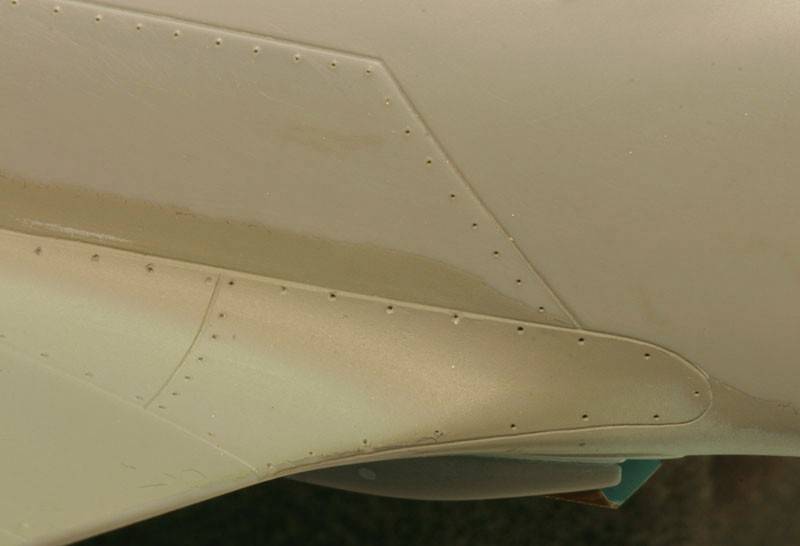
Putty is softer then plastic, so a light hand and lot of care is needed when
carving through this mess. After this was done I decided to add rows of rivets
in appropriate places. For both scribing and riveting I use needle from my compass,
held in the pin-vise. After finishing this operation I sprayed a layer of gray
paint to check if everything is smooth. Of course it wasn't, so I went 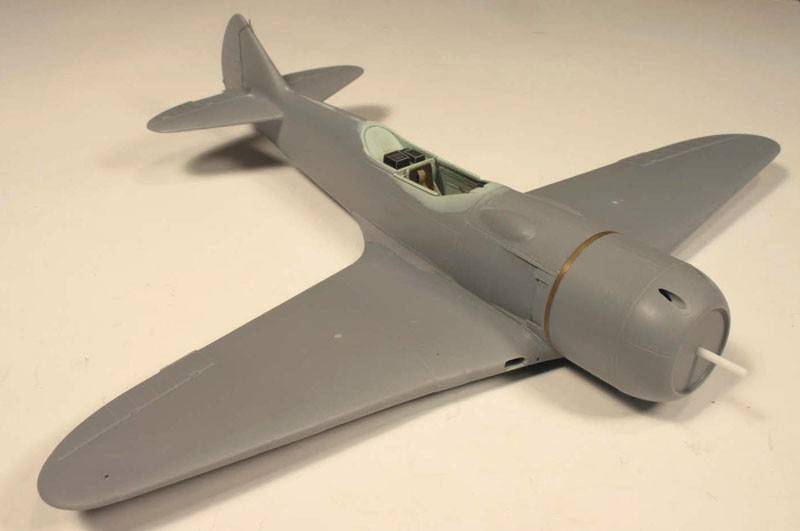
 back
to correct the glitches. More putty, more sanding...
back
to correct the glitches. More putty, more sanding...
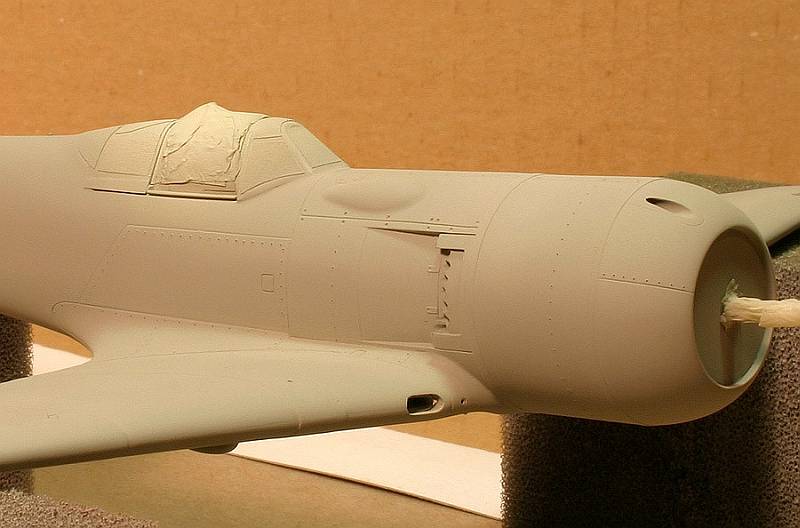
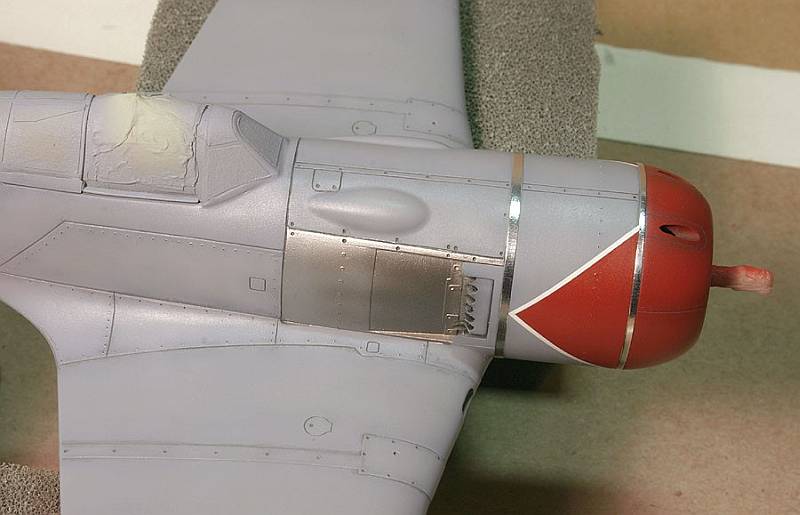
You can also notice that I replaced second cowling loop with brass strip, cut to the right width out of thin sheet. This loop had constant width on La-7, and the kit detail was inaccurate, and looked more like La-5FN feature.
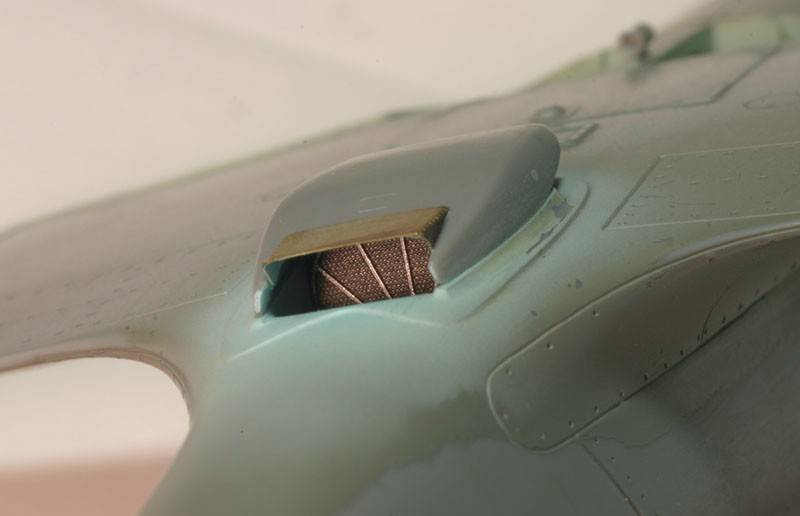
Radiator was installed under the wing, with photo-etched grills and cooling flap. These bits really highlight functionality of this element.
Surface Details
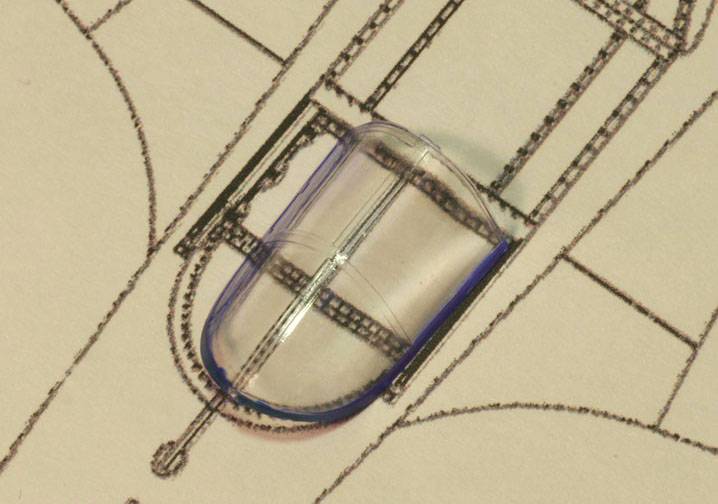
Remember how I said earlier that in theory Falcon vacu-form canopy should fit on my modified fuselage? Well, that was theory. When I finally test-fitted these parts, I found that both, windshield, and back glazing don't agree with the fuselage opening. Additional complication with acetate is that even when there's a perfect fit, one gets only very narrow edge as the matting surface. CA glue is in my opinion a must for a permanent and reliable bond. Falcon canopy helps in that is relatively thick (for an acetate) and very well defined. To prevent fogging of clear parts I dipped them in Future. Let me digress for a moment, and throw in few comments about this affair:
Rant about Future
Some people swear by this floor product. I view it as necessary evil. Shiny glazed effect that Future produces on airplane canopies became a fad on contest tables, and judges love to peer at it, but it is actually very much incongruous to the rest of the model. We try to make models as lifelike as possible, going through sophisticated weathering rituals, but on the end we leave on this shiny surface that just doesn't belong on a well used war aircraft. It may look nice, but it makes no sense. Especially WWII aircraft did not have crystal clear canopy windows, and if we are talking about Russian planes this point becomes really acute. Next time you find yourself flying somewhere, look through the side window, and try to count imperfections on the glass. If any, we should try to make the canopy look more opaque. On the other hand, Future protects the surface in many ways. If one uses CA glue, this protective coat is compulsory, due to vapor that CA releases as it cures. Future is also an easy way to hide all minor surface blemishes and unwanted scratches. Finally, it makes the surface smoother, and therefore masking tape lifts easier, once the painting is done. It is a delicate balance. In my opinion, naked clear plastic with its duller look is more realistic then Future glaze. After all, weigh your reasons, and unless you must coat your canopy in Future, don't do it! There, I said it... now I feel better.
Going back to my La-7, acetate windshield sides were considerably wider than Gavia's part. I trimmed the bottom somewhat, and then just squeezed it to fit, and secured it with CA glue. Rear glazing had proper width, but the contour of its edge still wasn't compatible. I attached it at points of contact, and then filled remaining gaps wit repeated applications of CA. I managed thereafter to accidentally brake off both transparent parts, and had to perform the process once again. Some considerable puttying was required to blend everything together. I added attachment "claws" to the sliding part of the canopy (they should slot into the guide railing made before). I fashioned these from small strips of old and used photo etched frame, bending them to an "L" shape, and then gluing to the inside edges of canopy in four places. With the canopy attached, my model started resembling familiar shape of La-7.
 |
 |
 |
 |
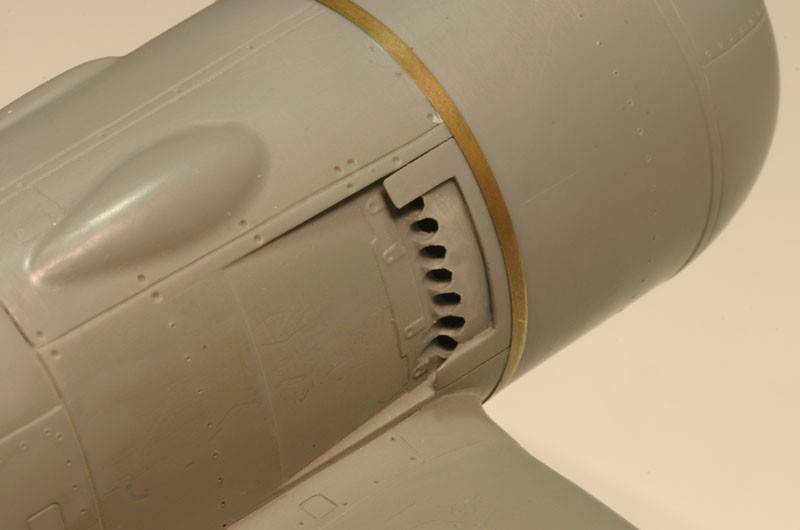 Engine
exhaust system is another prominent detail that was somewhat neglected in the
kit. "Part's" brass set gives an option to flare out engine cooling
flaps, and I chose to do this. However, this will leave exhaust stacks more
exposed, and kit bit is really not sufficient. After some thinking, I decided
to drill out openings for individual exhaust pipes, and later represent these
using short pieces of brass tubing. La-7 had individual exhaust for each of
its 14 cylinders, which yields 7 pipes on each side. This is a tight package,
and I had to be really careful while drilling, starting with smallest drill
for pilot holes, and then progressing towards the correct diameter.
Engine
exhaust system is another prominent detail that was somewhat neglected in the
kit. "Part's" brass set gives an option to flare out engine cooling
flaps, and I chose to do this. However, this will leave exhaust stacks more
exposed, and kit bit is really not sufficient. After some thinking, I decided
to drill out openings for individual exhaust pipes, and later represent these
using short pieces of brass tubing. La-7 had individual exhaust for each of
its 14 cylinders, which yields 7 pipes on each side. This is a tight package,
and I had to be really careful while drilling, starting with smallest drill
for pilot holes, and then progressing towards the correct diameter.
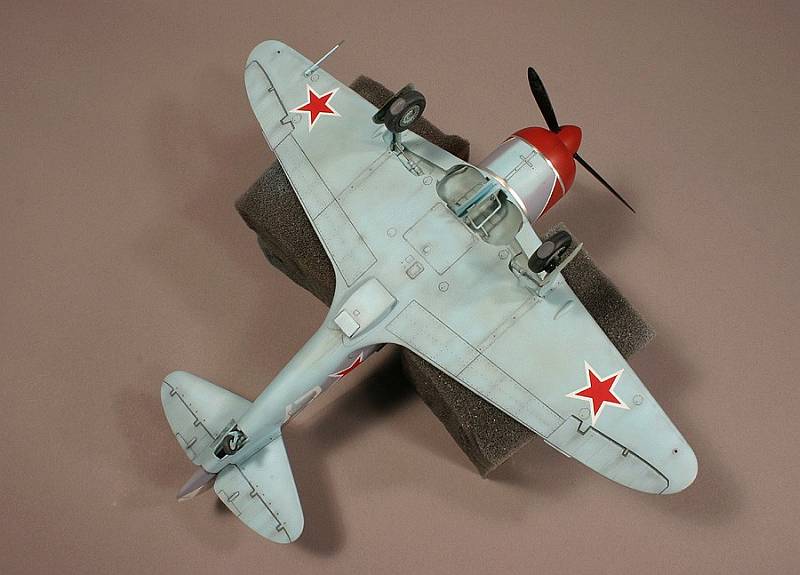
Landing Gear
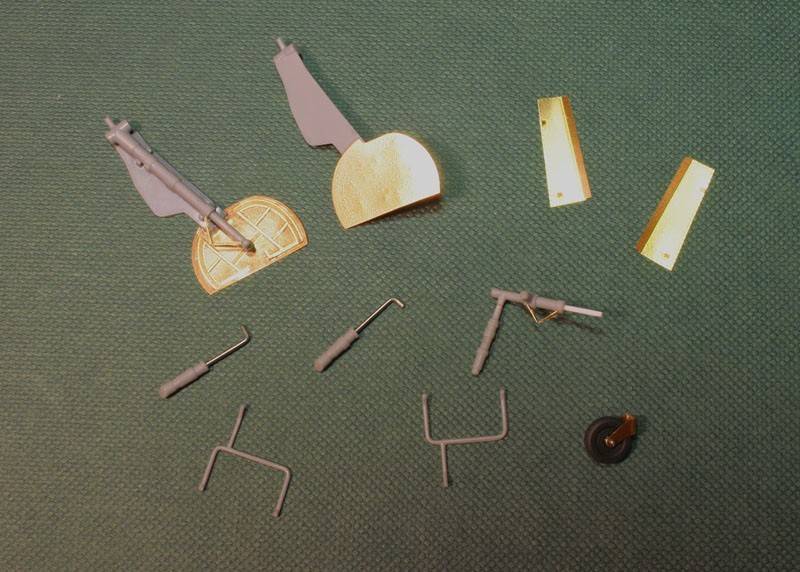 Not
thinking much about it, this again ended up as a medley of kit plastic, photo-etched
brass, and scratch-built bits. Note that I added some "dings" to the
main wheel covers, as these
Not
thinking much about it, this again ended up as a medley of kit plastic, photo-etched
brass, and scratch-built bits. Note that I added some "dings" to the
main wheel covers, as these 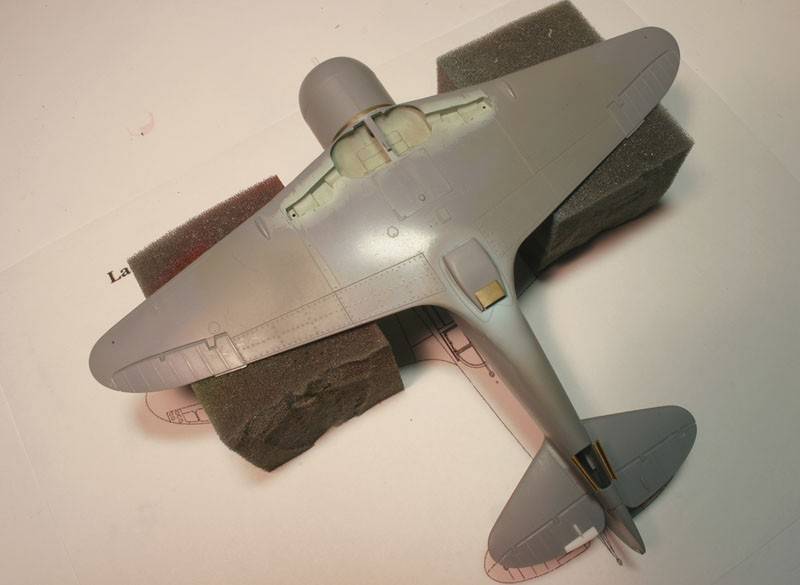 were
in reality only thin sheets of metal and didn't stay perfectly smooth for long.
Another advantage of brass landing gear covers is that you can add discrete
curvature to them (these parts followed curvature of the wing, and weren't absolutely
flat). I didn't use brass parts from the set for upper main landing gear covers
("socks"), as these included teardrop blisters, characteristic for
La-5, but not so for La-7.
were
in reality only thin sheets of metal and didn't stay perfectly smooth for long.
Another advantage of brass landing gear covers is that you can add discrete
curvature to them (these parts followed curvature of the wing, and weren't absolutely
flat). I didn't use brass parts from the set for upper main landing gear covers
("socks"), as these included teardrop blisters, characteristic for
La-5, but not so for La-7.
I originally painted the inside of gear bays in ALG-5, but after consulting with Erik realized that this is wrong. Everything will be over-painted with AMT-7, together with the underside of the aircraft. This will also be the color for landing gear elements. I plan to represent oleo struts using bare metal foil, and I will use same material for cowling rings. In the past I had great results using the foil and I can recommend it for representing contrasting "metal" details.
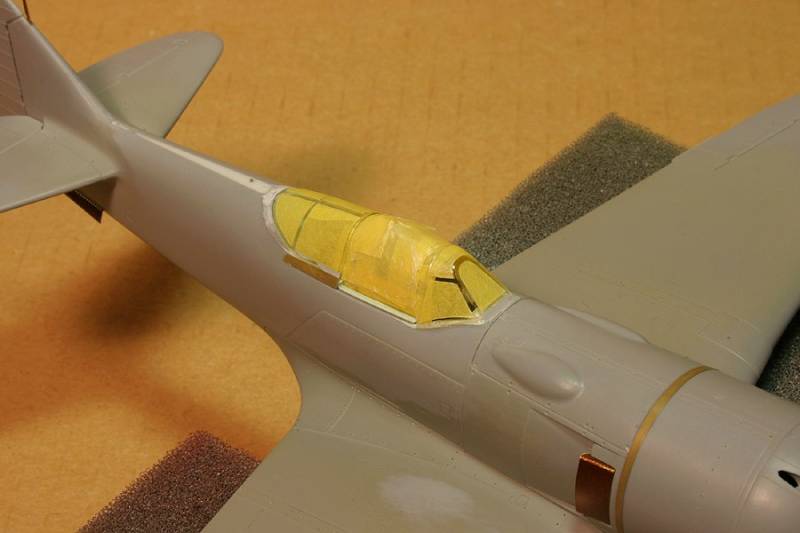
Masking & Priming
 I
have tried to procrastinate this step for as much as possible, but the time
for it inevitably came. Yes, I just 'love' to mask canopies. I have found that
if I fight the natural instinct, and spend more time during this process, I
will be ultimately more satisfied with my model. Further, using quality materials
will also enhance the final result, and may even make the process less unpleasant;
such one material being yellow Tamiya masking tape.
I
have tried to procrastinate this step for as much as possible, but the time
for it inevitably came. Yes, I just 'love' to mask canopies. I have found that
if I fight the natural instinct, and spend more time during this process, I
will be ultimately more satisfied with my model. Further, using quality materials
will also enhance the final result, and may even make the process less unpleasant;
such one material being yellow Tamiya masking tape.
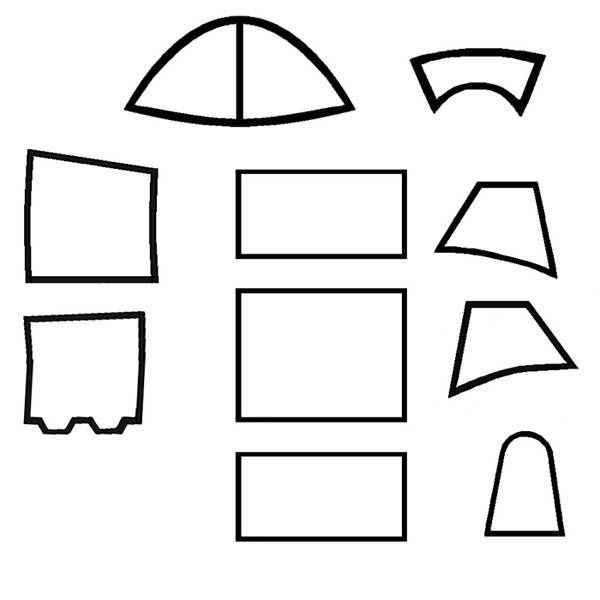
I have developed a process for producing accurate canopy masks that is somewhat
time consuming, but provides for great control and eliminates potential disasters
with the scalpel. I call it "reverse masking". Using some clear masking
tape, for example Scotch tape, I temporarily place it onto the clear canopy
parts. Then, trace the edges of the canopy frame with fine-tip marker onto the
tape. I do this free hand, and one panel at the time. It is much easier than
truing to trace the whole canopy on one piece of tape. I lift peaces of tape,
and paste them on a clean paper in a relatively arranged manner. When this is
done, I scan the templates into my computer, using big resolution. I can then
clean up all the shapes; straighten the lines and curves, using Microsoft Paint
(this software is more powerful than most people think). After this is done
I horizontally reverse the templates, making a mirror image of each one. I finally
group all of them in compact space.

 All
that is left is to print this mask in proper scale onto reverse side of some
labeling paper. I use one for labeling CD's. After using up all the labels,
one is left with a backing paper, which is slick on one side and plain on the
back. Print the template on the plain back-side (this is why it was necessary
to make mirror images of all the shapes). I usually make two copies just to
feel comfortable. Finally, I paste new Tamiya masking tape across the slick
side of the labeling paper, and then cut the shapes, tracing templates with
scissors. If everything is done properly, masks will fit like a glove. Separate
the masking tape from the backing, and fit it on the model. As I said, somewhat
time consuming, but it works great.
All
that is left is to print this mask in proper scale onto reverse side of some
labeling paper. I use one for labeling CD's. After using up all the labels,
one is left with a backing paper, which is slick on one side and plain on the
back. Print the template on the plain back-side (this is why it was necessary
to make mirror images of all the shapes). I usually make two copies just to
feel comfortable. Finally, I paste new Tamiya masking tape across the slick
side of the labeling paper, and then cut the shapes, tracing templates with
scissors. If everything is done properly, masks will fit like a glove. Separate
the masking tape from the backing, and fit it on the model. As I said, somewhat
time consuming, but it works great.
After everything is tucked in, I wash the model with a cotton tuff drenched in vinegar (spare the masked canopy if you can). This doesn't smell all that great, but it cleans the model and prepares the surface for paint. I sprayed some ALG-5 locally on the canopy area, to produce correct look to the inside canopy frames. This again takes some time to dry.
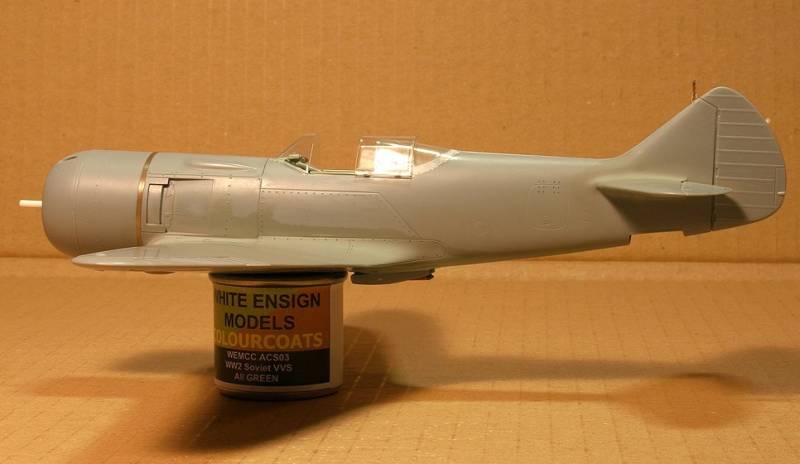
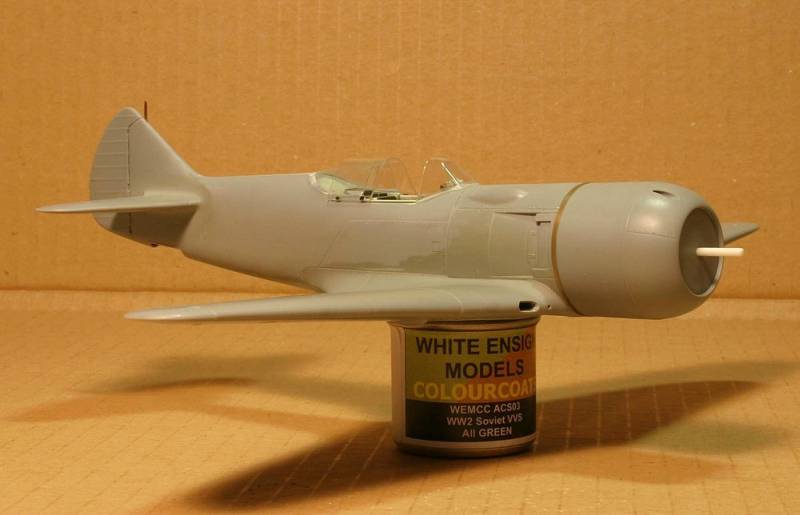
Not so long ago I started priming my models, and now I won't go back. It really helps in many ways. I use any fine-grained light gray paint with good coverage for this purpose. This time it was Model Master Light Sea Gray enamel. It also helps if the paint dries fast, as you can then prime the whole model (while handling it), and also correct small imperfections that priming reveals, with a light touch of fine sand paper (1500 grid).
 |
 |
 |
After a generous coat of paint surface may look somewhat grainy, but when the
coat cures thoroughly I will buff it with gradation of dry make-up brushes,
raided from my wife's cabinet. If brushes don't do the job, one can resort to
light sanding as well.
Painting
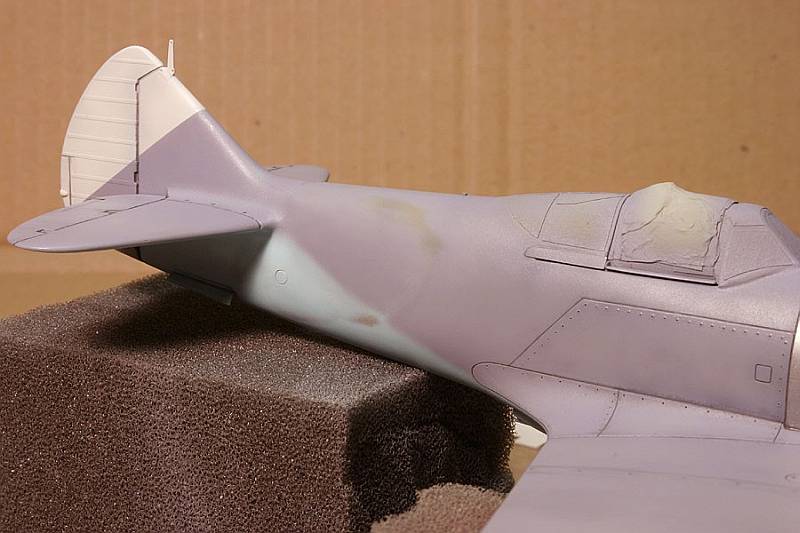
Finally we are going somewhere; this is the stage where model rapidly changes appearance. After priming it in the last step, it was time to spray some paint on.
I am using a combination of pre, and post-shading techniques, so I first loosely sprayed black along the panel lines. In retrospect, some gray color might have worked better, as the finish on this aircraft is so light.
A nice, quick, and easy job to start of the painting session was a white vertical tail trim. I sprayed it freehand, as the sharp border of this field will be defined with subsequent coloring.
 Next
came AMT-7 (White Ensign line) for the bottom surfaces. Again, pigment of this
color is really fine, and produces smooth satin finish. Drying time was about
48 hours though. After the main coat was laid, I mixed some Sea Gray with the
original color to gently alter the hue, and thinned that further, spraying it
to give some depth to the finish. I spray it here and there, very lightly, to
complement the already pre-shaded panels. The appearance mustn't be too well
organized, or it won't look convincing at all, so some random discolorations
will help. This process is somewhat artistic, and one needs to know when to
stop. I tend to believe that weathering should be apparent on the model, but
shouldn't jump out and dominate the finish. The final effect is subtle, but
very pleasing.
Next
came AMT-7 (White Ensign line) for the bottom surfaces. Again, pigment of this
color is really fine, and produces smooth satin finish. Drying time was about
48 hours though. After the main coat was laid, I mixed some Sea Gray with the
original color to gently alter the hue, and thinned that further, spraying it
to give some depth to the finish. I spray it here and there, very lightly, to
complement the already pre-shaded panels. The appearance mustn't be too well
organized, or it won't look convincing at all, so some random discolorations
will help. This process is somewhat artistic, and one needs to know when to
stop. I tend to believe that weathering should be apparent on the model, but
shouldn't jump out and dominate the finish. The final effect is subtle, but
very pleasing.
When all this cured, I started with the upper color, AMT-11. Now was the time
to mask previously painted white vertical tail tip. The border of the flash
is inline with the red star. I used the actual star decal to determine where
to mask. I also needed to reproduce fine demarcation line between the upper
and lower surfaces of the aircraft freehand, so I used smallest nozzle on my
Aztek airbrush (tan tip). The feather between the two colors should be soft,
 but
not splotchy, and all the lines should be smooth, not wavy. Steady now, focus,
add pressure, add paint... Same weathering techniques described before were
used on the upper surfaces as well.
but
not splotchy, and all the lines should be smooth, not wavy. Steady now, focus,
add pressure, add paint... Same weathering techniques described before were
used on the upper surfaces as well.
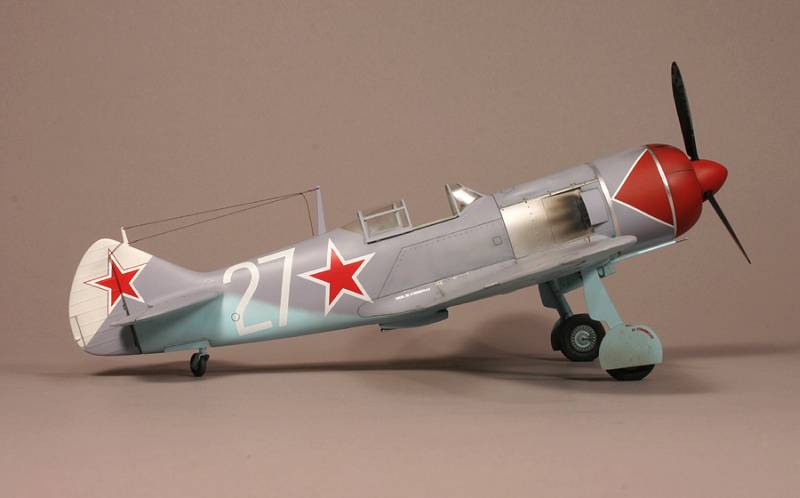
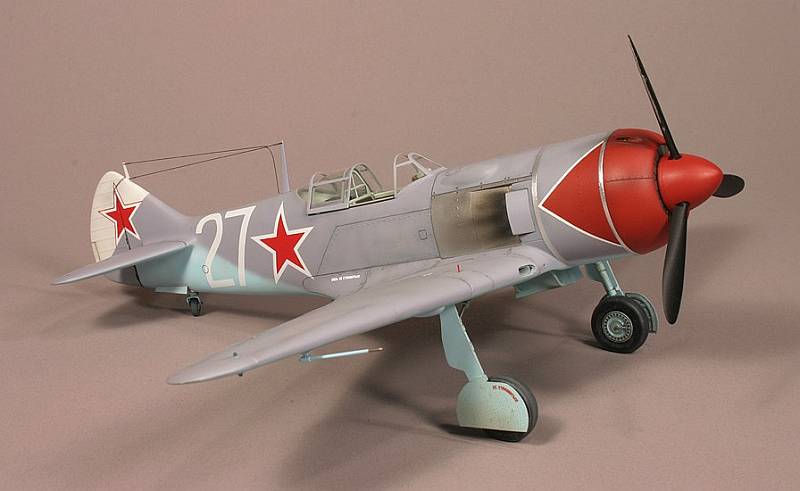
Now, as the main job was done, I could take a rest for another 48 hours, and let the new paint settle. I then airbrushed that idiosyncratic patch of AMT-12 on the port fuselage side under the cockpit, as per Erik's instructions. This time I lightened the color with few drops of white. It seamd to me that if I spray it straight from the bottle it will look to contrasty with much lighter AMT-11, and especially with white kill markings laid on top.
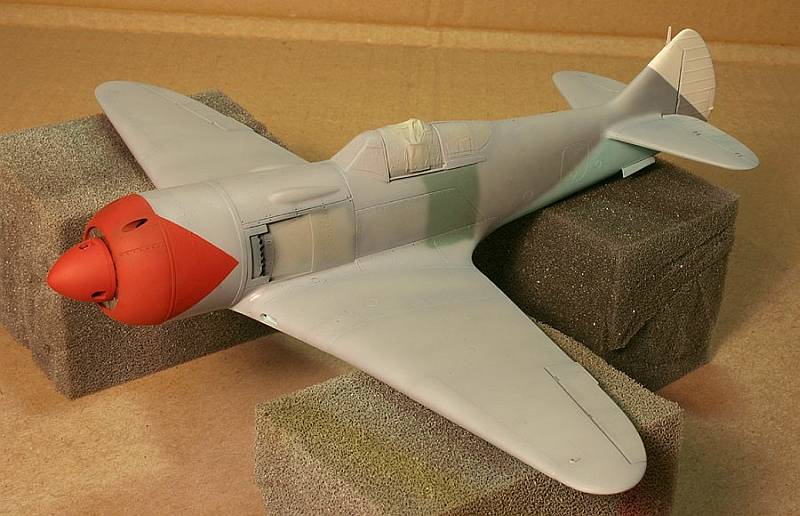
 For
the red nose, I used vinyl masks provided in the kit. I also added some green
to the red color, making it less bright. Green is perfect medium for darkening
red color (better then adding black), as these two are diametrically opposed
on the color wheel.
For
the red nose, I used vinyl masks provided in the kit. I also added some green
to the red color, making it less bright. Green is perfect medium for darkening
red color (better then adding black), as these two are diametrically opposed
on the color wheel.
Ahm, this dramatic nose art really changes the appearance. After de-masking I noticed that I stripped off small bit of paint on the brass cowling-ring. This is in spite of the fact that the adhesive of these masks was very gentle, the model was primed, and I even brushed the brass ring to add some surface roughness. The moral of the story is that hobby paints are not really designed for metal surfaces. But fear not, nothing is lost; these cowling rings will be covered in "bare metal" foil when the time comes.
Decals & More Painting
 Well,
I had to take a break from it all. I escaped to the white sands and emerald
sea of Republica Dominicana for a week. But now I am back, little well done
from the back perhaps, but with a grin on my face.
Well,
I had to take a break from it all. I escaped to the white sands and emerald
sea of Republica Dominicana for a week. But now I am back, little well done
from the back perhaps, but with a grin on my face.
Ah, yes the model. It started resembling Kozhedub's flying machine, at least
from the left side. The other side has a slight problem right now, but let me
come to that later.
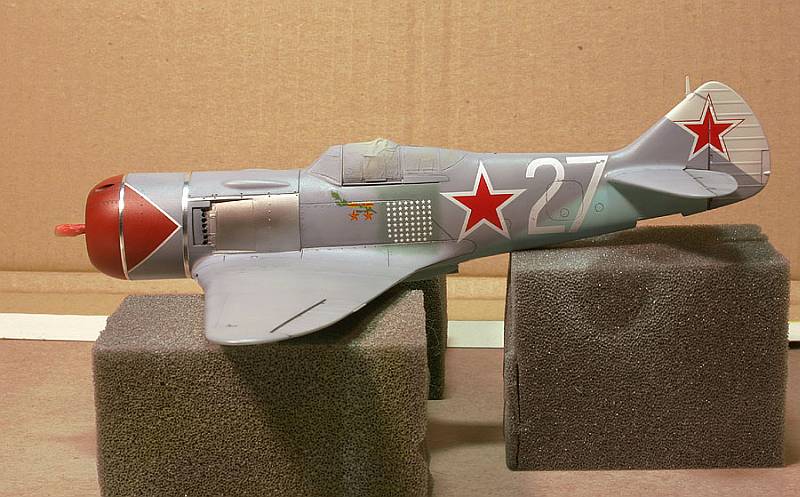
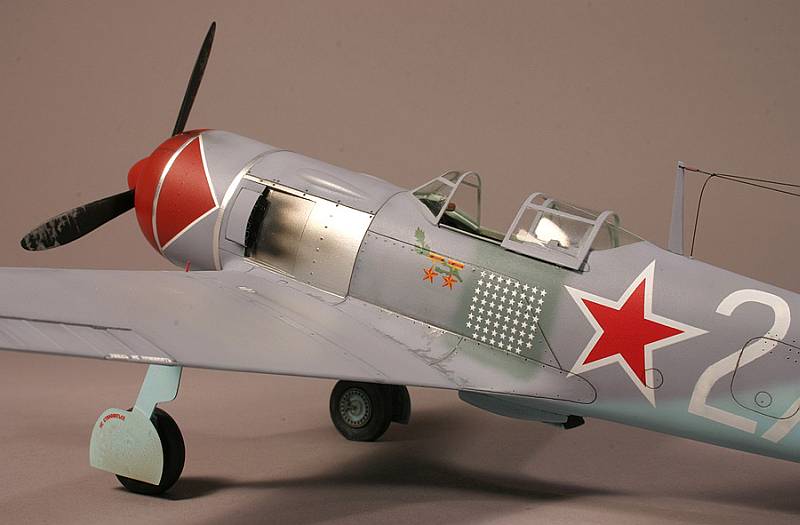
La-7 is now partially decaled. I used aftermarket stars, as they needed to be simple white-bordered, and not the Victory markings as given in the kit. The tail marking was made from a Victory star by carefully cutting off red trim from a part of the star that is outside of white section of the fin. Kill marks are stock, but they are slightly oversized, so I didn't manage to properly align the second HSU order with the border of the over-painted patch. Oh well, maybe that next model is going to be a perfect one...
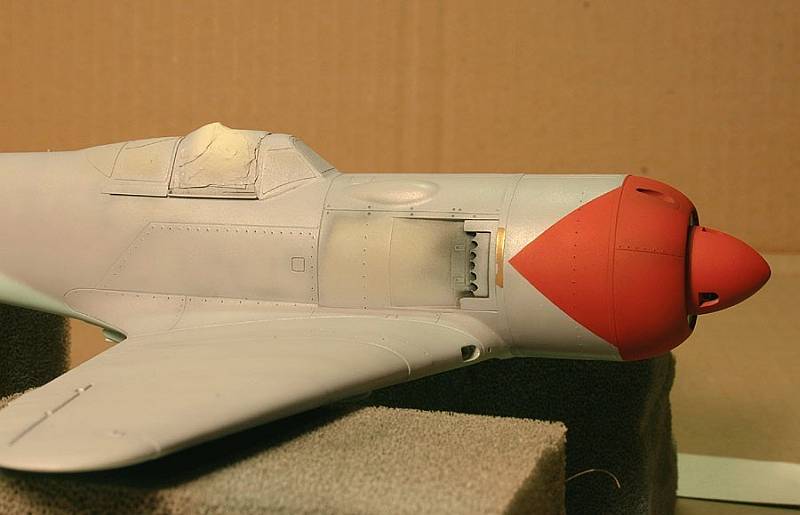
 I
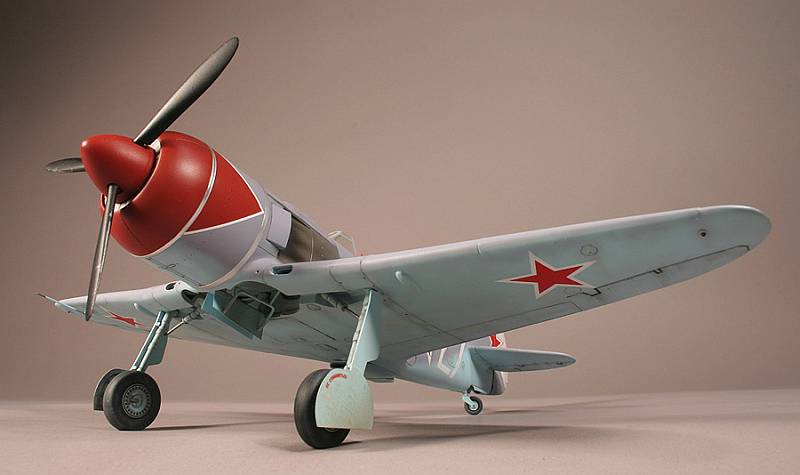
also applied "bare metal" foil on the cowling rings. They are far
too bright now, but that will be taken care of with the final flat coat. White
outline of the red triangles was achieved by cutting strips of larger white
decals pieces (this is given in the kit, but the decal is too wide). Guard panels
behind the exhaust were masked, and sprayed with Alclad II lacquers. Graduation
from lighter to darker gives a sense of slightly burnt metal. This will be emphasized
when I apply exhaust staining.
I
also applied "bare metal" foil on the cowling rings. They are far
too bright now, but that will be taken care of with the final flat coat. White
outline of the red triangles was achieved by cutting strips of larger white
decals pieces (this is given in the kit, but the decal is too wide). Guard panels
behind the exhaust were masked, and sprayed with Alclad II lacquers. Graduation
from lighter to darker gives a sense of slightly burnt metal. This will be emphasized
when I apply exhaust staining.
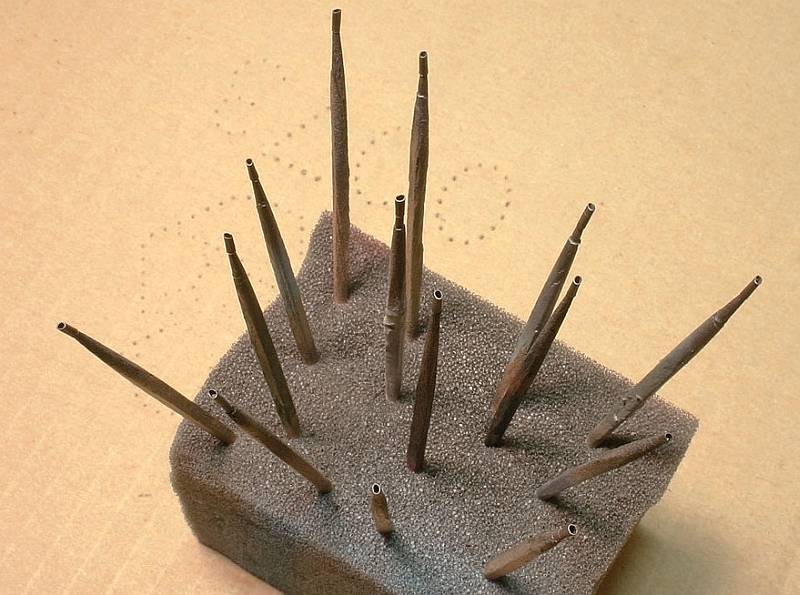
I worked on the exhaust pipes at the same time. Finding a brass pipe of the appropriate diameter, I've cut 14 short sections, and thinned the walls as much as possible. I also squeezed the ends a bit, so that they are not perfectly circular. A coat of MM "Burnt Metal" metalizer finishes the job for realistic looking exhaust pipes.
 And
now for the aforementioned problem. Kozhedub's plane wore big white 27 numbers
on the fuselage sides. Gavia offers this decal with a thin red border, and this
is wrong. I contemplated scissoring out this red trim, but this seemed as a
really daunting task. Further, these numbers are not quite of the correct shape,
judging from the available photos. So I turned to the old Hobbycraft decal sheet
that offers two alternatives of these numerals. The second alternative was of
the right shape and dimensions, and my choice was made. I applied these decals
with caution, but initially everything looked proper. And then I applied the
setting solution. Decals started curling, bubbling, and breaking up! I have
never seen something like it before. I managed to save the number on the left
side, but not without damage (see picture). This will be repaired with some
white paint.
And
now for the aforementioned problem. Kozhedub's plane wore big white 27 numbers
on the fuselage sides. Gavia offers this decal with a thin red border, and this
is wrong. I contemplated scissoring out this red trim, but this seemed as a
really daunting task. Further, these numbers are not quite of the correct shape,
judging from the available photos. So I turned to the old Hobbycraft decal sheet
that offers two alternatives of these numerals. The second alternative was of
the right shape and dimensions, and my choice was made. I applied these decals
with caution, but initially everything looked proper. And then I applied the
setting solution. Decals started curling, bubbling, and breaking up! I have
never seen something like it before. I managed to save the number on the left
side, but not without damage (see picture). This will be repaired with some
white paint.
But the one on the right side was beyond mending. It actually looked like it went through the paper shredder. I had to pull it off the surface. Unfortunately, the setting solution by now loosened the underlying gloss coat, so when the decal went, this layer was gone as well. Now I had jagged edges of surrounding gloss coat and a vacancy where the decal was. Leaving this mess to dry, I went to bed with the murder on my mind. Next day I carefully sanded the whole area with 600-grade sandpaper. You can see how this currently looks.

 I
will have to repair the paintjob with both AMT-7 and AMT-11, and then lay another
coat of clear gloss. I really hate when things like this happen, especially
this late in the project. These are the moments when all the extra patience
and determination get to be used.
I
will have to repair the paintjob with both AMT-7 and AMT-11, and then lay another
coat of clear gloss. I really hate when things like this happen, especially
this late in the project. These are the moments when all the extra patience
and determination get to be used.
The silver lining of this storm cloud is called Peter Vill. A good friend that he is, he is sending me some spare Hobbycraft decals for this number. You must think that I have lost my marbles for wanting to use same decals after such an affair, but if you tell me for another way to exactly copy the number "27" from the left side of the fuselage, I will gladly listen. In the mean time I will try again, and just be supper careful with the setting solution. After all I succeeded once, I just need another lucky strike. Right?
(...what's it called, the opposite of prelude... ah yes)
Finale
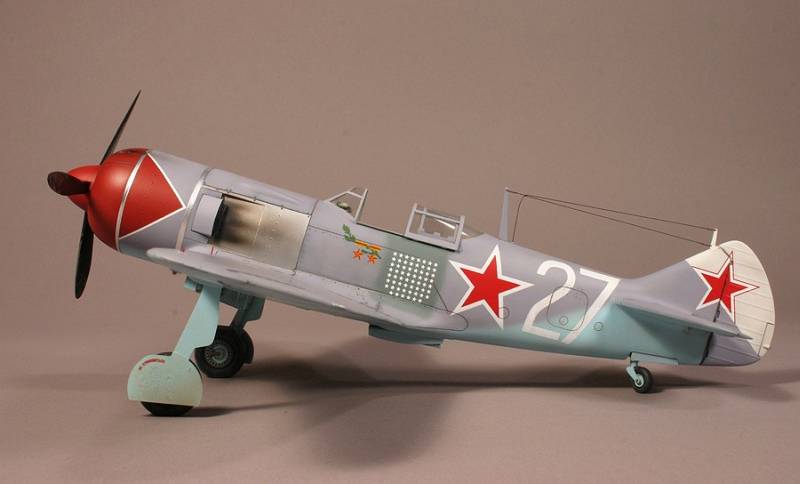
 Where's
the fire-brigade brass band? This puppy is going to be rolled into the hangar.
Well, on the shelf of my curio cabinet to be exact, but allow me some artistic
license.
Where's
the fire-brigade brass band? This puppy is going to be rolled into the hangar.
Well, on the shelf of my curio cabinet to be exact, but allow me some artistic
license.
It is finally done. I repainted the damage on starboard side of the fuselage, and followed this with another layer of gloss-coat. Peter's spare decals arrived, just in time to save the day. I needed both decals to compose one "27", since they started breaking up again. With ultimate patience, and caffeine-free hand I managed to get them in place. I waited until they were dry before applying some Solvaset.
 I
sprayed streaks of smoke behind the exhaust outlet. It is usually better to
use mixture of brown and black, instead of pure black for this purpose. I also
sprayed thin dust of Tamiya Smoke around the gun openings. Thorough layer of
clear matt followed. This was sprayed overall, sans bare-metal exhaust panels,
which were left in their natural state to create difference in reflectance.
I
sprayed streaks of smoke behind the exhaust outlet. It is usually better to
use mixture of brown and black, instead of pure black for this purpose. I also
sprayed thin dust of Tamiya Smoke around the gun openings. Thorough layer of
clear matt followed. This was sprayed overall, sans bare-metal exhaust panels,
which were left in their natural state to create difference in reflectance.
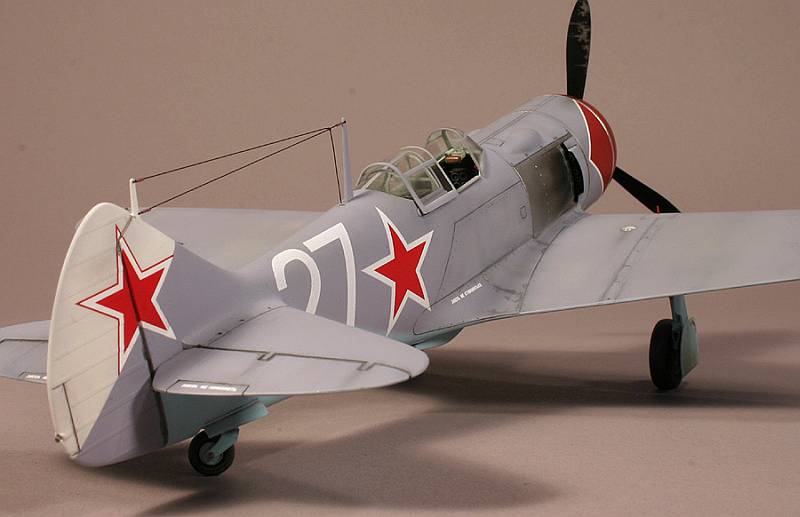
I added landing gear assemblies, propeller, sliding part of the canopy, and small details such as wingtip and tail lights (made of bits of stretched clear sprue), exhaust pipes, landing gear indicator stubs, Pitot-tube, and radio antenna.
After finishing the model I caught one more thing to rant about. Landing gear legs are little too long, which consequently makes the model sit a bit nose-proud. This can be noticed when comparing with the photos of the real thing sitting at a similar angle. In hindsight, cutting the oleos on both main legs and replacing them with shorter pieces (of syringe needle for example) can correct this. But I would be damned if I was to brake these parts now, and have more fuss with this La-7. The model is done, and fits right within authors' self-imposed tolerances... Hi, ho, let's go.
Thanks to Pete, and Erik for their help. It wouldn't have happened without you guys.
 |
 |
|
 |
 |
 |