| |
|||||
Flying Snake from BuffaloP-39 Under the Red Star
|
 |
The Airplane
This airplane is described in many known publications therefore I would not discuss it here. I would recommend "The Bells of the Kremlin".
The Model
 I
was pleasantly surprised by the Academy kit. Clean mold, crisp recessed panel
lines, excellent thin and clear canopies, and well-done wheel wells generate
an urge to build it right out of the box. Well, not bad at all. However, there
are some deficiencies. The door is opened from the port side while it was typically
unused on the ground. The reason for that was the throttle control that sticks
in the doorway and makes an entrance to the cockpit a challenge.
I
was pleasantly surprised by the Academy kit. Clean mold, crisp recessed panel
lines, excellent thin and clear canopies, and well-done wheel wells generate
an urge to build it right out of the box. Well, not bad at all. However, there
are some deficiencies. The door is opened from the port side while it was typically
unused on the ground. The reason for that was the throttle control that sticks
in the doorway and makes an entrance to the cockpit a challenge.
By some unknown reason throttle quadrant is shown right at the center of the door. The same unit is also shown on the opposite door. Other problem areas would be discussed later.
Well, it's time to start the model.
Fuselage
First of all I decided to superdetail the cockpit and to open the door from the correct side. Just at that time a wonderful resin set from Neomega became available. Prior to that I was planning to use Eduard photoetched set. When I received the Neomega masterpiece I checked for the fit of the cockpit tub and nose gear wheel well. The set was originally designed for Heller kit, consequently some adjustments are necessary due to the different plastic thickness of these kits. The plastic of Academy offering is thicker. It took me a little while to find the correct positioning of the resin details for this subassembly.
After that I opened the air intakes on the front sides of the fuselage halves.
These scoops were used to deflect gasses from the gun. Then I took care of the
doors. I removed the ridiculous throttle control from the left door using the
Dremel tool. After thorough dry fitting the door was glued to the fuselage halve.
From the starboard I cut the opening for the new door, which is supplied in
the Neomega set.
During this stage I visited the local Aviation Museum, which has a beautiful
P-39Q on display. I was kindly allowed to get inside the cockpit. This experience
greatly assisted me on the further work on the model.
 Looking
at the photos from various publications and seeing the engine in the museum,
I decided to open the engine access panel on the starboard and put an engine
there.
Looking
at the photos from various publications and seeing the engine in the museum,
I decided to open the engine access panel on the starboard and put an engine
there.
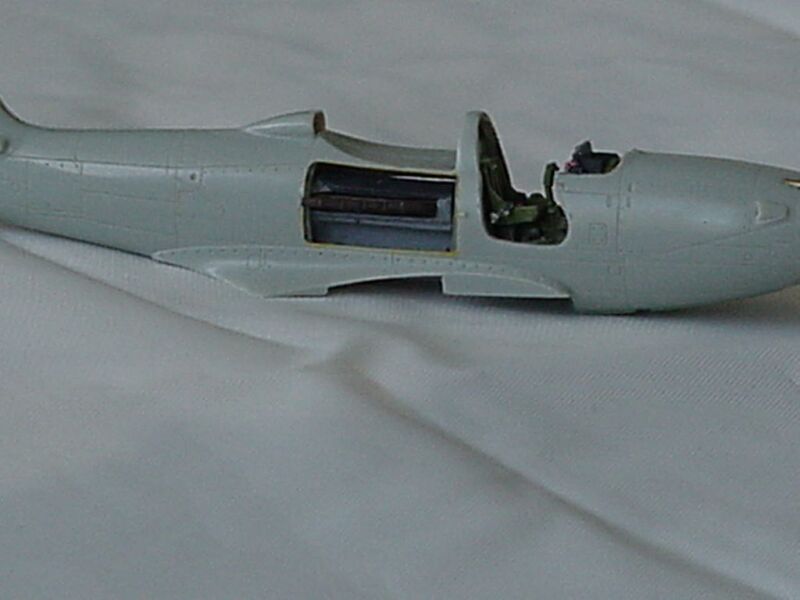
Said - done. It was not a problem to cut the access panel. I also made the
edges around the engine compartment thinner and framed them with thin stripes
of a plastic card. I made an engine from a piece of plastic and painted it appropriately.
At that time I was able to buy Moskit hollow exhaust pipes for this kit. I had
to drill and scribe pretty deep trench in the engine block to accommodate the
exhaust stack on the starboard. On the port side removing the wall on the fuselage
behind the stack opening solved the problem.
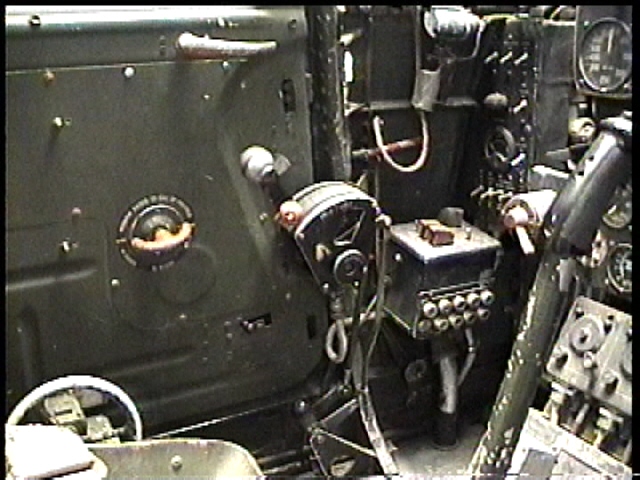
OK, the engine is installed. I placed the pilot's seat from the Neomega set
and painted the cockpit in interior green. The instrument panel and the side
panels were painted black. There are many different opinions how the 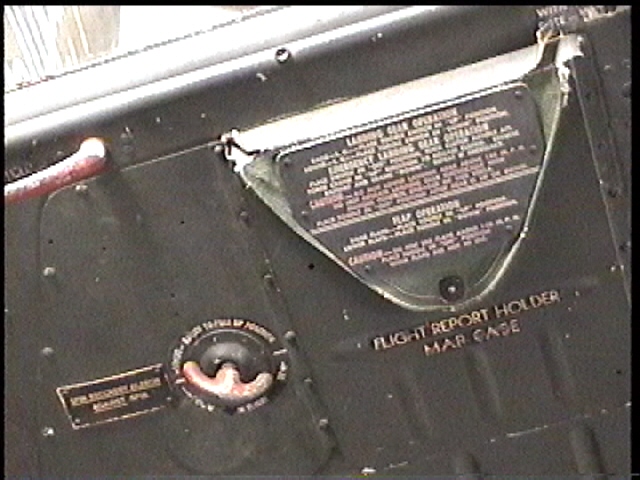 Cobra's
interior was painted. There are museum photographs showing the entire cockpit
in interior green or "Bell green", the photographs from the US Air
Force museum show the cockpit painted in black, and some photographs display
"bronze green" livery. Analyzing available photographs and the machine
in the local museum, I decided on the following scheme: the walls, the floor,
and the pilot's seat being interior green, the instrument panel and the side
panels - black, and the doors olive drab from both sides. The black and white
photographs on which one can clearly see the difference between black stencil
plates and the color of the door itself support this fact.
Cobra's
interior was painted. There are museum photographs showing the entire cockpit
in interior green or "Bell green", the photographs from the US Air
Force museum show the cockpit painted in black, and some photographs display
"bronze green" livery. Analyzing available photographs and the machine
in the local museum, I decided on the following scheme: the walls, the floor,
and the pilot's seat being interior green, the instrument panel and the side
panels - black, and the doors olive drab from both sides. The black and white
photographs on which one can clearly see the difference between black stencil
plates and the color of the door itself support this fact.
I added machine guns recharging handles from the Eduard PE set on the instrument panel. The handles were painted red. After that I put plenty of led balls into the nose part of the fuselage. Here the rule "The more - the better" should be followed.
 The
kit features early variant of the nose machine guns openings, which are typical
for P-400 and P-39-D1. Later versions were equipped with "brows".
I used thin brass tubing to cut appropriate details and superglued them to the
fuselage. Even thinner tubes were installed inside to replicate barrels.
The
kit features early variant of the nose machine guns openings, which are typical
for P-400 and P-39-D1. Later versions were equipped with "brows".
I used thin brass tubing to cut appropriate details and superglued them to the
fuselage. Even thinner tubes were installed inside to replicate barrels.
The fuselage halves were glued together. The fit here was pretty good, only few places were touched with the superglue used as putty. The air separator was installed inside the carburetor air scoop on the upper part of the fuselage behind the cockpit.
Wings and Further Assembly
 I
experienced no problems with wings. I thinned the plastic of the radiators doors
and cut the intakes in the wing roots. The N-version should feature wing machine
guns positioned so that the outward barrels are higher than inward. The kit
offering shows them on the same line.
I
experienced no problems with wings. I thinned the plastic of the radiators doors
and cut the intakes in the wing roots. The N-version should feature wing machine
guns positioned so that the outward barrels are higher than inward. The kit
offering shows them on the same line.
I glued the lower wing to the fuselage and than attached the upper wings. This
sequence assures better fit. All seams were treated with superglue. Since the
Neomega's nose wheel well resin detail was initially designed for the Heller
kit, an unavoidable gap between this part and the fuselage was treated with
putty. Then the horizontal stabilizer was attached and the seams were covered
with the superglue.
Detailing and Painting
 The
next step was to install the canopy glazing. Prior to this operation I cut the
side window from the right side of the canopy to make room for the door in the
open position (on the starboard side!). Care should be taken here since the
canopy is thin and delicate. Clear parts received a bath of Future. Despite
rather good fit of the canopy details to the fuselage, I applied a bit of Zap-a-Gap
to eliminate the seam at the windscreen. (I hate seams!)
The
next step was to install the canopy glazing. Prior to this operation I cut the
side window from the right side of the canopy to make room for the door in the
open position (on the starboard side!). Care should be taken here since the
canopy is thin and delicate. Clear parts received a bath of Future. Despite
rather good fit of the canopy details to the fuselage, I applied a bit of Zap-a-Gap
to eliminate the seam at the windscreen. (I hate seams!)
Now the model was ready for painting. Usually I clean plastic with the isopropyl
alcohol. The model was painted by Polyscale acrylics: Neutral Gray underneath
and Olive Drab elsewhere. Olive drab straight from the jar appeared to be too
dark and I added about 30% of white to achieve the satisfactory color. The wheel
wells and landing gear were painted in "Bell Green" color. The closest
match for it appears to be Green Zinc 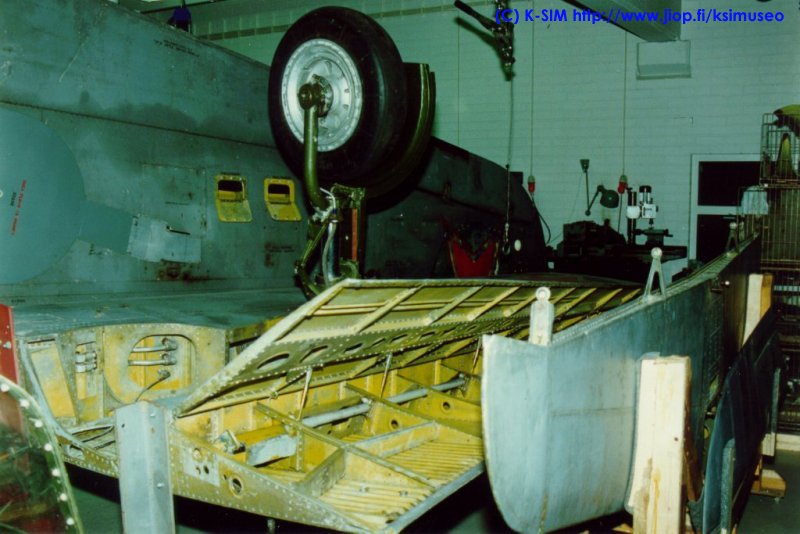 Chromate
from the Model Master acrylic line. You could check this color in the photographs
of the meticulously restored Airacobras of the Finnish
museum in Tikkakoski.
Chromate
from the Model Master acrylic line. You could check this color in the photographs
of the meticulously restored Airacobras of the Finnish
museum in Tikkakoski.
Then I installed the wheel well doors from the Eduard's PE set, as well as
the oleo scissors for the landing gear from the same set.
The model was covered by several thin layers of Future. When everything was
completely dry, I applied oil wash to all recessed lines. This operation was
repeated to insure uniform feel in the lines. After this operation the model
was sealed with additional layer of Future.
Decals, superdetailing, and final assembly
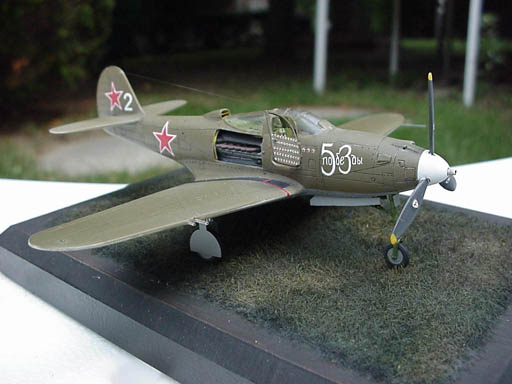
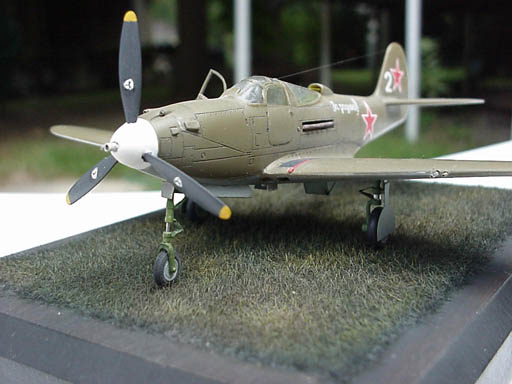
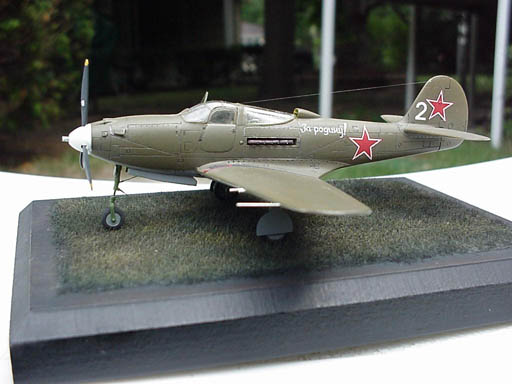
 I
decided on the Aircobra flown by the third top-ranking allied ace Nikolay Dmitrievich
Gulaev. I used Aeromaster decal set "Stalin's Cobras". Gulaev's machine
sported white numeral "2" on the fin along with red stars, three kill
marks on the nose part of the fuselage, fifty kill marks on the port side door,
and the inscription "53 Victories" on the nose from the starboard.
On the port side the slogan "Za rodinu" (For Motherland) was placed
aft the cockpit.
I
decided on the Aircobra flown by the third top-ranking allied ace Nikolay Dmitrievich
Gulaev. I used Aeromaster decal set "Stalin's Cobras". Gulaev's machine
sported white numeral "2" on the fin along with red stars, three kill
marks on the nose part of the fuselage, fifty kill marks on the port side door,
and the inscription "53 Victories" on the nose from the starboard.
On the port side the slogan "Za rodinu" (For Motherland) was placed
aft the cockpit.
The decals adhered very well. The only problem was with the stars on both sides
of the fin. The problem here is in the little bulges that replicate navigation
lights. The decals refused to conform to these elements  without
extra help. Solvaset saved the situation with flying colors! Then I placed the
rows of kill marks on the door. To avoid silvering, I cut and applied each row
separately. The inscription "Za rodinu", that has to be on the port
side of the fuselage, was not included in the decal sheet. It was custom-made
for me on the ALPS printer by Erik Pilavskii.
without
extra help. Solvaset saved the situation with flying colors! Then I placed the
rows of kill marks on the door. To avoid silvering, I cut and applied each row
separately. The inscription "Za rodinu", that has to be on the port
side of the fuselage, was not included in the decal sheet. It was custom-made
for me on the ALPS printer by Erik Pilavskii.
The model was covered by flat finish (I used Model Master acrylic). The canopy
framing was made from the stripes of decal paper painted in Olive Drab.
The landing gear was installed. I modified the nose gear by drilling and cutting
plastic right above the wheel thus making the "fork" more convincing.
Than I cut the nose gear lag at the place of an oleo strut, removed it, and
inserted a metal tube to make it look like metal (nothing substitutes metal
better than metal!).
 The
resin cockpit access door from the Neomega set was installed in the opened position
on the "correct" (starboard) side of the fuselage. The inner side
of the door with a wonderfully represented map holder was dry-brushed prior
to installation.
The
resin cockpit access door from the Neomega set was installed in the opened position
on the "correct" (starboard) side of the fuselage. The inner side
of the door with a wonderfully represented map holder was dry-brushed prior
to installation.
The spinner was assembled with the propeller. I removed plastic imitation of
the protruded cannon and substituted it with brass tubing. I used two tubes,
one representing a cover, and the second one, of smaller diameter, the barrel
itself.
 After
that I imitated chipped paint on the wing roots along the path to the cockpit.
The wire antenna was installed. And finally, the door handles from the Eduard's
PE set (really small ones!) were installed.
After
that I imitated chipped paint on the wing roots along the path to the cockpit.
The wire antenna was installed. And finally, the door handles from the Eduard's
PE set (really small ones!) were installed.