| |
|||||
Building the MPM 1/48 Pe-2FTBy Hector Mirasol |
 |
When I buy a modeler's magazine, one of the first things I do
is to have a look at the new releases section. To be honest is quite dull. It
is always the same: a new version of the Me 109 dog with a different, or a new
even better Fw 190 or even a German plane that never went of the drawing paper,
and maybe if you are lucky something that flew with the USAF or the RAF.
My heart rate always rises if a see anything with red stars so I don't need
to say I was really excited when I saw that MPM had released nothing less than
a Pe2 in 1/48 scale. I rushed to get my kit. After opening the box the sight
was promising. I could see a well engraved mold, plenty of parts bits and bobs,
the decals, the resin bits (very nice) and a set of instructions that seemed
quite clear .
Problems started when you try to put it together. In general terms
if you are experienced modeler and have a lot of patience and time and you really
want to have a Pe-2, then go for it, otherwise you may be better embarking yourself
in another project.
In my case it was clear I was going to have one on my shelves. From all the
many problems you will encounter during the building there is a solution. If
you want to build a reasonably easy out of the box kit, forget it.
Rather than describing any particular problems and to make it
short, I just will say that you will be better preparing yourself to get one
thing or another in nearly all stages of the building.
My best advice is, check everything twice and dry fit it twice at least, even
before getting the top of the glue out
.
 |
 |
 |
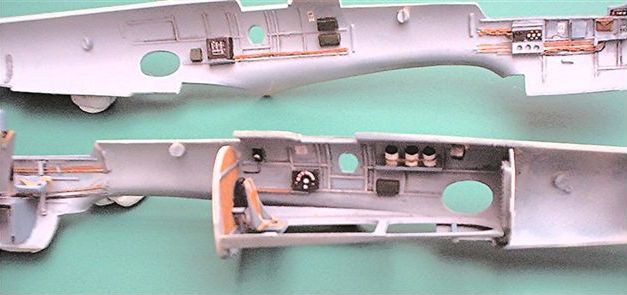
I started the construction following the manufacturer instructions which are comprehensive and clear. Each stage has been given a correlative number. The first stage was to build the cockpit interior. Stage one is easy. I just added a few details like wires coming down the control stick, belts for the seat, wires coming from the rudder pedals and going on the lower surface of the seats floor, and so on. Be careful before you glue the pilot's seat and calculate the position prior to gluing it, I did it by dry fitting it with the left half of the fuselage with the side consoles in place. I also replaced the barrels of the machine-guns by hypodermic needles.
 |
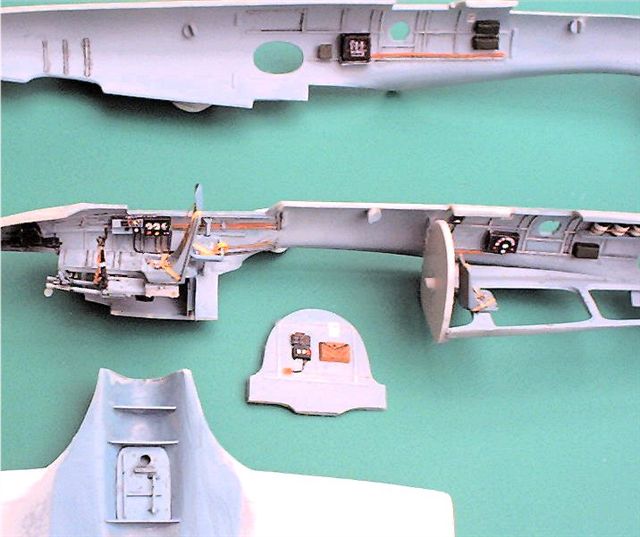 |
For stages 2 and 3 the same can be said, no major problems but need to dry fit and sand, particularly the floor. The way I normally work is to make sub assemblies. I paint first and glue it to the main part. If painting before gluing be sure you remove the paint of the surface that is going to get the glue. I had quite a lot of trouble to glue properly the floor and the two bulkheads of the rear section but that could be me being silly.
Stages 4 and 5 (or side work). First I have to say that I really
enjoy doing the interiors and I try to get them as good as I can, even if they
are going to be hardly visible.
Most of the time to do a nice a nice interior depends on having a good view
of the side panels and consoles. In this case it was rather difficult because
the information I had about the Pe-2 was quite good on exterior views but rather
scarce on the inside. I had to use my imagination a little (but you are not
going to tell it to anybody, are you?).
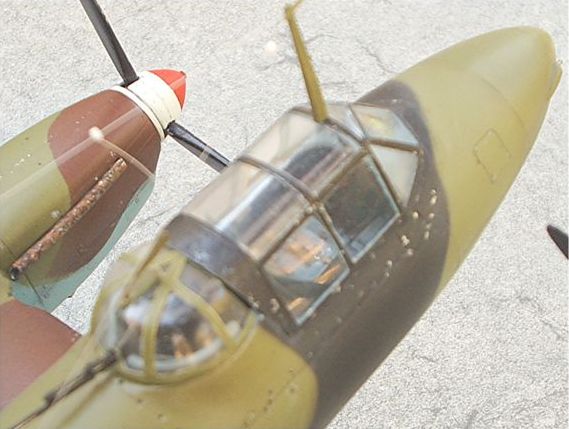
 The
first disappointment was to look at the instrument panel. In the real aircraft
it is in two halves, one in each side of the fuselage. The kit gives you two
parts with the shape of the panel but they are flat as a pancake. So I had to
drill the holes for the dials, put on top of them some etched brass that I had,
and paint something black with white lines on a piece of transparent acetate
(on reverse) and glue it to the back of the panel. It is much easier to say
it than to do it. I couldn't help to ask myself why if you're providing such
nice resin details you can not provide a blooming instrument panel.
The
first disappointment was to look at the instrument panel. In the real aircraft
it is in two halves, one in each side of the fuselage. The kit gives you two
parts with the shape of the panel but they are flat as a pancake. So I had to
drill the holes for the dials, put on top of them some etched brass that I had,
and paint something black with white lines on a piece of transparent acetate
(on reverse) and glue it to the back of the panel. It is much easier to say
it than to do it. I couldn't help to ask myself why if you're providing such
nice resin details you can not provide a blooming instrument panel.
On the rear compartment I also did some side detailing, something like a shelve
for O2 bottles (I saw it in some drawings from a French magazine), a few "general
purpose boxes", ammo containers, wires, etc. I scratched the access hatch
that goes in the floor of part 3 and drilled the holes for the nose gun barrels.
The one on the left side goes a bit higher than the right (not symmetrical as
in the instructions).
Also consider if you want to put in place the side windows before
or after you close the fuselage. I think is much easier and safer to do it before
you close it and then mask the outer surface. I left the upper access hatch
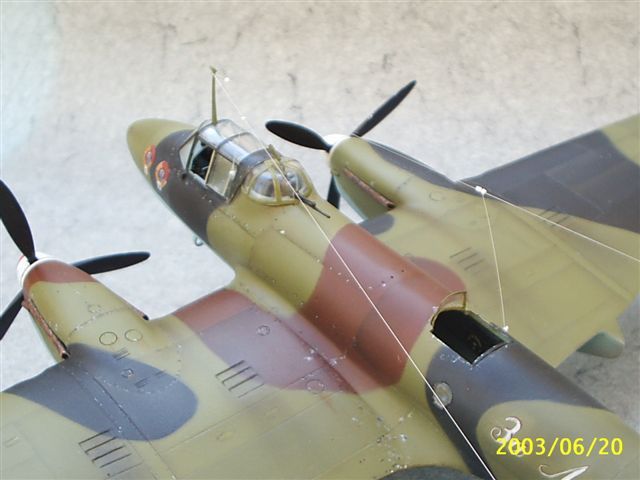
opened to make the inside a bit more visible.
Prepare yourself for quite a bit of careful sanding before you can put the fuselage
halves together .
 Stages
7 to 9 and 11. Big problem there. The wings are too thick and they have the
wrong dihedral. Part C53 is far too high and will prevent the half wings to
come together. Is easier to scratch build one (actually, two).
Stages
7 to 9 and 11. Big problem there. The wings are too thick and they have the
wrong dihedral. Part C53 is far too high and will prevent the half wings to
come together. Is easier to scratch build one (actually, two).
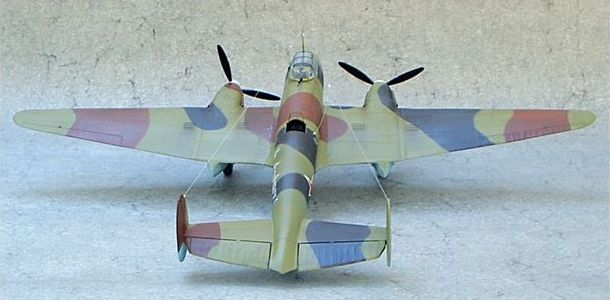
The main problem is indeed the wings angle. You can approach it in two different
ways. Either to cut the upper half (B4 and B6) at the level of the structural
reinforcement, out of the engine nacelles, glue the inner parts to the lower
part C3 and then glue the outer wings using a spanner or go the lazy way .
Needless to say that I went for the second option. I took the upper half wings
and instead of cutting them down I inscribed a line in the inside exactly in
the same place you would cut the wing. To locate the exact spot I put the wing
against a strong light and draw the line by transparency. Once the line is deeply
inscribed, you heat the wing (hot water or a hair dryer) and bend it to position.
Then, glue it first to the lower half wing and then to the central lower part.
Dry fit until you are sure you have got it .It will take several goes. Once
you have the wings, again you have to sand them down to fit them to the fuselage.
Again dry fit and ENSURE that all panel lines are correctly aligned before gluing
(otherwise you will get a few surprises). Clear as mud isn't it? May be there
is a much simple and sensible way of approaching the problem, I am just telling
how did I resolved it.
 Stages
10 and 12.If you want to have a nice radiator outlet, build it yourself, it
is easy and it will look much better. Part C 58 (the forward looking air intake)
is too big.
Stages
10 and 12.If you want to have a nice radiator outlet, build it yourself, it
is easy and it will look much better. Part C 58 (the forward looking air intake)
is too big.
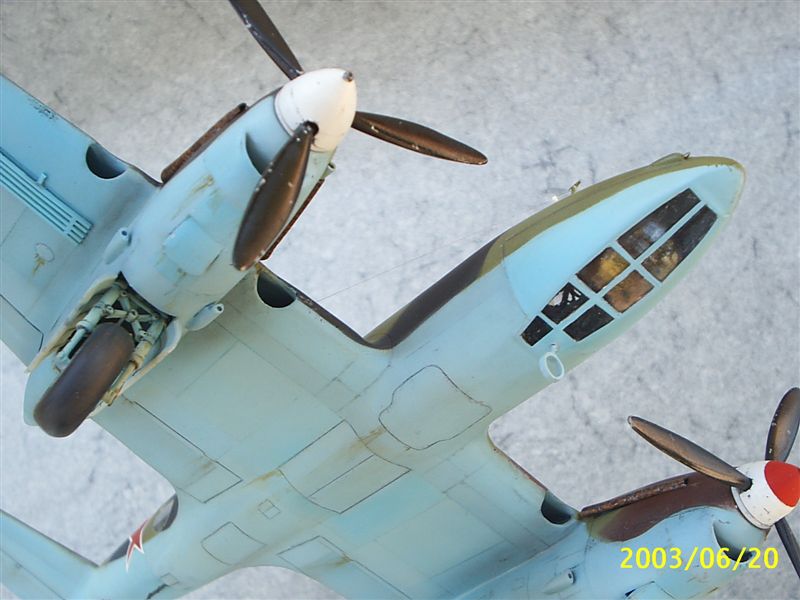
When finished, the wheel bay is rather roomy. If you do not want to see an empty
engine compartment through it, build a bulkhead with a bit of plastic card at
the back of C 55.
To glue the engine nacelles to the wing took me ages, first you have to sand
quite a bit. Once the engine can fit in place glue it and then use generous
amounts of filler for the resulting gap. The most important thing is to be absolutely
sure you align them properly with the longitudinal axis of the plane and the
panel lines.
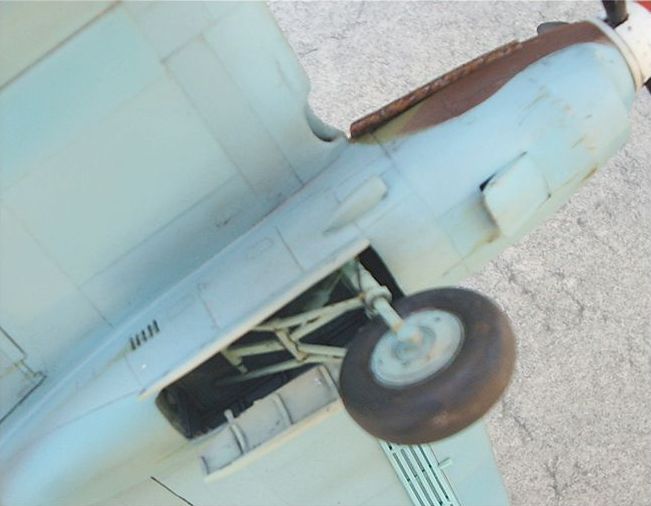
The construction of the landing gear itself does not pose major problems. I
detailed it with the break wires and little else. The tail wheel needs to be
reinforced.
I also reinforced the joint of the stabilizers with the fuselage using brass
spars. Again be careful with the dihedral angle and ensure than the fins are
completely vertical.
The dive brakes are extremely delicate. Gluing the lower glazed nose needs again
dry fitting, careful sanding and finally some filler .
The transparent part for the turret is too thick and when trying to drill a hole though it broke in half. (I repeatedly banged my head against the wall) The antennae mast is again too weak to be used and I scratched it with a bit of plastic, using a thin needle as a spar to fix it to the canopy top.
 The
surface detail is rather good and only a few access hatches have to be engraved.
The
surface detail is rather good and only a few access hatches have to be engraved.
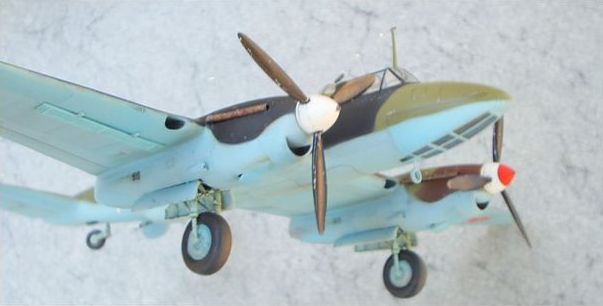
At this stage I was really fed up with the bloody beast but by now at last it was looking like a plane, ready to be painted. It seemed that finally I was going to have some fun. Ha.
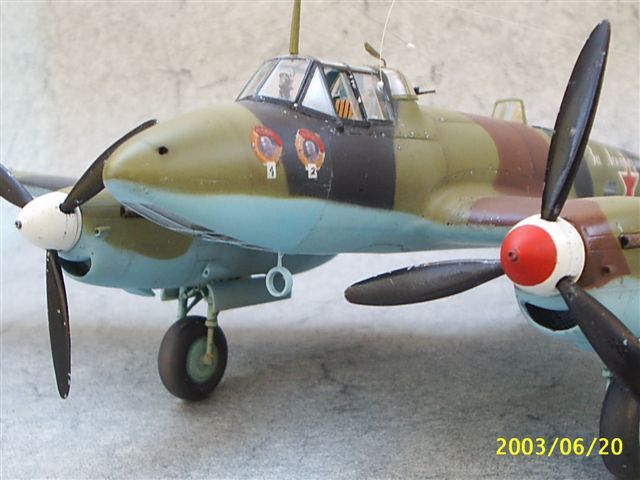
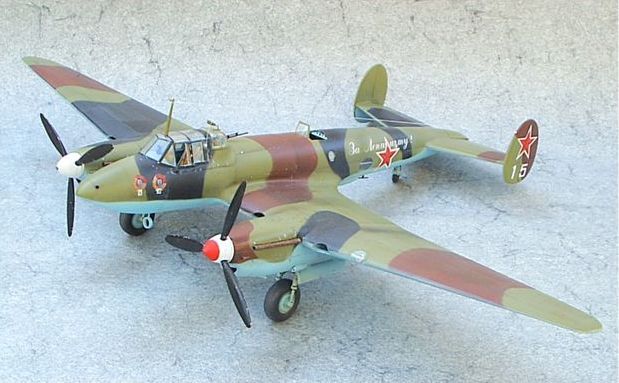
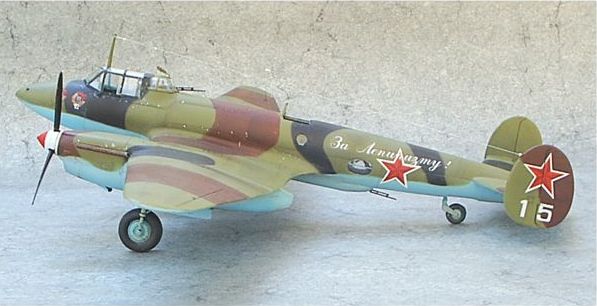
Erick came up with a very nice camo scheme (as usual). A nice three color scheme (black-green-brown) with a inscription on the side and Kremlin stars.
 I
first sprayed the underside blue and then the green on the top surfaces. Using
blue tack to get soft edges I masked the green base and sprayed brown and black.
Now is weathering time. Having so many panel lines I wanted to give each panel
a very subtle difference with the next one. I masked the adjacent areas using
masking tape and sprayed it with very thinned paint (80% of solvent) using the
same base shade but either subtly darker or lighter. The coat has to be very
thin and to blend it better; you can even spray on top another thin layer of
the base color. Finally I did the panel lines in the usual way.
I
first sprayed the underside blue and then the green on the top surfaces. Using
blue tack to get soft edges I masked the green base and sprayed brown and black.
Now is weathering time. Having so many panel lines I wanted to give each panel
a very subtle difference with the next one. I masked the adjacent areas using
masking tape and sprayed it with very thinned paint (80% of solvent) using the
same base shade but either subtly darker or lighter. The coat has to be very
thin and to blend it better; you can even spray on top another thin layer of
the base color. Finally I did the panel lines in the usual way.
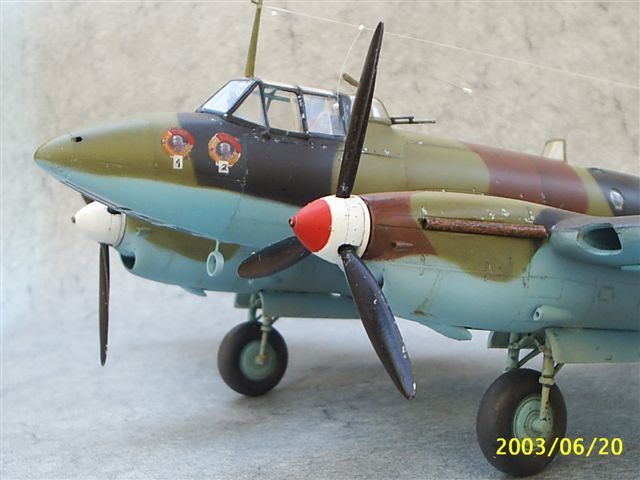
After that the plane was looking really nice, full of subtle shades and chromatic depth (as they call it). It was time for varnishing prior to decals. And I hate varnishing.
 I
used Halford's gloss varnish which managed to turn the black to gray all over
the place, changed the green shade and just made a mess of it.
I
used Halford's gloss varnish which managed to turn the black to gray all over
the place, changed the green shade and just made a mess of it.
While I was swearing very badly in at least 3 different languages and having
fits of anger, I dropped the bloody plane while the varnish was still
fresh. All the dust that was nicely hanging around since the 17th Century got
stuck to it.
Persevere, my son, if you want to reach perfection. That is what Confucius used
to say to his beloved son before he joined a Punk band.
I had to clean, sand and paint again. Again I varnished and again it turned
the black to gray. Theoretically it will go back to the original black shade
once you spray the mat coat. It didn't .
At least the decals went nicely (they were supplied by Master Pilawskii himself). I had to hand paint some details in the orders of Lenin and part of the stencil because the grain of the print was too obvious.
 As
I said, after spraying it with mat varnish, the black was still gray, so I had
to re-spray all the black bits, the panels and some of the green too!
As
I said, after spraying it with mat varnish, the black was still gray, so I had
to re-spray all the black bits, the panels and some of the green too!
Finally I spent about three miles of stretched sprue trying to put the antennae
which I finally did.
The thing was finished. My friends and fellow modelers said that all my pain
was worth suffering in a vane attempt to comfort me .
I left the finished product of my endeavor on the table and smoked
a cigarette asking my self what is the meaning of life, and what should a man
response to fatality be.
A phrase came to my mind: We are de Borg, all resistance is futile .
Enjoy.