| |
|||||
NeOmega 1/48th I-16 Type 24By Hector Mirasol |
 |
About two years ago I did see for the first time a NeOmega Kit. It was in the English Nationals and I remember perfectly how impressed I was by finding somebody mostly interested in VVS subjects and producing high quality resin casts.
On that occasion they had in display a resin kit of the Yak-1 UT and I immediately fell in love with it. But is well known that love can be a very expensive business. The kit was a little gem, the price wasn't. Flesh is weak.
At the time NeOmega was already making upgrade kits for the I-16
and being an absolute adorer of this plane I thought nothing better could happen
to me than having a complete NeOmega I-16 in my hands. The main problem of platonic
love is that the lover tends to have unrealistic high expectations in the love's
subject.
The NeOmega´s I-16 is based on the old Hobbycraft´s Ishack. They
have used the fuselage and have redone the wings and ailerons, the nose, the
interior, the lower part of the fuselage with the bays of the landing gear and
the landing gear itself. The kit also gives you a very nicely detailed engine,
the exhaust pipes, the propeller and spinner, a piece of adhesive foil to represent
the cowling bands, side doors and flaps and a very nice set of decals to represent
two different machines and finally an instruction sheet.
 |
 |
 |
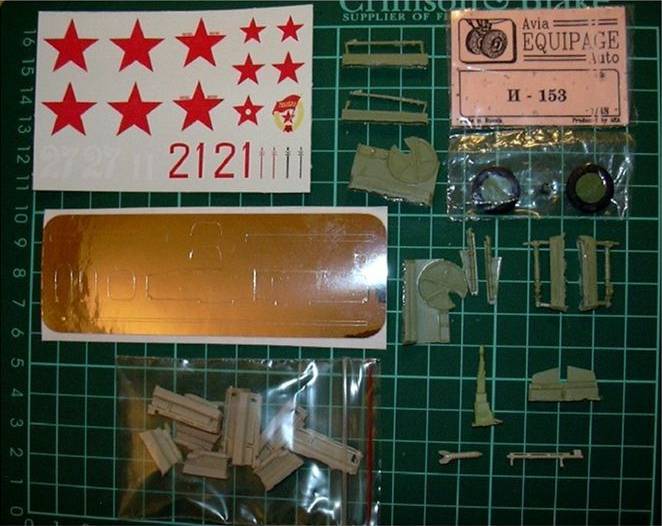 |
The resin can be either green or dark grey, the casting is reasonably good but it is necessary to look carefully at the parts because there is some very fine "bubbling" is some areas, mostly the wing's edges, and to check that the parts are not bent. As it happens in most of the resin kits to separate parts from the resin frames can be tricky, but such is life.
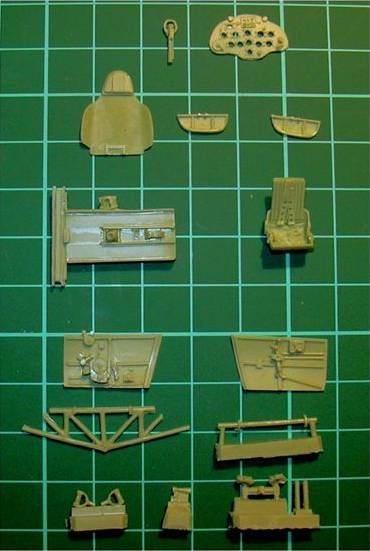
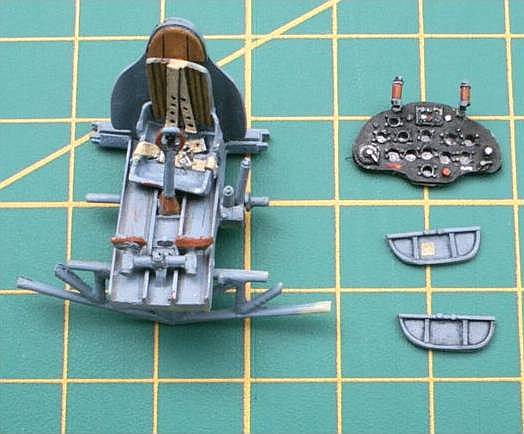
The interior set includes the side walls, the cockpit floor, the instrument panel, the machine gun handles (if you can use this term), the seat's bulkhead, the control stick, the side doors, the rudder pedal bar and an intriguing part of the airframe. The detail is good and the engraving fine.
 |
 |
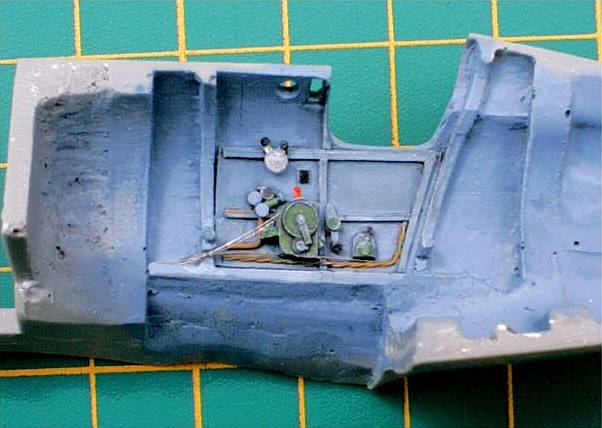 |
The fitting does not cause any major problem in the main structure. The instrument panel needs to be drilled but the kit has no detail to represent the dials or does not give you acetate with them printed (which would be an excellent idea). The first real problem comes when trying to figure out how to attach the cockpit floor to the airframe. The instructions are quite small and unclear. When checking the parts against the drawings in Maslov´s book on the I-16 (Armada) I could not find a part of the airframe that has that triangular shape. Then even if you decide to go ahead and do it, there is no space inside the fuselage to fit it. What I did was to ignore that part and dry fit the whole of the floor and seat mount and scratch build the two transversal beams where the floor sits. At this stage I think it will be fair to say that my best advice on making this kit is that before you do anything, dry fit and think about it. You can always say that modelling is an intellectual exercise, unlike this day politics. I painted the walls and frame in Wood universal primer (following Erik's comments on the subject). Instrument panel is black and some colour detail was given to the landing gear mechanism, the leather covering back and head rest and the seat belts (yes in the picture the seat is displaced sidewise, but that was not glued yet). The cables were painted in black or that distinctive orangy colour that you can see in some interior pictures of VVS aircrafts. At this stage you also have to cut out the side doors if you are going to leave them open. When all the different bits are finally in place it is time to close the fuselage and get ready for the next step.
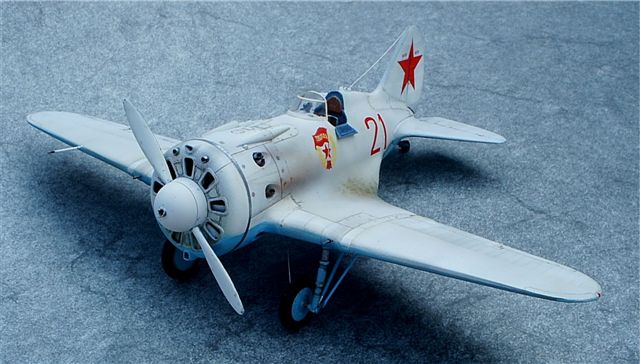
Putting together the fuselage offers no problems but the next stage (attaching the wings) is a bit more intellectual. As my friend Pete would say I am not sure that NeOmega has engineered the kit in the most convenient way. The operation requires joining the wings to the lower central part of the fuselage. Once this sub-assembly is done, you have to glue it to the fuselage halves. Not so easy. First you have to adjust the dihedral of the wings to the fuselage and then you will realize there is no way. The central section is too thick and much sanding, dry fitting and swearing is involved in this process. I am sure that a more sensible approach can be found and I shall be most grateful if any of you can enlighten me. Once the wings were finally attached to the fuselage and the stabilizers were in place, the plane revealed its final aspect. There is a very distinct characteristic which "stroked" me immediately and that is the way the wing joins the fuselage in its posterior insertion. That is one of the most typical features of the I-16 in comparison with other designs. It is quite evident in the drawings and it is also patent in the Hobycraft´s kit, but here is rather conspicuous. My first impression was of disbelief but when I compared it with the drawings of Maslov´s book I couldn't decide if that wing root was or not exaggerated.
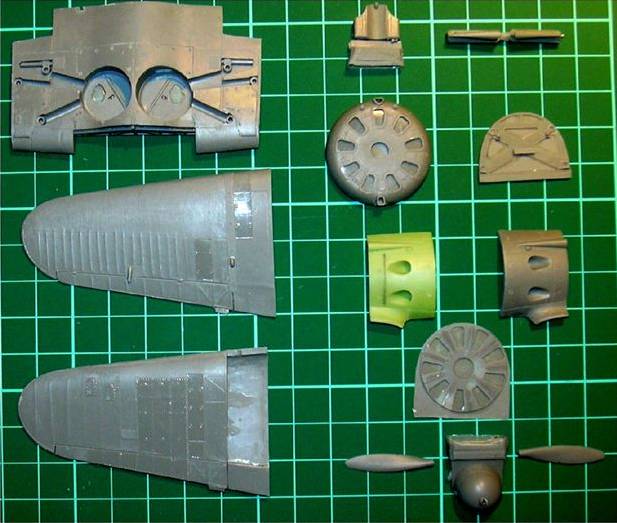
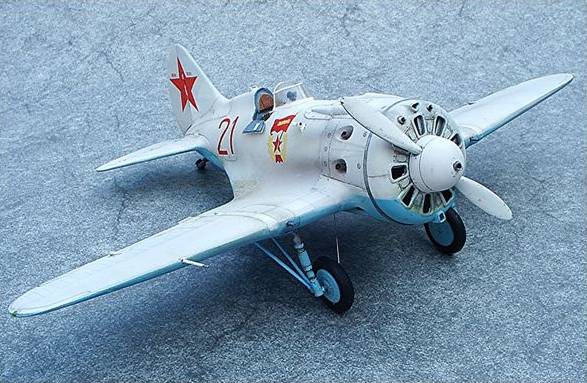
My intention after opening the box was to make the model with the side panels removed to show that beautiful engine. To my immense disappointment, one of the side panels in my kit was missing. I immediately wrote to NeOmega and increadibly a few weeks later they sent me a replacement. I am really grateful to them because in my experience, kit builders tend to ignore this kind of request if not try to extortionate you. But not joy is complete and they send me a type 5 cowling instead (I am equally grateful).
 If
you look at the thickness of the parts, you will see that to fit the engine
inside of the nose is not going to be easy. On the other hand, to cut down the
side panel is again going to be rather difficult and probably it will be simpler
to scratch build it.
If
you look at the thickness of the parts, you will see that to fit the engine
inside of the nose is not going to be easy. On the other hand, to cut down the
side panel is again going to be rather difficult and probably it will be simpler
to scratch build it.
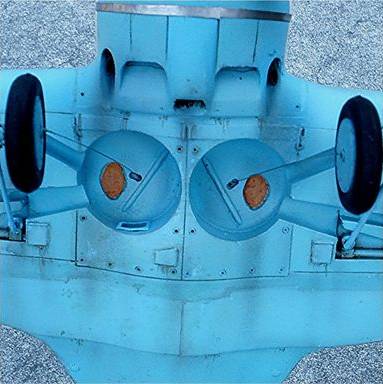
Much controversy is going on around the shape of the air outlet in the lower part of the cowling. Again I am not in a position to ascertain it. My visual impression if you are looking at the aircraft from the side is that NeOmega has done it too high, so I did sand it down. I insist that this is just my impression and nothing I could ascertain after examining drawings or pictures .
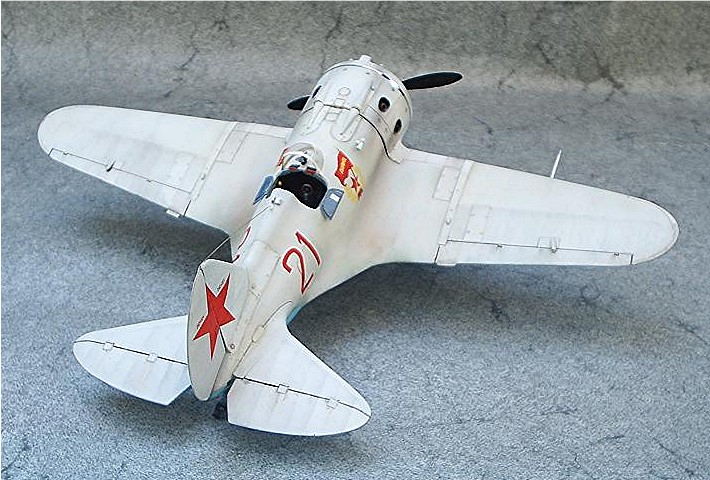
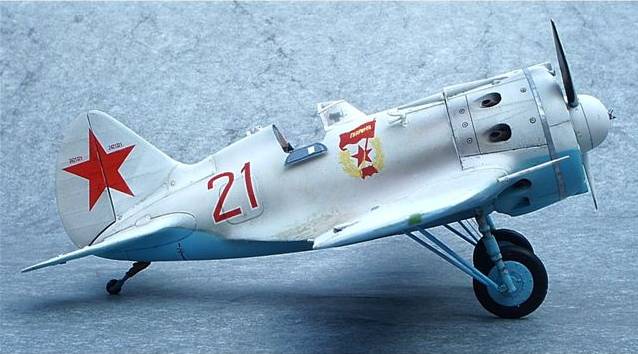
When looking at pictures of the I-16 it is also quite obvious that there is a gap between the cowling panels and the fuselage, this looks more so if looking at the aircraft from the rear as it happens in the famous picture of Gennady Tsokolayev in his red 21 ( Black Cross, Red Star , volume 2 page 58). To achieve this effect I did sand down the edge of the cowling from the inside.
The landing gear is reproduced very finely but completely in resin. That means it looks well but it is very weak and sooner or later it will succumb to the weight of the aircraft. I was determined to use it so I did reinforce it drilling holes in both ends of the leg and inserting inside a very thin needle (a taxonomist needle to be exact) which gave the leg the desired strength. The needle was left to protrude from the end that joined the wing where I drilled also a little hole to produce a stronger union. The wheels have fine detail and come with rubber tyres.
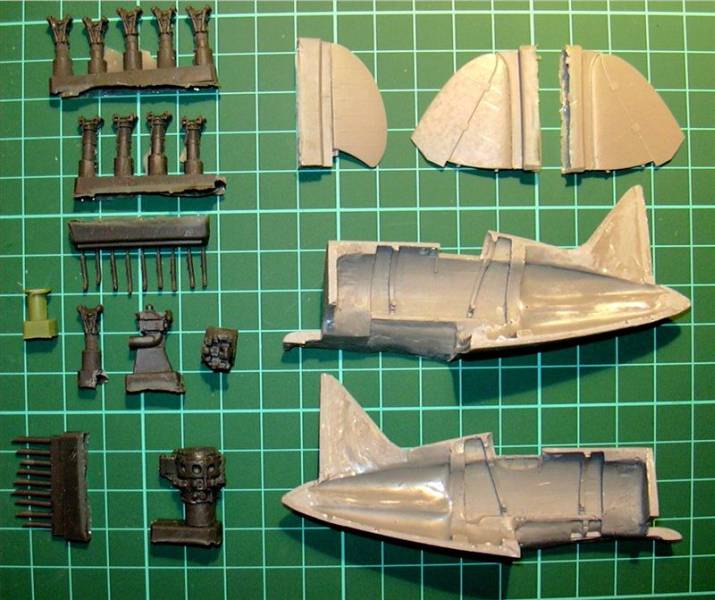
The kit also gives you the covering of the landing gear which is very nicely done. I did not use them because all pictures of red 21 show it without the covers to avoid mud accumulation. If you wish, you can also add a set of underwing rockets very nicely moulded.

 As
you were probably guessing I did choose to represent Tovarich H.S.U. LeytenantG.
Tsokolayev red 21. He was a soviet ace, credited with 20 victories flying with
the 4 Guards regiment (4 GIAP /VVS -KBF) in early 1942 in the Leningrad area.
There are several pictures both of pilot and machine (I really would like Mr
Petrov to authorise me to use one of them).
As
you were probably guessing I did choose to represent Tovarich H.S.U. LeytenantG.
Tsokolayev red 21. He was a soviet ace, credited with 20 victories flying with
the 4 Guards regiment (4 GIAP /VVS -KBF) in early 1942 in the Leningrad area.
There are several pictures both of pilot and machine (I really would like Mr
Petrov to authorise me to use one of them).
The plane is painted in a weathered winter white scheme that allows you to see in some parts the green camouflage underneath. The lower surfaces are painted Blue.

 After
spraying a coat of grey primer (Halford's car paint) I gave a base coat of green
and then went for the underside blue. The mixture was self made (is anybody
out there thinking on issuing a nice set of VVS acrylic colours?) and the shade
was approved by the man himself (Tovarich Pilawskii). Once the base blue coat
is given I did change the shade a bit (with a bit of white or light grey) and
painted some panels. Then tone it down with a bit of dark grey or black and
do the same in other areas. I do not follow a pattern; just do what it looks
well and logic. This way of painting gives you a depth an colour richness that
improves drastically in comparison wit a uniform coat of colour. It is easily
done, you only need a bit of patience and a masking tape (Tamiya is really good
but expensive). Once the job is done it is time for panelling. That means that
using very thin dark paint (brown, grey or even black) you spray it at a very
low pressure over the panel lines.
After
spraying a coat of grey primer (Halford's car paint) I gave a base coat of green
and then went for the underside blue. The mixture was self made (is anybody
out there thinking on issuing a nice set of VVS acrylic colours?) and the shade
was approved by the man himself (Tovarich Pilawskii). Once the base blue coat
is given I did change the shade a bit (with a bit of white or light grey) and
painted some panels. Then tone it down with a bit of dark grey or black and
do the same in other areas. I do not follow a pattern; just do what it looks
well and logic. This way of painting gives you a depth an colour richness that
improves drastically in comparison wit a uniform coat of colour. It is easily
done, you only need a bit of patience and a masking tape (Tamiya is really good
but expensive). Once the job is done it is time for panelling. That means that
using very thin dark paint (brown, grey or even black) you spray it at a very
low pressure over the panel lines.
 Same
thing is done over the fabric covered areas to stress the structural ribs and
other details. Then I did the same with a more brownish shade were dust and
smoke may stain the plane.
Same
thing is done over the fabric covered areas to stress the structural ribs and
other details. Then I did the same with a more brownish shade were dust and
smoke may stain the plane.
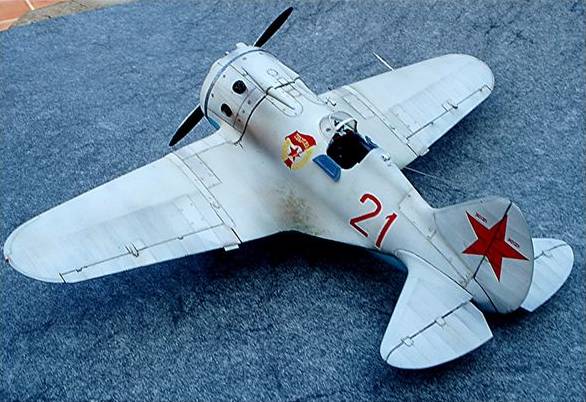
The upper surface was treated in the same fashion, but using white, not covering completely the green base. Panelling was done in the same way and then with brown and green I did accentuate the weathering effect in some parts particularly the wing roots cowling and were the upper camouflage joins the underside.
 To
represent the exhaust smoke I did use again very thinned paint, first grey,
then redish brown and finally black (in that order).
To
represent the exhaust smoke I did use again very thinned paint, first grey,
then redish brown and finally black (in that order).
To reinforce a bit more the effect of the panelling I used very thinned down oil paint and wiped out the excess using a clean brush or a piece of cloth (cowling rivet lines, fuel and oil registers and tail and wings reinforcement panels). I forgot to mention than the camera mount and the aerial are my own production.
The decals are really good but unfortunately they only give you one Guard badge. I have seen Soviet plane having badges or emblems in the port side only but never having it only in the starboard side. So I decided to hand paint it around a small red star coming from a tank kit. Not too bad.
The rest you can see by yourself. Carpe diem.
NeOmega I-16 kit is expensive, as resin kits are. It is very nicely moulded but has some engineering problems being the principal one the relation of wings and fuselage. I am not knowledgeable enough to judge on accuracy but I am not happy with the lower cowling which in the real thing looks much more shallow. The posterior wing root will need analysis too. It is demanding and is not for the novice but when finish it looks well. Since I did the Yak-1 UT I am a NeOmega fan but the I-16 has not been resolved to the same high standard .
The original Hobbycraft´s kit is the mother of all I-16 but is grossly inaccurate. It is still a perfect working material for the new "amendment" kits coming to the market. Using the old plastic kit and all the available resin accessories you can build very nice models of nearly any variant of I-16, accurate and with a high quality of detail. I am afraid that if NeOmega wants to be the best choice for making an I-16 (24) has to work on both engineering and price.