| |
|||||
Special Hobby 1/48th Polikarpov I-15By Hector Mirasol |
 |
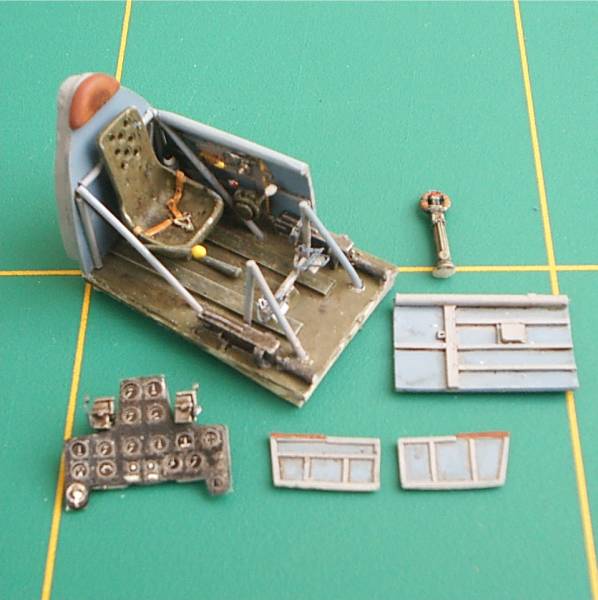
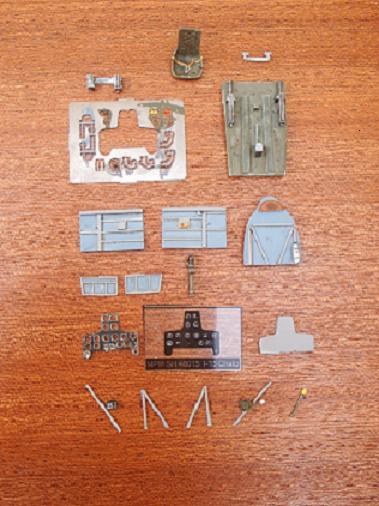
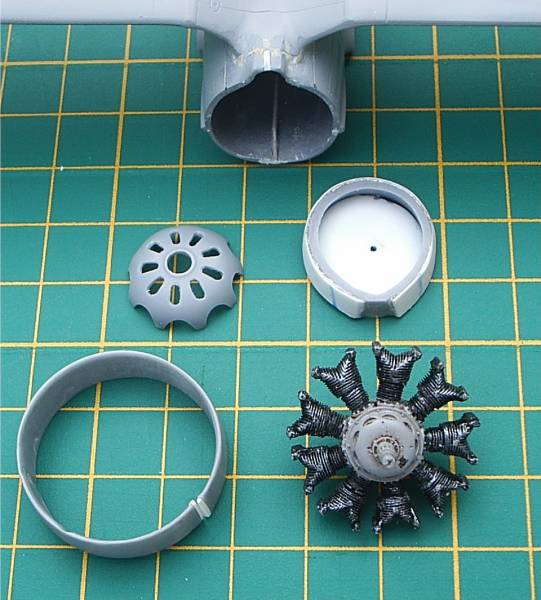
The kit includes two frames of 25 injected plastic parts including the fuselage, wings, undercarriage and cowling. There is also a set of resin parts representing the engine block and cylinders, collimator, seat and cockpit side walls and floor and some small interior details. The set of etched parts includes the instrument panel, and some other small detail parts (the aiming ring and some levers) and finally four sets of clear canopies and cockpit side windows.
The plastic is of good quality with fine recessed engraved details (a bit too subtle in some parts, mostly in the fuselage panels). The injection is good with little flares and no significant unwanted marks.
The kit also includes a nice decal sheet with 3 different Spanish planes; two Republican and one nationalist plane. The instructions come in a small booklet with 3d drawings and a clear building sequence.
To build the model I have followed the instructions suggested order with no major problems.
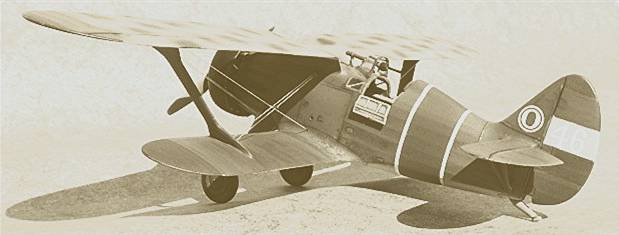
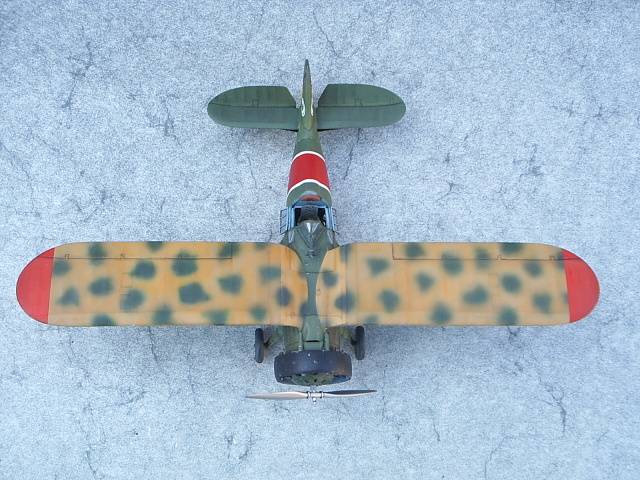
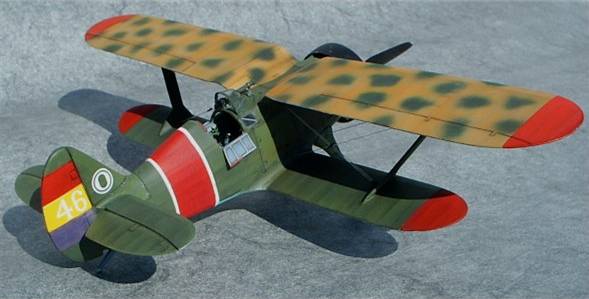
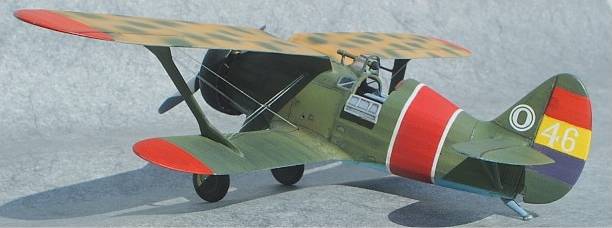
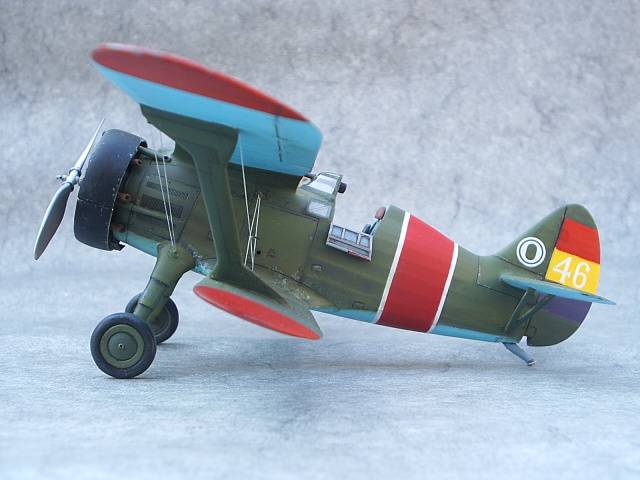
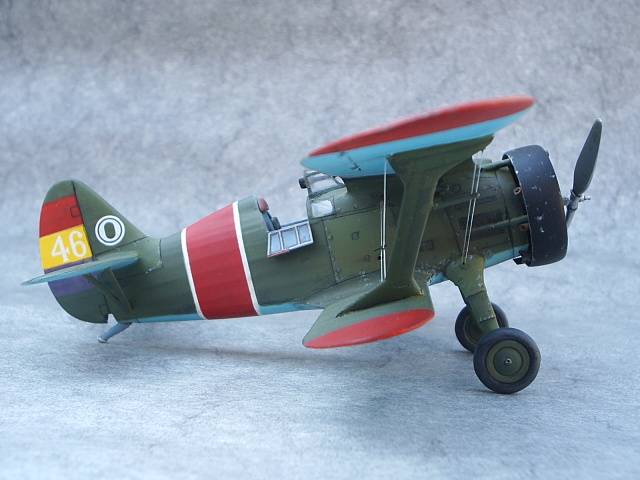
Before I start any model I try to have a clear idea of which plane I am going to represent. In this case I wanted to replicate a Spanish Chato (Snub nose), that was the nickname that the Spanish pilots gave to this plane, earning an undisputed reputation in the Spanish skies. If possible I always choose a colourful subject, may be a bit unusual. As a rule it has to be based on a well known machine and preferably on a picture of it. The vast majority of Spanish Chatos were green with blue undersides. There is a large number of squadron marks to use and numerals of different t shapes and locations. The kit includes a mottled wing Chato which immediately cached my eye. I was not sure of anything looking like it in the Republican side so I browsed few books till I found a not very good picture of it. It can be found on Patrick Lareau´s book LÁviation Republicaine Espagnole (Docavia 8, Editions Lariviere) page 76 and belongs to the 26th group leader during the Jarama battle. (Most probably Ivan Kopets, alias José). As far as I am aware this is the only Chato in Spain that wore a mottled camouflage ever.
 As
I said I always try to follow the manufacturer's instructions.
As
I said I always try to follow the manufacturer's instructions.
Initial steps one to 10 are to build the interior and you can follow them without
any trouble. Arriving to step 10 I thought to leave the side doors for later.
Step 11 is to put the cockpit side windows which gave additional light to the
inside of the cockpit. There are several clear windows given by the manufacturer
but they do not fit in the gap .I did enlarge with as flat rigid sanding file
but still I did not liked the effect so finally I decided to do it myself with
two squares of very thin clear acetate. Through the window you can see a part
of the fuselage frame (as it can be seen in the profiles). I painted all the
interior parts during the building process. Choosing the colour is always tricky,
in this case I asked Eric who told me that the VVS colours before the war period
are still under investigation. He suggested a bluish grey (as the PO2 interior)
for the side wall and frame (which I normally paint in a bit lighter shade to
reinforce the visual effect). The floor is painted dark green and the seat probably
too, as I could see in some pictures). The instrument panel was black, highlighting
all the instruments and using the dials film (nice touch).
After painting all the interior I weathered it and gave to the whole thing a
wash with dark umber oil paint ( is just a wash, and thereof is mostly stained
turpentine).
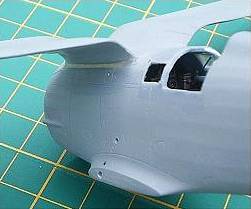
 Closing
the fuselage does not pose major problems (step 12), I had to do adjust the
nose end using some plastic card and sanding. Parts A6 and A7 do not fit properly
and again I had to adjust them gluing thin plastic card and sanding till the
fit was acceptable.
Closing
the fuselage does not pose major problems (step 12), I had to do adjust the
nose end using some plastic card and sanding. Parts A6 and A7 do not fit properly
and again I had to adjust them gluing thin plastic card and sanding till the
fit was acceptable.
Now was time to approach the most troublesome bit when building
a biplane. That could be hard enough but then I wanted to work on my painting
techniques to reinforce the effect of the weathered fabric in lower wing (the
upper one was going to be less noticeable because the mottled camo). There is
not enough space to use the air brush along the wing.
I decided to glue the upper wing to the fuselage now and the paint with the
lower wings and stabilizers apart to assemble it later. As you can see I just
need to look for trouble.
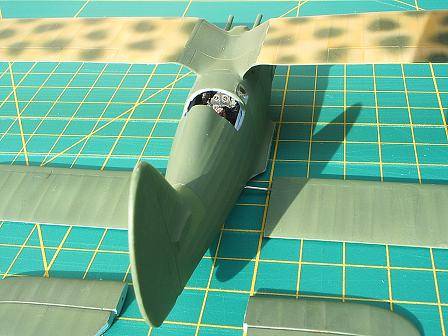
The fit of the upper wing, with its characteristic gull shape,
was quite poor and needed sanding and filing as could be seen in the picture.
 I
prepared a couple of holes to improve the attachment of the lower wing and stabilizers
to the fuselage using metal spars. That means that you have to be extremely
cautious aligning the wings and keeping the right dihedral and also considering
that you have to attach it to the upper wing. That was the most significant
problem I found building the kit. Parts B10 and 11 are too short. I drilled
two holes in the both upper and lower wing exactly in the place were the attachment
goes (Sorry I do not know how to name this part in English) and then used a
thin entomologist needle to fix it there was nearly a mm of gap and blue so
I used plastic card to fill it dry fitting it many times till I had it right.
This is a complex process and the only major inconvenient for using the Special
Hobby kit. Only for this reason I would only recommend it for experienced modellers.
Indeed it could be just me and there is an easier approach I could not found.
I
prepared a couple of holes to improve the attachment of the lower wing and stabilizers
to the fuselage using metal spars. That means that you have to be extremely
cautious aligning the wings and keeping the right dihedral and also considering
that you have to attach it to the upper wing. That was the most significant
problem I found building the kit. Parts B10 and 11 are too short. I drilled
two holes in the both upper and lower wing exactly in the place were the attachment
goes (Sorry I do not know how to name this part in English) and then used a
thin entomologist needle to fix it there was nearly a mm of gap and blue so
I used plastic card to fill it dry fitting it many times till I had it right.
This is a complex process and the only major inconvenient for using the Special
Hobby kit. Only for this reason I would only recommend it for experienced modellers.
Indeed it could be just me and there is an easier approach I could not found.
Small parts as aiming gear, Pitot´s tube on the side of the fuselage and
wires were left for the final stages. It is difficult to know were the wires
go and the manufacturer should facilitate our task a bit more. It is important
to locate the point were the wires go in the fuselage and wings and drill them
before painting and assembling the lower wings. Because the wires going from
the landing gear legs to the wings and from the fuselage near the cockpit to
the lower wing are double it is convenient to drill two small holes exactly
at the same distance.
The rest of the assembly process has no relevant difficulties and once finished depicts quite nicely the typical aspect of the Chato.

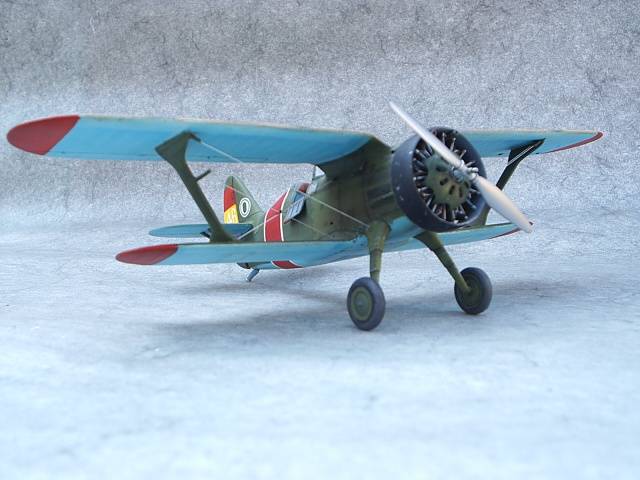
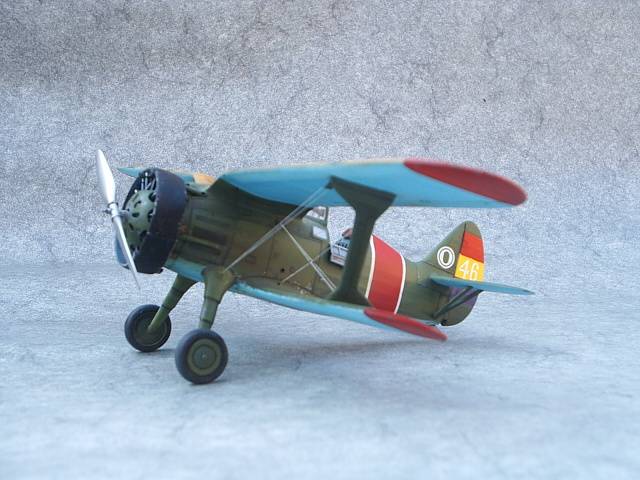
 The
standard Republican camouflage on Soviet manufactured planes was green. Which
shade exactly is so far a question nobody can answer yet. I have spoken with
several pilots and mechanics who told me that the green was darkish. In comparison
with the soviet machines they flew while training in the USSR, there was a clear
difference. Angel Sanz (a Mosca (I-16) pilot trained in Kirovabad) has told
me that the soviet machines were painted in a much brighter shade of green which
coincides with A II green, but the ones he flew and saw in Spain were darker
in appearance (describing something like an olive green) and the undersides
were blue as the sky (which is bright over here). With such non specific information
I decided to mix my own mixture of green. The shade chosen was a weathered version
of AII green (which darkens with sun exposure if I am not wrong, and adding
some more dark grey and dark green)
The
standard Republican camouflage on Soviet manufactured planes was green. Which
shade exactly is so far a question nobody can answer yet. I have spoken with
several pilots and mechanics who told me that the green was darkish. In comparison
with the soviet machines they flew while training in the USSR, there was a clear
difference. Angel Sanz (a Mosca (I-16) pilot trained in Kirovabad) has told
me that the soviet machines were painted in a much brighter shade of green which
coincides with A II green, but the ones he flew and saw in Spain were darker
in appearance (describing something like an olive green) and the undersides
were blue as the sky (which is bright over here). With such non specific information
I decided to mix my own mixture of green. The shade chosen was a weathered version
of AII green (which darkens with sun exposure if I am not wrong, and adding
some more dark grey and dark green)
The general technique was to give an over all green coat, then thing down the
paint and change the shade several times to reinforce the colour visual effect.
When working in surfaces that represent metal panels, I make darker the border
and more clear the central area. As many different shades you use, better will
be the effect. When working over surfaces that represent fabric, normally the
middle area is lower than the borders (pushed up by the ribs) and therefore
is dark in the centre and brighter over the ribs. To dark the shade I add black,
dark grey or a dark shade of green, to bright it up I use white, grey or yellow.
It is a question of trying and a bit of intuition. The real secret is to thin
down the paint to allow a transparency effect. The panel lines are treated with
very thin b dark grey or black paint using a mask (post it or similar) just
over the inscribed line. If you have as nice compressor and you are able to
regulate the air pressure you can really make wonders, if you don't (that's
my case), you discover the incredible human capability to swear in different
languages.
The upper wing has a "desert yellow" background. Again you have to
use your imagination and the good thing is that NOBODY can say you are wrong
because there are no accepted references on the subject. As a mere speculation
I think they could be similar to the Italian colours. I used Vallejo's desert
yellow (this is a Spanish brand of acrylic colours very popular amongst people
painting figures and so).
The underside blue was AII blue, a bit pale for Erik's taste.
 I
had to attach the painted lower wings to the fuselage (that means that I had
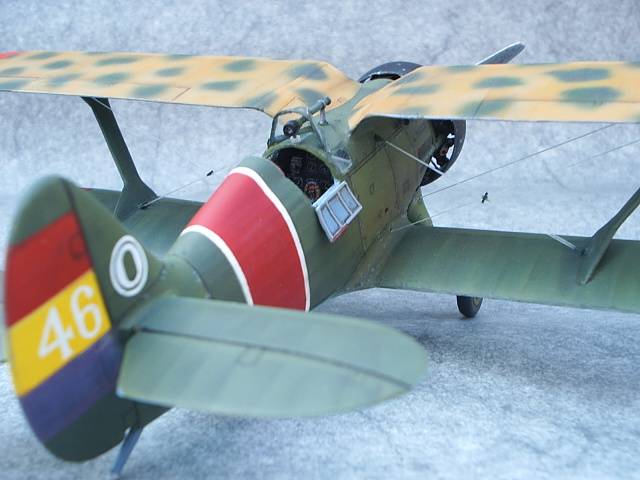
to repaint a few bits). The Red bands were painter on the wing's tips (all four)
and the fuselage. This case, as other planes in Grupo 26 had a thin white band
around it. The decals were from the kit and I decided to paint the Spanish Republican
flag in the tail.
I
had to attach the painted lower wings to the fuselage (that means that I had
to repaint a few bits). The Red bands were painter on the wing's tips (all four)
and the fuselage. This case, as other planes in Grupo 26 had a thin white band
around it. The decals were from the kit and I decided to paint the Spanish Republican
flag in the tail.
Before using the decals I gave a thin coat of acrylic gloss varnish (Micro Gloss). Then the decals and most important for the final appearance of the plane, using oil paint to make it run inside the panel lines and making oil stains and weathering effects ( with burn umber ). It is important to use really good turpentine (no just white spirit). If you over do it or just don't like it, wipe it away with a dry and clean brush or even a piece of soft fabric, and you can try till it looks nice. A very good alternative to turpentine is a solvent called Heptane. It is difficult to find, you need to have a chemistry contact, but it dries in seconds and will not alter the acrylic coat underneath at all.
Once all this was over, I gave a new coat of satin varnish, and
in some places just matt varnish)
Let it dray few days and now is time for the final paint touches and finally
all the rigging (I hated it).
And that is all, folks.Enjoy.
 |
 |
 |
 |
 |
 |
 |
||