| |
|||||
Accurate Miniatures 1/48th Yak-1By István Vadász |
 |
I met the type first once upon a time in A.D.Mihaylk's book titled
The Falcon Family.
That experience drove my modelling career to a definite way. I still have the
book on the shelf although it is quite worn. In the beginning of the 1970's
there were very few written material about WW2 flying history here in Hungary.
 What
were had a strong propaganda charge in and it showed the events only from one
side.
What
were had a strong propaganda charge in and it showed the events only from one
side.
 Obviously
special attention and care was paid not to be published any verifiable data.
Obviously
special attention and care was paid not to be published any verifiable data.
In spite of this, those who had experience of the soviet type of news-reading
could make out the necessary facts. Unfortunately these books will not reach
the readers too soon. I am afraid that the younger generation will get known
the history of the Eastern Front from one side again but peeling off the propaganda
only men and history remain.
I received the Accurate Miniatures Yak-1 with big welcome. Some hope arose in me to build a nice and accurate Yak-1 after the old and telling the truth a bit inaccurate Mikro kit in 1/72 scale. After opening the box the hope still remained since the content of it suggested me an enjoyable build.
I do not mention all the details of the building procedure, our friend Peter Vill has done this, and I mention only the specialities I met.
During the building process I decided not to hang anything on
the plane, because I have not found any pictures of a Yak-1 with armament or
fuel tank hung under wing. And I felt that I would spoil the shape of the plane
if I hang weapons or fuel tanks. The thing I could not resist was the Eduard
photo etches issued during the build. Since I am a cautious gambler I started
with the most complicated and risky parts: the flaps. After getting some silver
hair and losing only one part I took the most detailed section of the model
in my hands. Only after having them in my hand completed, I started to cut the
flaps out of the wings and building the upper parts in. The first amazement
came at completing the wings. The main spar did not fit to its place so I had
to glue it first to one side and then after some days to the other side of the
wing.
 I
could go on assembling the wings only after complete drying. I used the well
tested method gluing the halves. First I glued the leading edges with Revell
needle-type glue. Then after some days drying I leaked solvent between them.
This way I prevented the glue's solvents from spoiling the inside of the thin
parts; because it is evaporating slowly (this effect can come out sometimes
after months). After a short period the next problem came. The glue flew in
to the very promising transparent fuel gauges meter and it started the job there
from the inside. I am sure I will do next Yak different. The suggested process
is the following. Before assembling the wings you should pre-drill the gauges
place in the wings and glue the transparent parts in. Then glue the paper-printed
fuel meter to its place and then assemble the wings. The size of the sheet dividing
the inner side of the fuselage from the undercarriage box seems a bit meaningless.
I wonder if there is a gap between the sheet and the spar.
I
could go on assembling the wings only after complete drying. I used the well
tested method gluing the halves. First I glued the leading edges with Revell
needle-type glue. Then after some days drying I leaked solvent between them.
This way I prevented the glue's solvents from spoiling the inside of the thin
parts; because it is evaporating slowly (this effect can come out sometimes
after months). After a short period the next problem came. The glue flew in
to the very promising transparent fuel gauges meter and it started the job there
from the inside. I am sure I will do next Yak different. The suggested process
is the following. Before assembling the wings you should pre-drill the gauges
place in the wings and glue the transparent parts in. Then glue the paper-printed
fuel meter to its place and then assemble the wings. The size of the sheet dividing
the inner side of the fuselage from the undercarriage box seems a bit meaningless.
I wonder if there is a gap between the sheet and the spar.
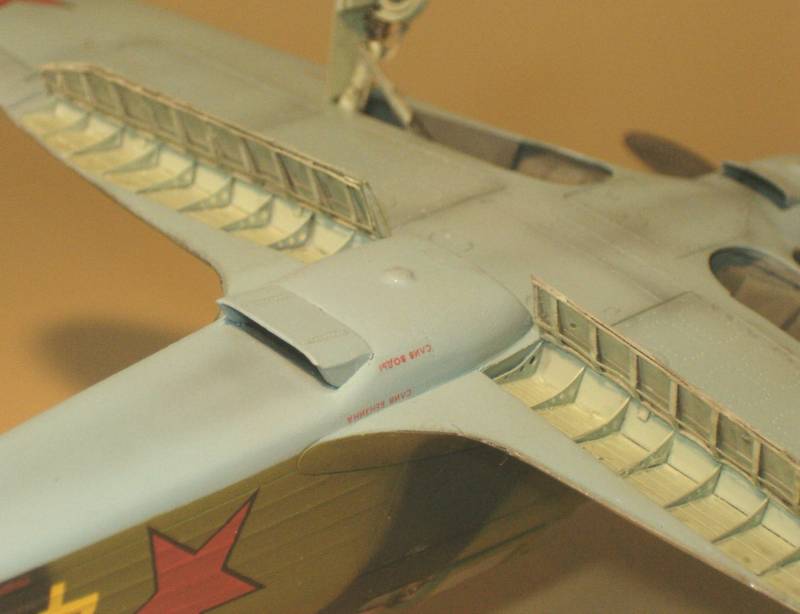
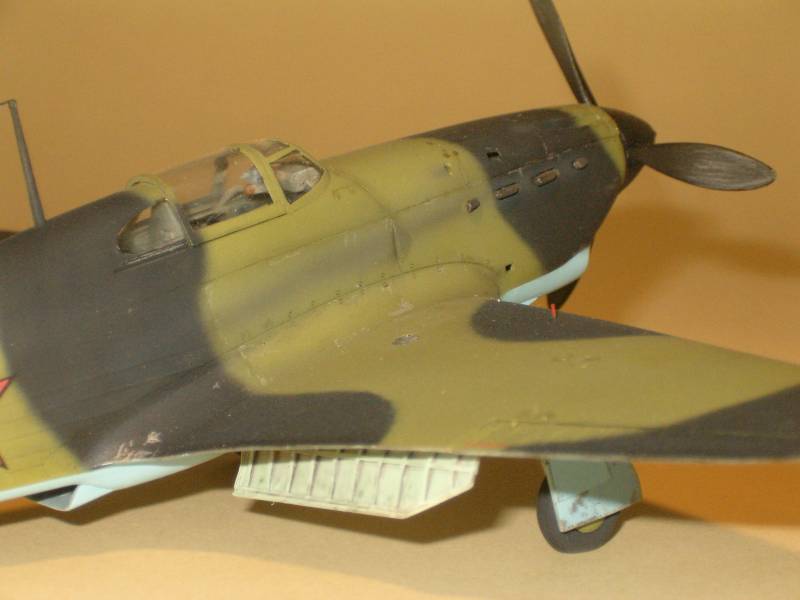
The inner part of the cockpit should be folded in a special way. It would not
be a problem if the inner section fit the fuselage joint. There is an unpleasant
step between the outer part of the cooler and the fuselage. It is time and patience
consuming job to work on it. Fast and enjoyable building came until I got to
the filling part. Here came the carelessness of the model designers out. Why
did they separate the spine instead of the well tested two-halves? So the filling
line 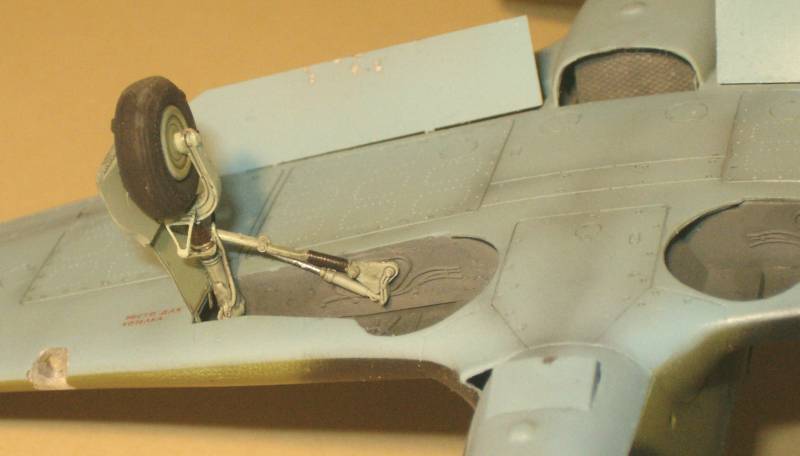 went
up to a critical surface from a neutral surface. However AM states that you
do not have to fill the gap I think it can be skipped in the most rare case,
because during manufacturing the mould can deform and the fit is not perfect.
But it is a very good idea that the glass part of the canopy is larger so as
to fit to spine. There is a little bulge on the release taps of the oil cooler
and water cooler as well and both are split by the joining line of the two halves
of the fuselage. To sand them together is a modeller-tester mission. It would
have better to give two separate coolers. I soon realized that I do not have
the skills to sand these bulges together properly. I decided to cut them drastically
off and then I recreated these tiny little things with the help of some sprue
and surfacer.
went
up to a critical surface from a neutral surface. However AM states that you
do not have to fill the gap I think it can be skipped in the most rare case,
because during manufacturing the mould can deform and the fit is not perfect.
But it is a very good idea that the glass part of the canopy is larger so as
to fit to spine. There is a little bulge on the release taps of the oil cooler
and water cooler as well and both are split by the joining line of the two halves
of the fuselage. To sand them together is a modeller-tester mission. It would
have better to give two separate coolers. I soon realized that I do not have
the skills to sand these bulges together properly. I decided to cut them drastically
off and then I recreated these tiny little things with the help of some sprue
and surfacer.
One more little anger! Why do American manufacturers mould their logo onto the
outside of the model? Once I met a beautiful model while I was a jury at a modelling
competition. It was nicely done but accidentally the modeller forgot to eliminate
the logo. What can I say? We were amused by it!.
 There
were few reliable info about the painting of Russian aircraft when I started
so I used Gunze RLM02 recommended by AM. Now it is the odd one out of colour
range but referring to Klaus Niska's colour catalogue Tamiya RLM02 (XF-22) is
perfect as well as Gunze H-308 grey. Although the two colours are not the same
according to FS reference however the original tones have a great dispersion.
In 'before painting' phase I started to hesitate how to paint. It seems a bit
unbelievable to me that I could not find any non-standard or decorated plane
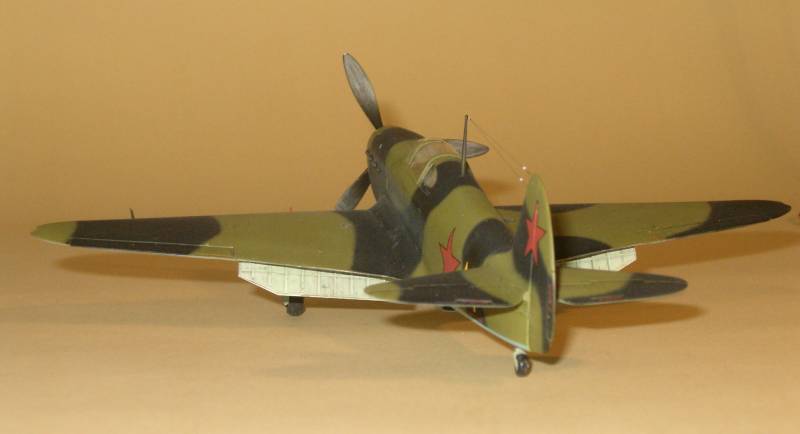
in my references. Two planes remained at my list. First is Baranov's No. 1.
One little problem arose that I was not sure about the exact inscription. Perhaps
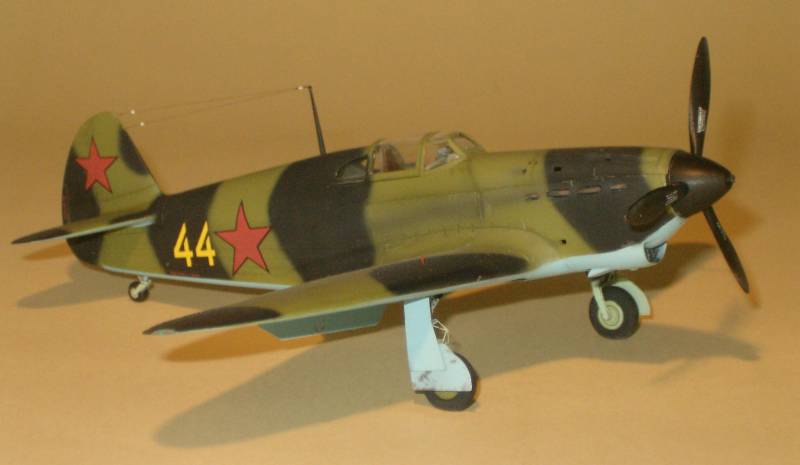
he had more planes decorated similarly. The other one was Lili Litvak's No.
44. I had one problem with it. Looking through the excellent works from modelling
point of view, somehow I did not like them because it seemed a bit deformed.
I took out the best virtue from my arsenal called patience and send the model
to exile onto the shelf for two years. By that time I found this webpage and
examining my conception about painting soviet aircraft I revaluated them.
There
were few reliable info about the painting of Russian aircraft when I started
so I used Gunze RLM02 recommended by AM. Now it is the odd one out of colour
range but referring to Klaus Niska's colour catalogue Tamiya RLM02 (XF-22) is
perfect as well as Gunze H-308 grey. Although the two colours are not the same
according to FS reference however the original tones have a great dispersion.
In 'before painting' phase I started to hesitate how to paint. It seems a bit
unbelievable to me that I could not find any non-standard or decorated plane
in my references. Two planes remained at my list. First is Baranov's No. 1.
One little problem arose that I was not sure about the exact inscription. Perhaps
he had more planes decorated similarly. The other one was Lili Litvak's No.
44. I had one problem with it. Looking through the excellent works from modelling
point of view, somehow I did not like them because it seemed a bit deformed.
I took out the best virtue from my arsenal called patience and send the model
to exile onto the shelf for two years. By that time I found this webpage and
examining my conception about painting soviet aircraft I revaluated them.
At last I asked Erik.
His answer came soon and I received the profile of the well known No. 44.
And then came the surprise! The plane started to live in my eyes and it took
some days when I found out why! I examined the photos and it turned out that
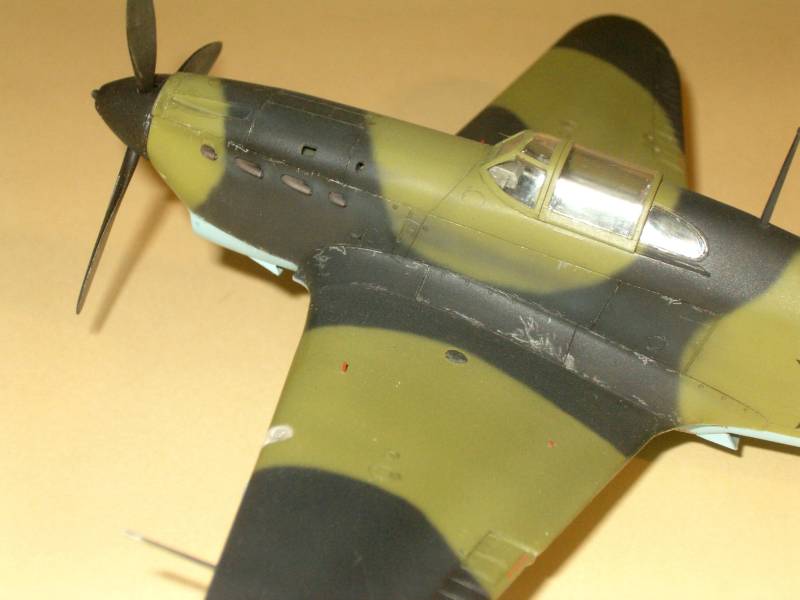
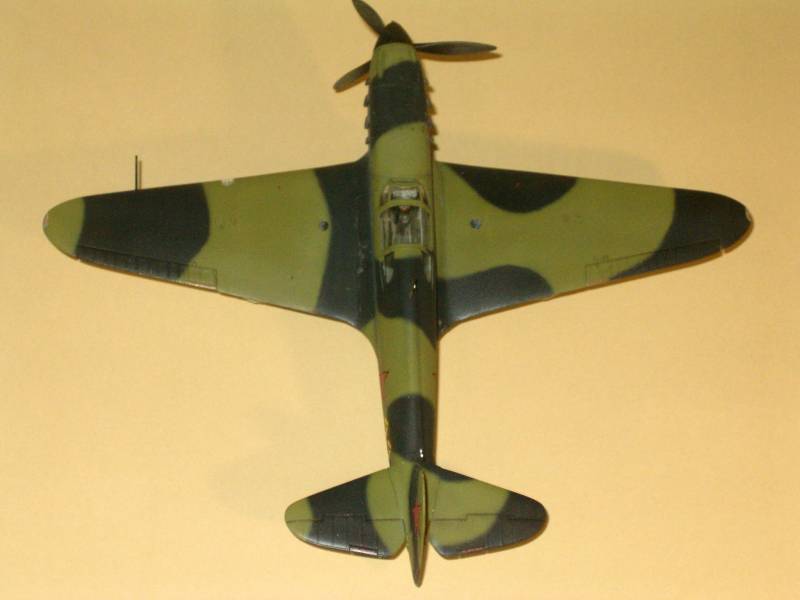
AM - I do not know why - created a quite new camouflage pattern. The pattern
AM uses deforms the shape of the plane!
Now the job turned dynamic.
 The
flaps and the wheel discs received metal primer colour but I am not satisfied
with the mix, so I will use a bit more blue shade next time. I painted the u/c
legs with the same colour since I saw on several pictures them lighter than
the underside. I did not find AII Blue in my collection so I home mixed it.
I used Gunze H58 (US Interior Green) for AII Green. I faded AII Black with some
Panzer Grey so it became a good basic for the panelling job that I made with
matt black (I raised the effect with blue). I closed the surface with acryl
Tamiya Clear gloss coat and put on the good quality decals. After that I airbrushed
on gloss coat and then I emphasized the shadow-effect with artist's turpentine
thinned Humbrol gloss black. I set the final shine with Testor's different coats.
Painting the exhausters is always a great challenge! I airbrushed a mix of silver,
red-brown and grey and then the end of the exhauster got many shades of grey
and black. Metallic coloured pastel-pencil was used for the chipped paint effect
and I put some exhaust dirt with well thinned Gunze acryl Black onto the sides.
I thinned black paint with quick vapouring pure alcohol so it reaches the surface
dry. This way it shows a faded almost grey tone.
The
flaps and the wheel discs received metal primer colour but I am not satisfied
with the mix, so I will use a bit more blue shade next time. I painted the u/c
legs with the same colour since I saw on several pictures them lighter than
the underside. I did not find AII Blue in my collection so I home mixed it.
I used Gunze H58 (US Interior Green) for AII Green. I faded AII Black with some
Panzer Grey so it became a good basic for the panelling job that I made with
matt black (I raised the effect with blue). I closed the surface with acryl
Tamiya Clear gloss coat and put on the good quality decals. After that I airbrushed
on gloss coat and then I emphasized the shadow-effect with artist's turpentine
thinned Humbrol gloss black. I set the final shine with Testor's different coats.
Painting the exhausters is always a great challenge! I airbrushed a mix of silver,
red-brown and grey and then the end of the exhauster got many shades of grey
and black. Metallic coloured pastel-pencil was used for the chipped paint effect
and I put some exhaust dirt with well thinned Gunze acryl Black onto the sides.
I thinned black paint with quick vapouring pure alcohol so it reaches the surface
dry. This way it shows a faded almost grey tone.
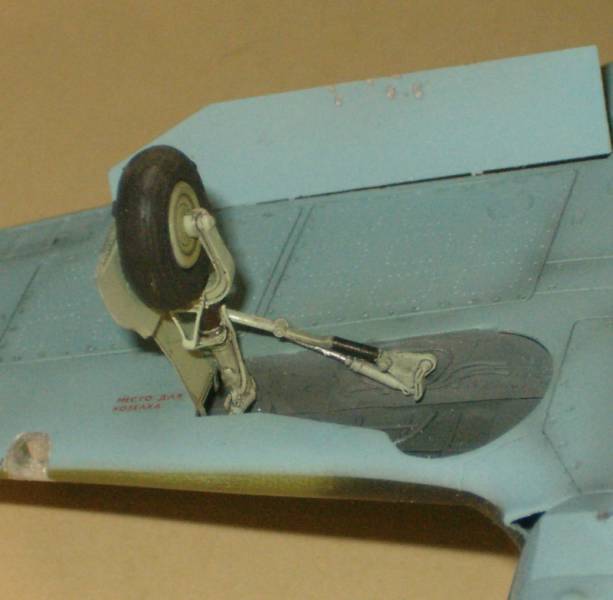
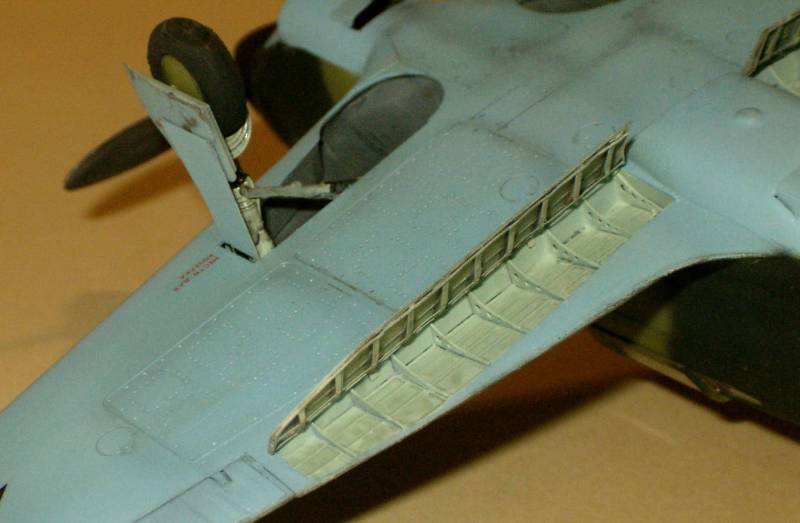
 The
positioning of the undercarriage satisfied me. I wish it was as perfect in every
model's case! I left the original plastic of the lower part of undercarriage
doors, because I liked it better than Eduard's etched part. However I changed
the upper part, since it sticks out improbably. It was a great surprise that
Eduard's flaps should be glued with two little supports so I did not have to
glue at the whole length of the flap. I used a fibre of a split plastic rope
for the antenna. It has a great advantage to hair and metallic fibre that it
is insensitive for the change of humidity and heat of the air.
The
positioning of the undercarriage satisfied me. I wish it was as perfect in every
model's case! I left the original plastic of the lower part of undercarriage
doors, because I liked it better than Eduard's etched part. However I changed
the upper part, since it sticks out improbably. It was a great surprise that
Eduard's flaps should be glued with two little supports so I did not have to
glue at the whole length of the flap. I used a fibre of a split plastic rope
for the antenna. It has a great advantage to hair and metallic fibre that it
is insensitive for the change of humidity and heat of the air.
As a conclusion we can put a beautiful model to our shelf.
It would be a pity to miss it!
 The
result will compensate for the bother caused by the unadvised planning of the
model. These are not great mistakes, only little inconveniences that extend
the building time. Model companies would draw the conclusion that it is a hobby
and I work and struggle at another place! I think I would buy more of a more
easy build model (so the company can sell me more if it is simpler to build)!
The
result will compensate for the bother caused by the unadvised planning of the
model. These are not great mistakes, only little inconveniences that extend
the building time. Model companies would draw the conclusion that it is a hobby
and I work and struggle at another place! I think I would buy more of a more
easy build model (so the company can sell me more if it is simpler to build)!
Many thanks for Erik for the profiles and my friend Robert Varga for rendering the text into English.
Now I have opened the box of Yak-1b.