| |
|||||
Yet Another Magnificent "Seven"
|
 |
Since announcement of their release of this famous Soviet WW2 fighter I was
holding my breath. Earlier iterations of this radial-engine beauty by KP and
Frog were well beyond modern standards and their accuracy was questionable at
best.
Well, those who wait patiently are rewarded and earlier this year Eduard released
three kits in a series of La-7 family: two-gun version, three-gun version, and
profi pack.
As a super-detail edict I had to wait few more months to get my hands on the
profi pack.
Quick glance inside the box made it clear that this kit is from "must buy"
category judging by the quality of molding and surface details. Needless to
say that all the references were set aside for the work months before the model
arrived.
 I
am not going to tell you the story of the real thing as it was told before many
times. As of today excellent sources such as Gordon's and Khazanov's Soviet
Combat Aircraft of the Second World War, Vol.1, Erik Pilavskii's Soviet Air
Force Fighter Colors 1941 - 1945, and Milos Vestsik's Lavochkin La-7 (listed
in alphabetical order) will tell you as much as one will need for a starter.
I
am not going to tell you the story of the real thing as it was told before many
times. As of today excellent sources such as Gordon's and Khazanov's Soviet
Combat Aircraft of the Second World War, Vol.1, Erik Pilavskii's Soviet Air
Force Fighter Colors 1941 - 1945, and Milos Vestsik's Lavochkin La-7 (listed
in alphabetical order) will tell you as much as one will need for a starter.
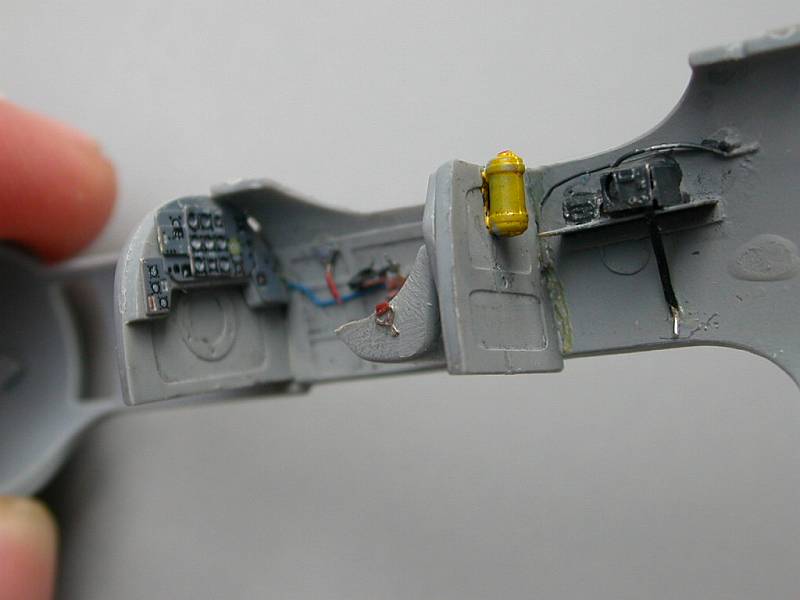
OK, time to get to work, which I usually start from the cockpit.
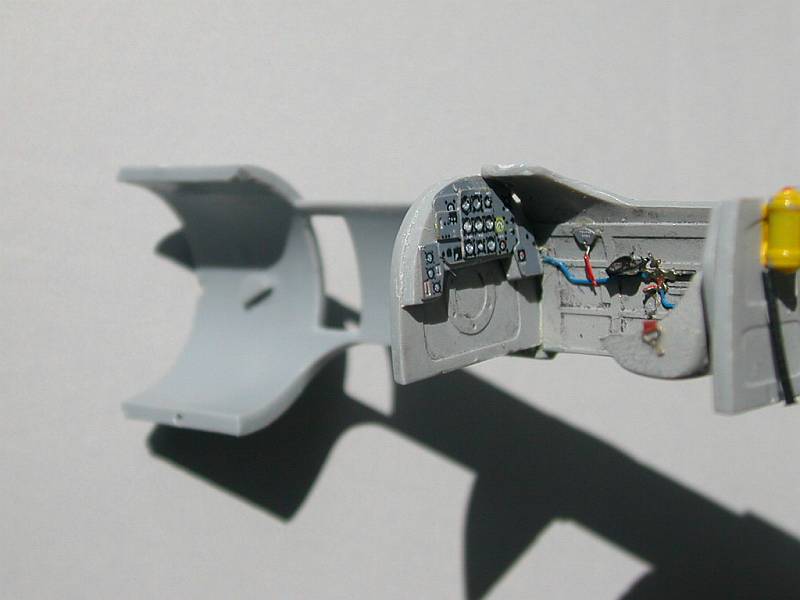
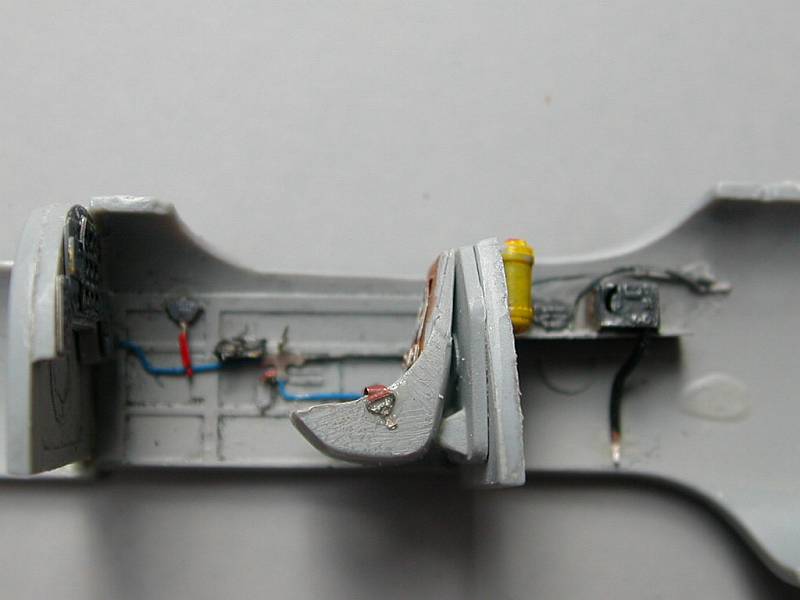
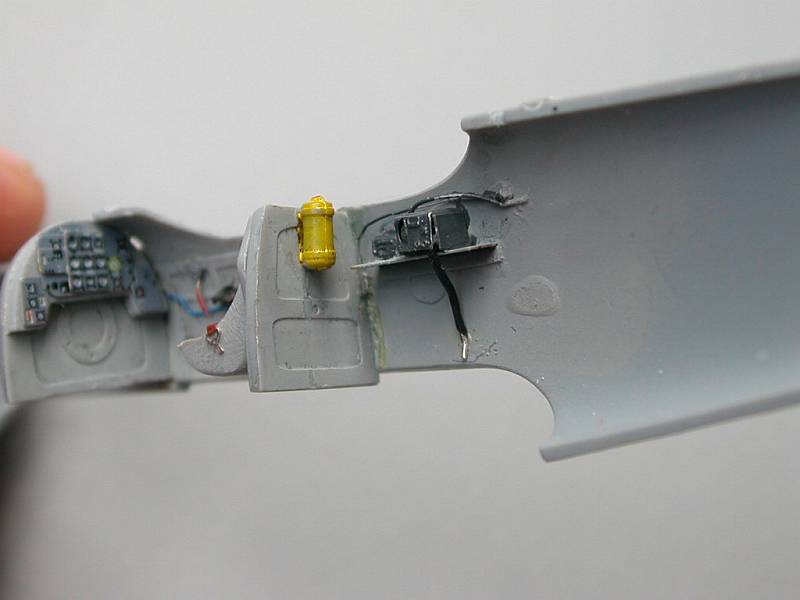
 Although
the cockpit in the kit's plastic form is quite basic, it could be greatly enhanced
by the photoetched set included in the profi pack (the same set is also a part
of Eduard's more extensive PE detail set released not long ago). I was very
impressed with the colored PE seat belts, instrument panel, various handles
and piping. Carefully examining photographs of the cockpit in the reference
books I decorated the cockpit (which received its portion of painting). All
started to look much more realistic. The only problem not addressed by the manufacturer
was space behind the pilot's seat - just an empty space.
Although
the cockpit in the kit's plastic form is quite basic, it could be greatly enhanced
by the photoetched set included in the profi pack (the same set is also a part
of Eduard's more extensive PE detail set released not long ago). I was very
impressed with the colored PE seat belts, instrument panel, various handles
and piping. Carefully examining photographs of the cockpit in the reference
books I decorated the cockpit (which received its portion of painting). All
started to look much more realistic. The only problem not addressed by the manufacturer
was space behind the pilot's seat - just an empty space.
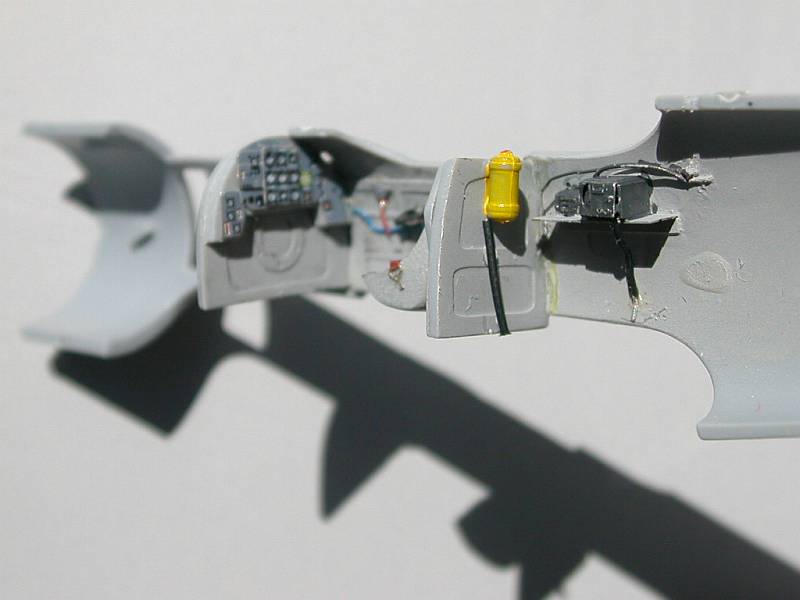
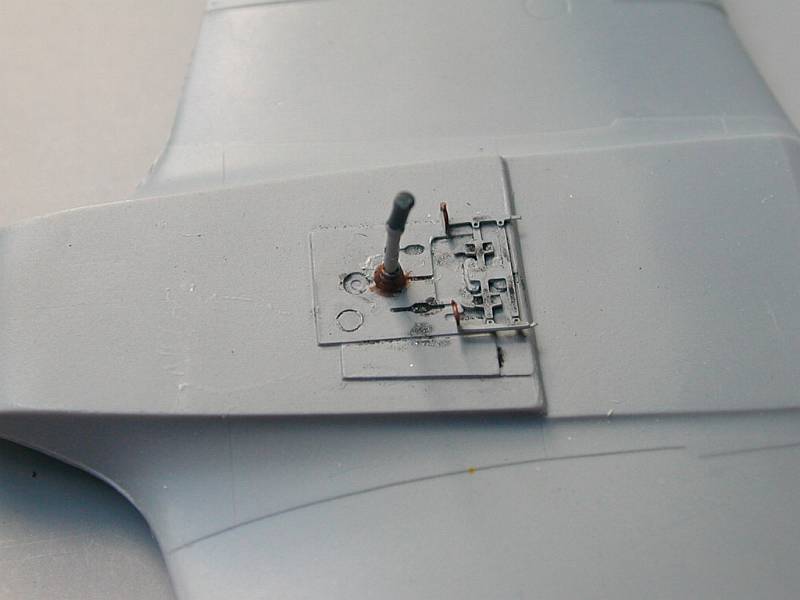
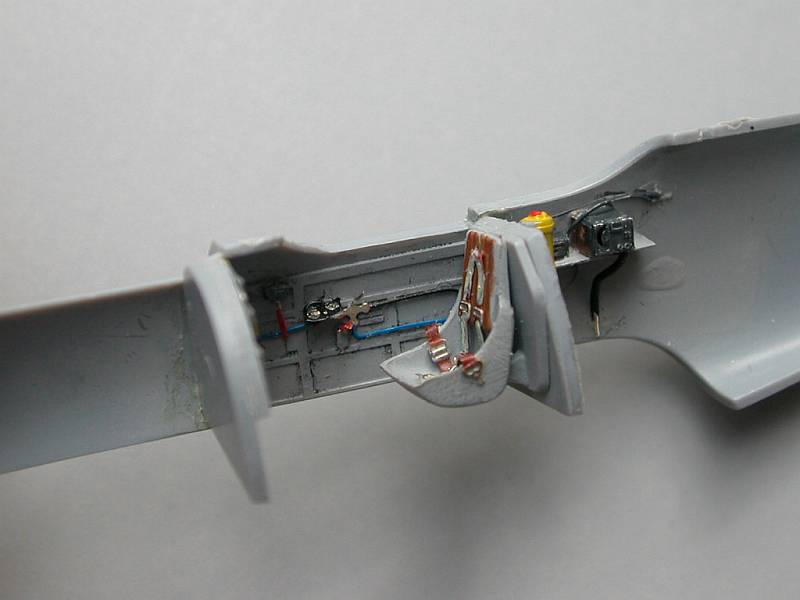
It was time to do some scratchbuilding of the radio shelve but I was not convinced
tht it should be of the MiG-3 type. As usual, in the time of great doubt, friends
came to the rescue and supplied me with even more references of how the radio
equipment was arranged (actually, the second edition of 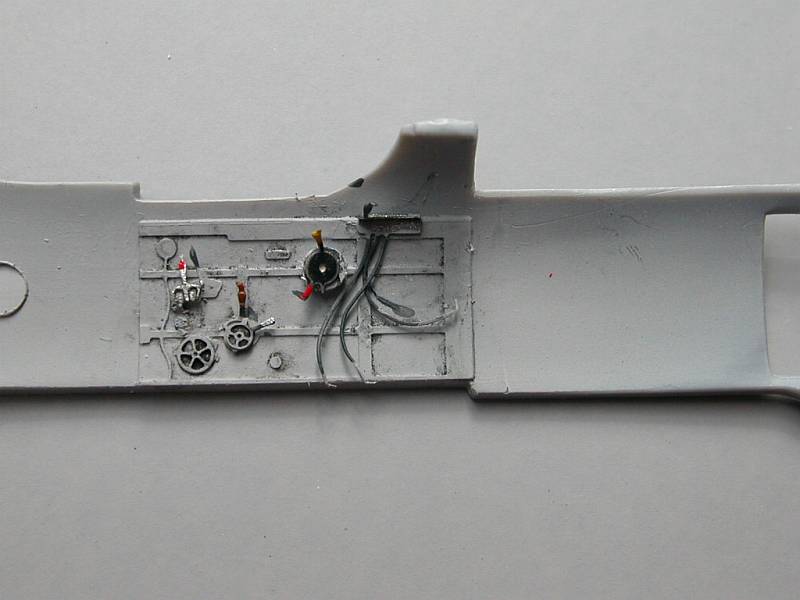
 Milos
Vestsik's book has some excellent photos of this area - by that time I had the
first edition of his book - you got the hint, did you?). After examining these
newly revealed evidence of radio equipment arrangement I decided to spare myself
from scratching plastic inserts and resorted to photoetched parts again. This
time Part PE set for Yak-18 served me as a source of necessary radio boxes.
Adding some wires solved the problem of making it look realistic enough (when
everything is done one can hardly see what is inside but I know it's there).
The cockpit floor received rudder pedals from the kit's PE set, the cockpit
was washed and various side panels' handles were installed. By the way, Eduard
supplied some extra PE parts (really small ones) in case some of them will disappear
(and they did, of course!).
Milos
Vestsik's book has some excellent photos of this area - by that time I had the
first edition of his book - you got the hint, did you?). After examining these
newly revealed evidence of radio equipment arrangement I decided to spare myself
from scratching plastic inserts and resorted to photoetched parts again. This
time Part PE set for Yak-18 served me as a source of necessary radio boxes.
Adding some wires solved the problem of making it look realistic enough (when
everything is done one can hardly see what is inside but I know it's there).
The cockpit floor received rudder pedals from the kit's PE set, the cockpit
was washed and various side panels' handles were installed. By the way, Eduard
supplied some extra PE parts (really small ones) in case some of them will disappear
(and they did, of course!).
 One
of the most prominent details of the fuselage are exhaust pipes and louvers.
Exhausts are given as plastic arcs with some vaguely seen details, which are
supposed to represent pipes. Simple glance on a photograph of this assembly
on a real plane just doesn't allow for the use of the kit parts (this is much
better handled on Eduard's new PE set). I decided to use something more realistic.
At this time the best solution to exhaust pipes problem is - yes, you guessed
it right - Moskit exhausts. But they don't make them for La-7! I found a solution
by scavenging pipes from their I-153 set. All I needed was just much shorter
pieces of the smallest available diameter, and I-153 set just gives you that.
I cut small sections and pressed them a bit so that they don't look perfectly
round or oval but rather a bit flat. I glued them to the inner sides of the
One
of the most prominent details of the fuselage are exhaust pipes and louvers.
Exhausts are given as plastic arcs with some vaguely seen details, which are
supposed to represent pipes. Simple glance on a photograph of this assembly
on a real plane just doesn't allow for the use of the kit parts (this is much
better handled on Eduard's new PE set). I decided to use something more realistic.
At this time the best solution to exhaust pipes problem is - yes, you guessed
it right - Moskit exhausts. But they don't make them for La-7! I found a solution
by scavenging pipes from their I-153 set. All I needed was just much shorter
pieces of the smallest available diameter, and I-153 set just gives you that.
I cut small sections and pressed them a bit so that they don't look perfectly
round or oval but rather a bit flat. I glued them to the inner sides of the

 louvers
one by one and it made all the difference in the world! Well, I hope nobody
would count them because there is one pipe short on each side (the pipes were
a bit bigger in diameter after all - Moskit, do you hear me? Exhausts just for
La-7 would be nice to have).
louvers
one by one and it made all the difference in the world! Well, I hope nobody
would count them because there is one pipe short on each side (the pipes were
a bit bigger in diameter after all - Moskit, do you hear me? Exhausts just for
La-7 would be nice to have).
Than I attached the louvers to the fuselage sides. Small problem occurred at
this time. When the lovers are almost shut the fit is OK, but when they are
open so that the pipes are visible ( a very prominent feature!) there is a gap
between the louvers and the fuselage on the top side of the assembly. This was
easily dealt with by plastic inserts.
I closed the fuselage part after this (adding whatever details from the tail
landing gear necessary).
I carefully fitted gun cover panel and assembled the front cowling with engine
louvers.
 I
assembled wings and attached them to the fuselage. The fit was quite good and
I used very little putty to fill small gaps. The problem arose with the shape
of wingtips - they are a bit too pointed. I used the wings of KP La-5 kit to
make a paper template and used it as a guide for a pencil line. Few strokes
with a file solved this problem for good.
I
assembled wings and attached them to the fuselage. The fit was quite good and
I used very little putty to fill small gaps. The problem arose with the shape
of wingtips - they are a bit too pointed. I used the wings of KP La-5 kit to
make a paper template and used it as a guide for a pencil line. Few strokes
with a file solved this problem for good.
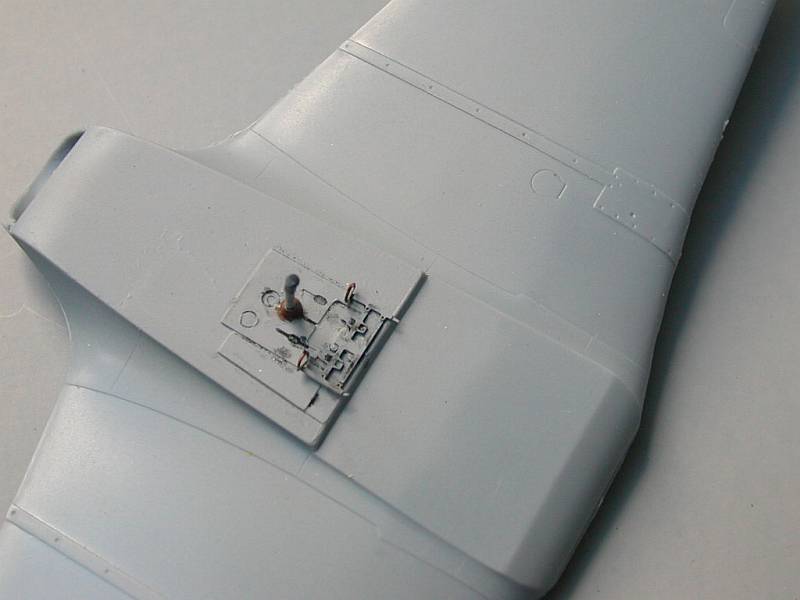
I dressed an oil cooler scoop with PE radiator and attached it to the lower
wing.
At this time the model started to look like a real little fighter on the factory
floor.
From the beginning I decided to keep the canopy open to show all the real estate
of the cockpit area. I do prefer vacuum-form canopies for they look more realistic
due to much more to scale thickness. There are not many choices available today
(aftermarket guys, do you read me?) - just 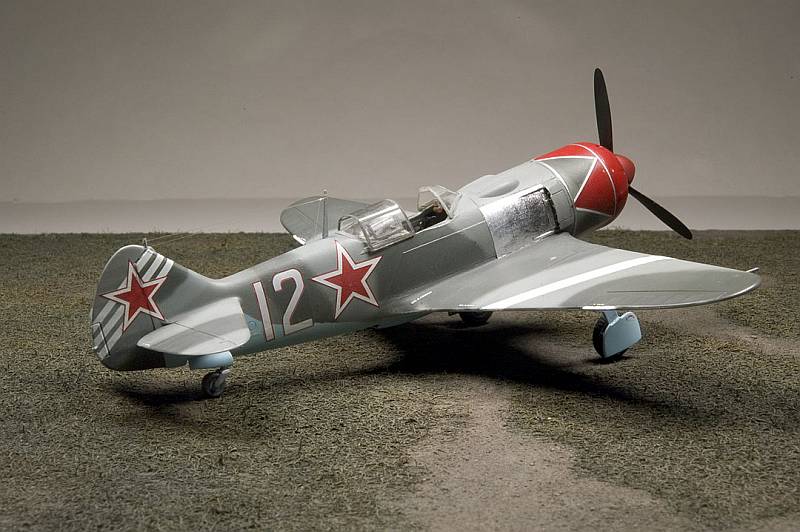 old
good Falcon. I carefully cut three pieces from their base and dry-fitted them.
To my disappointment they did not fit. At all!. The aft canopy would just fall
through the opening in the fuselage, so I decided to keep the kit's part in
this case. The sliding canopy is quite usable but the front one did not fit
either. I started to consider my options. I could use the kit's front canopy
as well but something did not appeal to me in it looks. Checking against the
references I verified that the windshield is too wide and just doesn't look
like Lavochkin. An old good La-5FN from KP offered more realistic alternative.
But as I mentioned, it's Falcon version did not fit. The solution was easier
done than said: I filed off the "cheeks" around the sitting place
for the front canopy and the replacement almost clicked in place. I filled small
gaps and sanded whatever had to be sanded. Obviously, clear parts received a
dip in the Future prior to assembly.
old
good Falcon. I carefully cut three pieces from their base and dry-fitted them.
To my disappointment they did not fit. At all!. The aft canopy would just fall
through the opening in the fuselage, so I decided to keep the kit's part in
this case. The sliding canopy is quite usable but the front one did not fit
either. I started to consider my options. I could use the kit's front canopy
as well but something did not appeal to me in it looks. Checking against the
references I verified that the windshield is too wide and just doesn't look
like Lavochkin. An old good La-5FN from KP offered more realistic alternative.
But as I mentioned, it's Falcon version did not fit. The solution was easier
done than said: I filed off the "cheeks" around the sitting place
for the front canopy and the replacement almost clicked in place. I filled small
gaps and sanded whatever had to be sanded. Obviously, clear parts received a
dip in the Future prior to assembly.
I prepared final subassembly details (landing gear doors and landing gear) and
thinned the doors for the tail wheel. Spinner and propeller were assembled as
directed. It was something odd with the spinner shape and I at first decided
to use this part from an old KP La-7 kit. However I decided to give it a try
and after several minutes of circular motion with a sand paper the kit's spinner
changed its shape in the right direction thus being saved from the spare box.
A word on the prop. Eduard made the best ever VISh-105 propeller in this scale.
It was tough to decide what aircraft I would choose to represent. I wanted
something colorful but not what everybody else was doing. I saw the box art
of Gavia 1/48 cousin and liked it a lot. However, with no photographic evidence
of the real thing I was very skeptical of their offering.
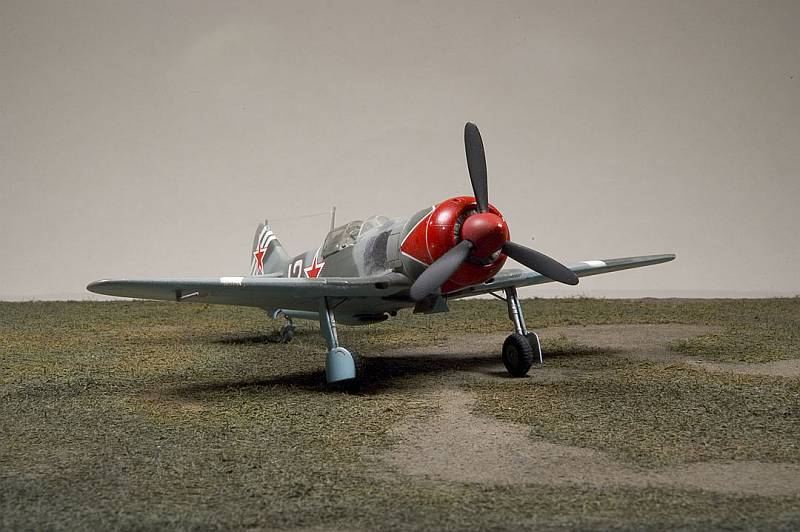
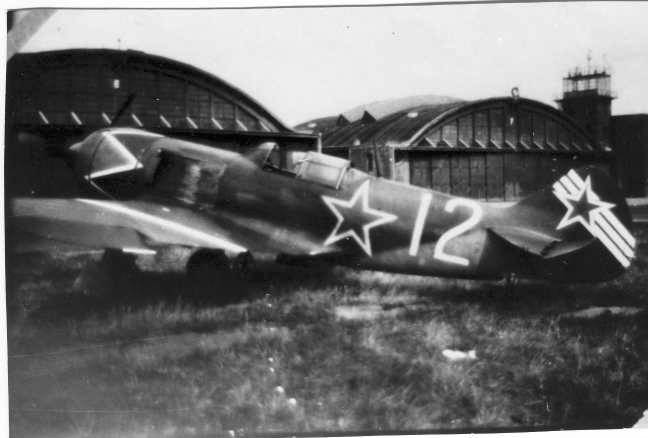 As
I said before, good things come to those who are patient (not always my virtueJ).
A photograph of Kosolapov's La-7 circulated on Russian discussion forum and
soon appeared in the second edition of Milos Vestsik's La-7 book. That was IT!
No doubts in my mind, I will finish my model in these markings! It's time to
mention that Major Kosolapov was a commander of 937 IAP of 322 IAD. The photograph
was taken In Prague in May 1945.
As
I said before, good things come to those who are patient (not always my virtueJ).
A photograph of Kosolapov's La-7 circulated on Russian discussion forum and
soon appeared in the second edition of Milos Vestsik's La-7 book. That was IT!
No doubts in my mind, I will finish my model in these markings! It's time to
mention that Major Kosolapov was a commander of 937 IAP of 322 IAD. The photograph
was taken In Prague in May 1945.
The model was painted blue underside and AMT-11 grey on the top. Than I applied
the spots of AMT-12 dark-grey paint in appropriate areas (except of the nose).
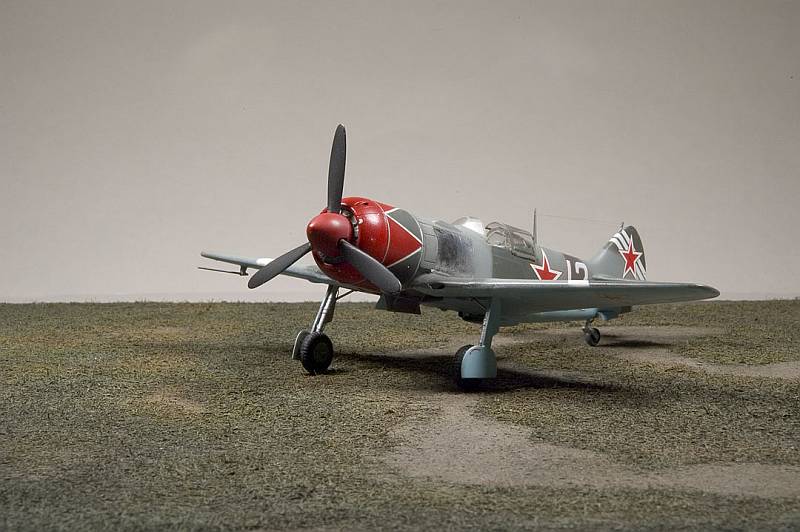
The most interesting part started with the nose decoration. As we all know,
red paint will look differently over different underplaying coats. I certainly
did not want red color to be too light over light-grey surface and too dark
over dark-grey one. I decided to use a uniform light-grey color in the nose
area for this purpose. I masked everything accept the very front of the nose
where the decoration is solid. This part was sprayed red and the masking tape
was removed. After thorough drying I masked the rest of the nose so that to
spray top and bottom parts of it repeating the process several days later for
the left and right sides. Everything went as planned to my delight. Than I reversed
the process and masked red areas to apply dark-grey color between red segments.
Now you can calculate how many days it took considering at list one day of drying
time for each iteration.
 I
decided to paint white stripes on the wings, while the tale decoration to be
accomplished with decals.
I
decided to paint white stripes on the wings, while the tale decoration to be
accomplished with decals.
Everything painted and dry, I applied Future and made subtle wash to accentuate
panel lines where appropriate.
Decals came next. The stars from the kit's decal sheet were a bit too orange
to my eye and I decided to use aftermarket offering from Eagle Strike Production
set 72074 Russian National Insignia WW2. The color of Eduard's decals was not
the only (and main) reason for my choice: the fuselage star on Kosolapov's machine
is much bigger than the one in the kit offering. Decals went on without any
problems. The nose was further decorated with white outlines of the red "tulip"
and silver decals representing harnesses of the cowling. I also added some paint
chipping, which was supplied by Eduard in decal form (excellent move!).
The model received a flat coat after which I removed masking tape from the
canopy glazing (my favorite part). I attached the landing gear and their doors.
The wheels are given in two variants: ready to go and with the disks molded
separately. This is an excellent idea and makes painting much easier. However,
I decided to use Equipage wheels for LaGG-3 model. I dressed the landing gear
with PE details.
I decided to use Bare Metal Foil ® for exhaust side panels. The only problem
with that was how to apply exhaust stains on their surface. I did not want to
cover them with flat coat - it kills this metallic look and feel. It took several
weeks to figure it out. I used very fine black powder, which sticks 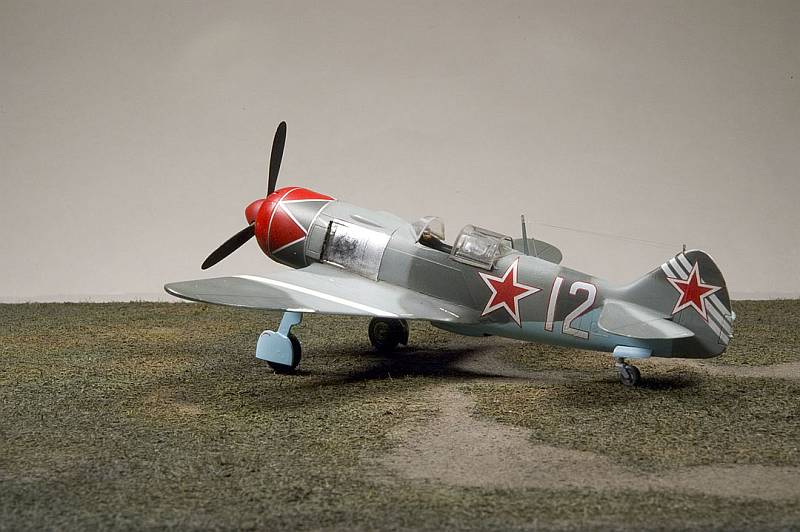 very
well (unlike the pastel chalk). I did not try CMK new powders; they might as
well do the job. I am not at liberty to reveal the secret of my solution but
you will be surprised when you one day willJ (I gave my word to 3Guyz company,
our local club guys who found it and kindly offered me to test it, not to reveal
where does it come fromJ).
very
well (unlike the pastel chalk). I did not try CMK new powders; they might as
well do the job. I am not at liberty to reveal the secret of my solution but
you will be surprised when you one day willJ (I gave my word to 3Guyz company,
our local club guys who found it and kindly offered me to test it, not to reveal
where does it come fromJ).
Everything was almost ready, just few final touches with antenna wire and Pitot
tube to finalize the process. I made Pitot tube from fine tubing and used the
plastic base of it from the kit.
When I took few test shots of the model and shared it with my friend Alex Ruchkovski
(he is famous for his very sharp eye and no less sharp criticism if something
is not right) and he pointed me to the fact that the model just doesn't sit
right, looking a bit too Fw-190-eish. I looked at the photographs one more time
and realized that Alex was absolutely right. If one assembles landing gear doors
to the legs as is suggested by the assembly pins, the result would be like what
I got. It wasn't an easy decision but I had to do it: I removed the landing
gear and shortened them a bit (look at the photos in your references to find
this point). Correspondingly, I had to cut landing gear doors as well. The struts
had to go as well and I decided to make them from metal tubing.
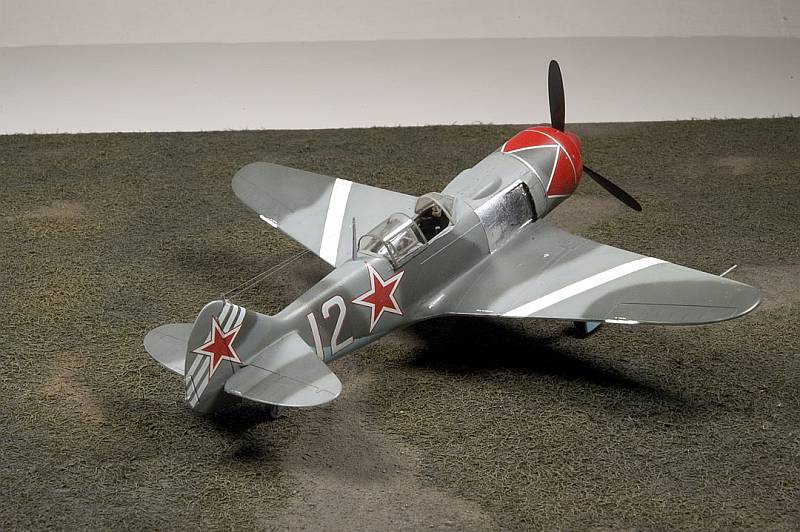
When landing gear was redone it looked as La-7 should be looking - mighty fighter
of the Victory.
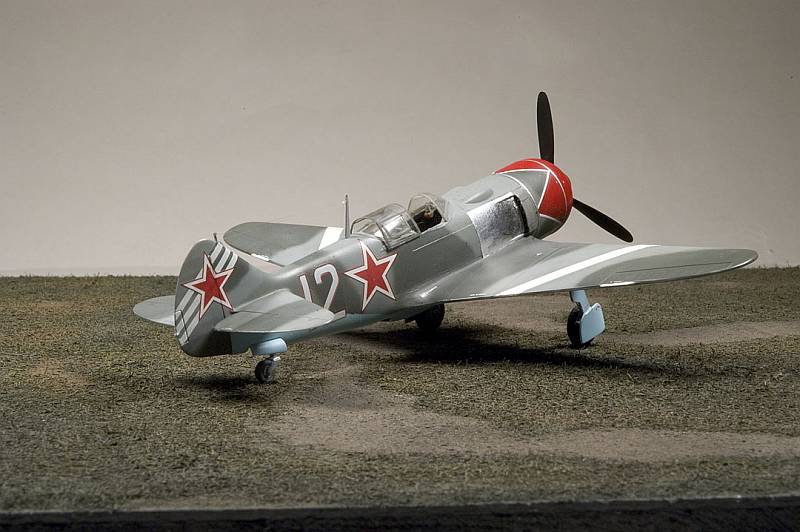 I
enjoyed every minute of work on this little gem. Few bugs did not detract me
from its strong points and high quality. These small errors are easily correctable
although there is some suspicion that the wing chord is not where it should
be.
I
enjoyed every minute of work on this little gem. Few bugs did not detract me
from its strong points and high quality. These small errors are easily correctable
although there is some suspicion that the wing chord is not where it should
be.
Details are excellent and crisp, PE parts saved the day with the cockpit interior
(and I did not have to wait for them another halve a year).
Eduard did a great job to give us very nice model of this prominent fighter-plane
as well as left some room for improvements to modelers with AMS (advanced modelers
syndrome).
I just hope Eduard will not stop on La-7 kit and will seriously consider the
La-5 family for their nearest future plans.
I also hope that Aires or CMK will produce a detail set for this model with
cockpit details and motor and gun bays. This model is just crying for things
like that!
Highly recommended for modelers of all levels.
My thanks are extended to:
1. Terry Higgins of Skygrid for review sample
2. Matt Bittner for the review kit direct from Eduard
3. Alex Ruchkovski for invaluable advise and additional references
4. Aleks Sekularac for expert advise on photographing my model
5. 3 Guys and Dave Shwab for the secret black powder to replicate exhaust stains