Yakovlev Yak-9P
1/72nd Scale
by Bill Powers

Yakovlev Yak-9P 1/72nd Scale
|
|
I bought the ICM Yak 9T when it first came out but was disappointed at the
crudeness of the pieces. When Atlanta announced the Korean War as a theme for
their Regional Convention, I planned to convert the Yak 9T into a North 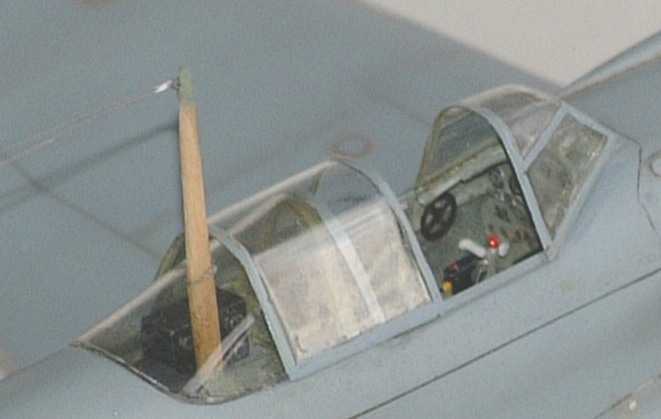 Korean
Yak 9P. I bought the AJ Press Monograph on the Yak 7-9 as a reference. My first
shock when I compared the kit pieces to the monograph plans was the inaccurate
taper of the ICM wing and the grossly oversized airleons. I began work and had
almost finished the model for the contest, but not quite. The North Korean markings
came from a rare Super Scale MiG 15 1/72 set and I ruined the markings on one
wing (couldn't find any replacements!). I didn't like the markings anyway, so
I forgot about the contest, sanded off the markings and began to spend more
time on the finish. In the end, I used the kit Russian Stars, which look much
better.
Korean
Yak 9P. I bought the AJ Press Monograph on the Yak 7-9 as a reference. My first
shock when I compared the kit pieces to the monograph plans was the inaccurate
taper of the ICM wing and the grossly oversized airleons. I began work and had
almost finished the model for the contest, but not quite. The North Korean markings
came from a rare Super Scale MiG 15 1/72 set and I ruined the markings on one
wing (couldn't find any replacements!). I didn't like the markings anyway, so
I forgot about the contest, sanded off the markings and began to spend more
time on the finish. In the end, I used the kit Russian Stars, which look much
better.
The correction of the wing taper and airleons was a major undertaking, but this following was required for the conversion:
- increased the chord of the horizontal stabilizer
- Removed oil radiator from nose
- added oil cooler intakes in wing root and "dump doors" under the
wing
- re shaped and relocated the glycol radiator toward the rear of the fuselage
- increased length of rear canopy by making a mold and vacuumforming another
piece
- added carburetor air intake, muzzel troughs and gun breech covers to top of
engine cowling
- cut opening for radio directional finder, vacuumformed cover, built radio
directional finder
- rescribed to match -P version panel lines, filled fabric areas
- reshaped spinner
- built new exhaust stacks to fit into kit's openings
- corrected wheel well shape, to match PART wheel covers
- reduced the chord of the airleons by one half!
I did NOT change the location of the vertical stabilizer, enough is enough!
 Added
detail:
Added
detail:
I sanded and sanded to smooth all the additional work and was finally ready to paint!
I painted the panel lines in a dark shade of the finish color, then painted
lighter tones of the finish color between the panel lines. Finally, another
even lighter tone of the finish color was sprayed overall. The panel lines were
highlighted with three colors of oils: Raw Sierra for the gas tank areas, 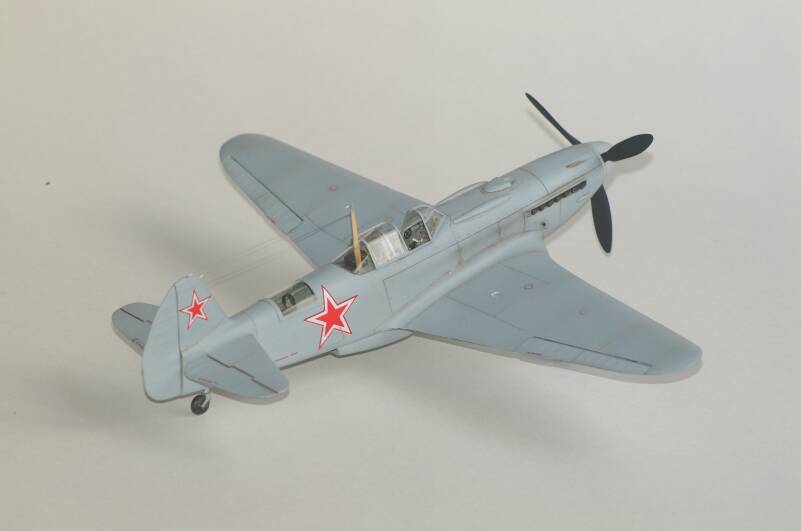 Yellow
Ochre for the outer wing panels, top and bottom and Burnt Umber for the panels
lines on the fuselage and wing next to the engine compartment. These oil washes
would be allowed to spread out from the panel lines, staining the paint. Then
another misting of the finish color was sprayed over all the panel lines to
tone down the oils. I did this over and over for about a month. Then a coat
of Future was applied and the model was decaled. More Burnt Umber used only
in the panel lines to highlight the panels. Then a semi gloss final coat.
Yellow
Ochre for the outer wing panels, top and bottom and Burnt Umber for the panels
lines on the fuselage and wing next to the engine compartment. These oil washes
would be allowed to spread out from the panel lines, staining the paint. Then
another misting of the finish color was sprayed over all the panel lines to
tone down the oils. I did this over and over for about a month. Then a coat
of Future was applied and the model was decaled. More Burnt Umber used only
in the panel lines to highlight the panels. Then a semi gloss final coat.
The model was awarded a second in conversions at the 2001 Region 2 Convention.
The model looks great but was way too much work!