The Fighting Trainer
Building ICMs Yak-7A in 1:48
by Peter Gunti
The Fighting TrainerBuilding ICMs Yak-7A in 1:48by Peter Gunti |
|
 When
I bought the Yak-7 kit of ICM I expected it to be strongly based on the same
brand's Yak-9 Kits. I had serious doubts about the feasibility of such a derivative.
Once again, my pessimism was unfounded, as the kit is fundamentally different
in most respects, thereby avoiding the duplication of earlier mistakes and providing
improved detail. Basically the box is worth its money with the exception of
one part. The single piece cockpit-transparency has overdimensioned frames in
the forward section that can ruin the appearance of the entire model. Fortunately
Falcon have properly identified this shortcoming and produced an alternative
part. Don't build the kit without it!
When
I bought the Yak-7 kit of ICM I expected it to be strongly based on the same
brand's Yak-9 Kits. I had serious doubts about the feasibility of such a derivative.
Once again, my pessimism was unfounded, as the kit is fundamentally different
in most respects, thereby avoiding the duplication of earlier mistakes and providing
improved detail. Basically the box is worth its money with the exception of
one part. The single piece cockpit-transparency has overdimensioned frames in
the forward section that can ruin the appearance of the entire model. Fortunately
Falcon have properly identified this shortcoming and produced an alternative
part. Don't build the kit without it!
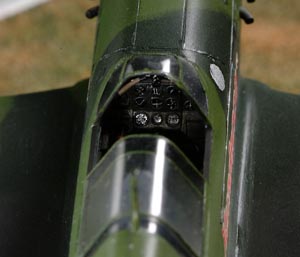
Assembling is straightforward and I built it almost straight from the box.
The fit of the parts is good except for the engine cover that needed a bit of
filling/sanding. A detailed engine is provided in the kit for those of you who
like 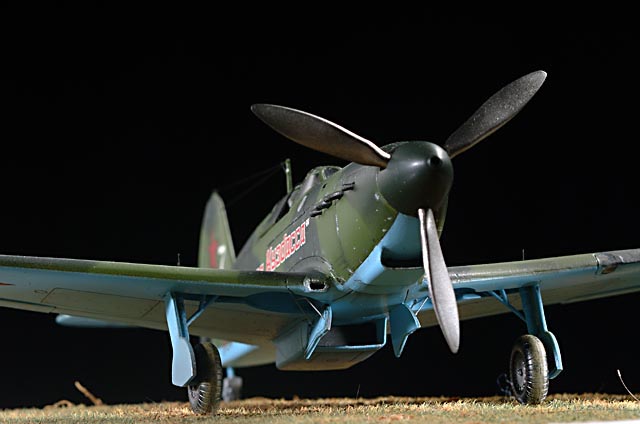 some
hardcore superdetail. Since other variations of the kit are featuring two-seat
aircraft, the rear fuselage is molded with sliding rails for the rear cockpit.
This has to be removed for single-seaters. I added some cockpit detail and,
lacking proper documentation on the real thing, based the details on the Yak-1
rather than the Yak-9. (Historically, the 1 and the 7 are closer relatives.)
The oil-cooler outlet is molded flat and has to be opened at the rear. The two
air-scoops at the wing root have to be opened as well. This is real easy if
you do it before the wings are assembled. Don't forget to add the gear-pins
on the top of the wings. A landing light has to be added in the wing root, the
bulky transparency is, again, best replaced with a piece of flat sheet. The
exhaust pipes are too long and should be shortened considerably.
some
hardcore superdetail. Since other variations of the kit are featuring two-seat
aircraft, the rear fuselage is molded with sliding rails for the rear cockpit.
This has to be removed for single-seaters. I added some cockpit detail and,
lacking proper documentation on the real thing, based the details on the Yak-1
rather than the Yak-9. (Historically, the 1 and the 7 are closer relatives.)
The oil-cooler outlet is molded flat and has to be opened at the rear. The two
air-scoops at the wing root have to be opened as well. This is real easy if
you do it before the wings are assembled. Don't forget to add the gear-pins
on the top of the wings. A landing light has to be added in the wing root, the
bulky transparency is, again, best replaced with a piece of flat sheet. The
exhaust pipes are too long and should be shortened considerably.
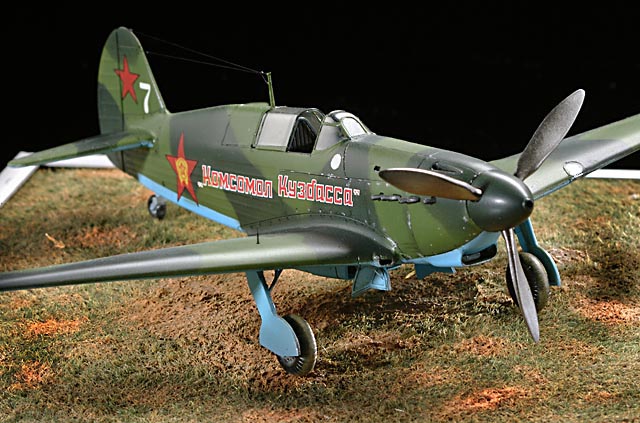
 Using
this site as a reference (and Federal Standard samples), I mixed the colors
from Tamiya acrylics. The decals came with the Kit. I chose # 7 "Komsomol
Kusbassa" because I found a good picture of the original in an old Finnish
publication titled Red Stars, Volume 1. The picture clearly shows a large
circular panel left unpainted right in front of the windshield. This feature
is not mentioned in the otherwise accurate painting instructions. The propeller-blades
are finished in natural metal Alclad instead of the flat black recommended by
the instructions. This is another detail I believe to have recognized from the
Using
this site as a reference (and Federal Standard samples), I mixed the colors
from Tamiya acrylics. The decals came with the Kit. I chose # 7 "Komsomol
Kusbassa" because I found a good picture of the original in an old Finnish
publication titled Red Stars, Volume 1. The picture clearly shows a large
circular panel left unpainted right in front of the windshield. This feature
is not mentioned in the otherwise accurate painting instructions. The propeller-blades
are finished in natural metal Alclad instead of the flat black recommended by
the instructions. This is another detail I believe to have recognized from the
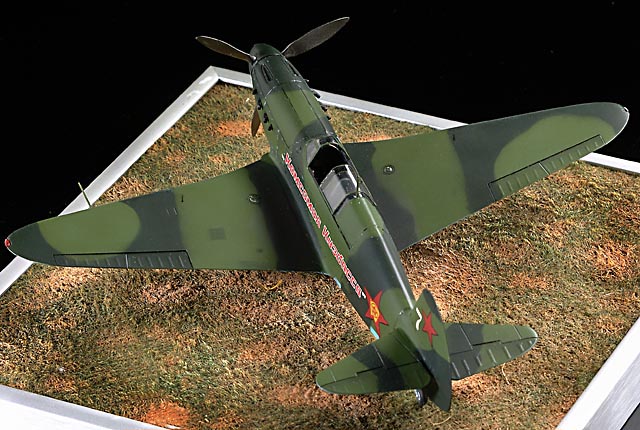 photograph
but I am not really sure about this one. An oval hole in the engine cover could
be a shell chute. Only one in two aircraft had it. The fuselage stars are slightly
undersize. I ignored this minor flaw, as it is only a matter 1-2 millimeters.
The appearance is still ok. There are of course a fair number of aftermarket
products for the Yak-7. As these were unavailable to me at the time of building,
I had to do without. With hindsight, I would have liked to use some nice photoetched
parts to add more detail.
photograph
but I am not really sure about this one. An oval hole in the engine cover could
be a shell chute. Only one in two aircraft had it. The fuselage stars are slightly
undersize. I ignored this minor flaw, as it is only a matter 1-2 millimeters.
The appearance is still ok. There are of course a fair number of aftermarket
products for the Yak-7. As these were unavailable to me at the time of building,
I had to do without. With hindsight, I would have liked to use some nice photoetched
parts to add more detail.
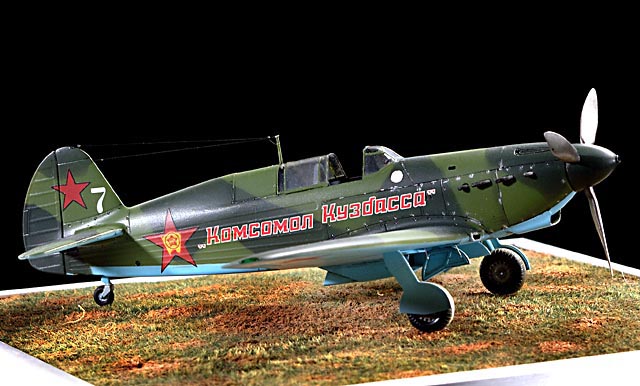
Conclusion
 ICM
has done a good job to represent this elegant member of the Yak family. If you
replace the transparencies, you can build an accurate model with much less effort
than is needed for their 48th scale Yak-9.
ICM
has done a good job to represent this elegant member of the Yak family. If you
replace the transparencies, you can build an accurate model with much less effort
than is needed for their 48th scale Yak-9.