Modeling the Eduard Yak-3 in 1:48 Scale
By Peter Vill
Modeling the Eduard Yak-3 in 1:48 ScaleBy Peter Vill |
|
Recently, Neil Robinson asked me if I would build the models of YAK fighters that are available in 1/48 scale, as my present trend is aircraft of the VVS I readily agreed.
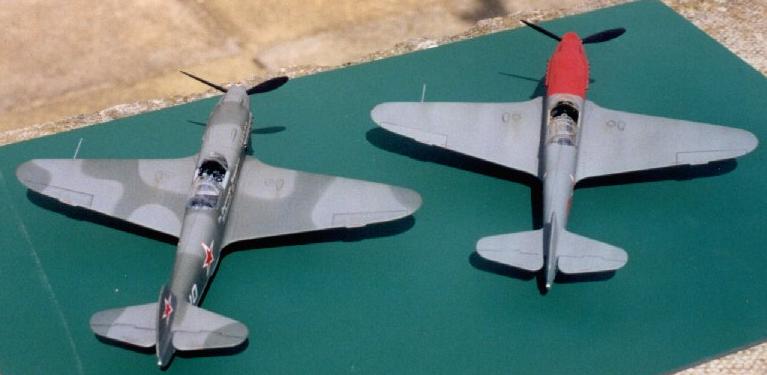
I had already built the Eduard YAK-3 so set about doing the ICM YAK-9T, but on one of my frequent visits to E. D. Models I happened to set my eyes on a resin cockpit detail set for the YAK-3 by Neomega. The resin set is beautiful and it took about 10 seconds for me to decide that I wanted to build a second -3 using this detail set, fortunately Neil agreed. The YAK-3 is to my eye the most attractive of the war time Yak fighters, gone is the chin mounted oil cooler ( this item being replaced by two smaller units mounted in the wings with a small intake close to each wing root) the only thing breaking its clean lines is a radiator mounted below the fuselage like the P-51 Mustang.
The Yak-3 was developed around the same time as its more numerous stable mate the YAK-9, and was a direct development of the YAK-1 series. The YAK-9 entered service at the very end of 1942 while the YAK-3 did not reach the front line units until early 44.
Yakovlev OKB developed the prototype YAK-1M with the aim of improving the aerodynamics of the -1 series airframe. It incorporated all of the lessons learnt and changes made in the previous YAK-1 and -7 series airframes. The wing span was shortened to 9.2 metres, the chin mounted oil cooler was replace by units fitted within the wing and the radiator was fitted beneath the cockpit. The result was a very clean looking aircraft and the test flights confirmed that Yak had produced a winner. The Soviet government was so impressed with the initial reports that it ordered the YAK-1M into production under the designation YAK-3.
In construction the YAK-3 was typical of many Soviet aircraft, but weight saving ideas incorporated in the YAK-9 had been used. Apart from the shorter span the wing made use of duralumin spars and was covered with resin impregnated plywood; this resulted in a saving of some 150-kg. The fuselage frame was of tubular construction the forward section of which was skinned with metal and armour plate while the rear was again covered with resin wood. A large number of components were the same as those used on the YAK-1 but with fine-tuning and a little alteration. This seems to be the maxim of YAK, take what works and basically leave it alone, it also meant that the production plants did not suffer any great disruption or learning curve as they already had experience of assembling a very similar airframe.
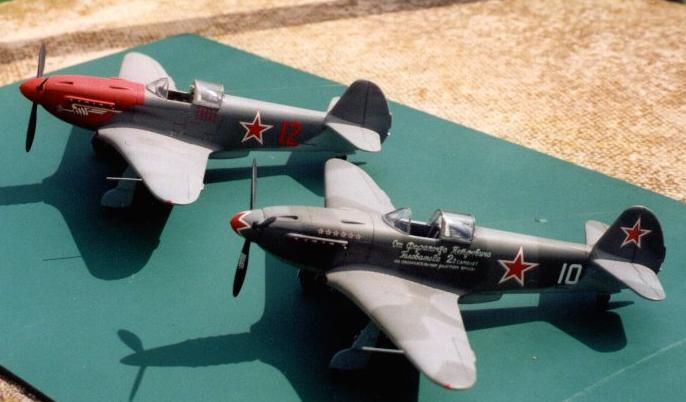
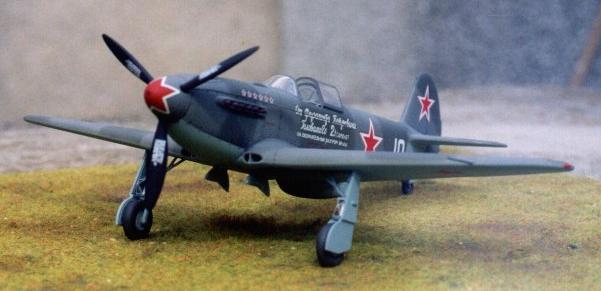
The engine used in the YAK-3 was the more powerful Klimov VK-105 variant, the 1260 hp VK-105PF-2, and this resulted in a top speed of around 398 mph at 14,500 ft. Armament consisted of 1 ShVAK 20mm cannon firing through the propeller spinner and 2 UBS 12.7mm machine guns mounted on top of the engine. So good was the YAK-3 at the normal Eastern Front combat altitude I am informed that Luftwaffe pilots were told that if they did not get it with the first pass then they should not try to dog fight, just get away ( In fact the OKL issued a decree on 10 th June 1944 requiring all Luftwaffe fighters to avoid combat below 5,000m with any YAK fighter lacking an oil cooler under the nose). A large number of VVS pilots became aces while flying the YAK-3. One of the most famous units to fly the -3 has to be the French volunteers who made up the Normandie-Niemen unit, one such aircraft is included in the kit decal options. At the end of the war these French pilots were given their YAK-3`s and allowed to fly them home to France, were on arrival they beat up the streets of Paris before Landing. The French Air Force continued to use these 40 or so YAK-3`s in training schools until 1956 reportedly without accident. One YAK-3 is preserved in the Museum at Le Bourget. During the war some were in the region of 4848 YAK-3`s were built with around 700 of these being delivered after the wars end.
The Eduard Kit
The Eduard kit of the YAK-3 in 1/48 scale is available in two forms, the cheaper basic kit or the slightly more expensive Profipack, both offer excellent value for your money. The difference is that the Profipack version has etched and resin parts as well as a canopy mask added, there are also different decals. The plastic parts are the same irrespective of which version you purchase. The level of detail moulded into the plastic is superb and the fit is about the best you could wish for. Both models I have built were the Profipack versions and to be honest due to the detail moulded into the plastic I did not use a lot of the photo etched on the first one. Due to the fact that I used the resin cockpit set by Neomega, most if not all of the extras you get in this version found their way into my spares box. Well what do you get for your cash, 54 parts in light grey plastic, 6 clear, 2 resin wheels with weighted tyres, a mass of photo etched, 1 Canopy mask set, the usual Eduard photo negative instrument panel and finally 4 decal options.
The Neomega Resin Set
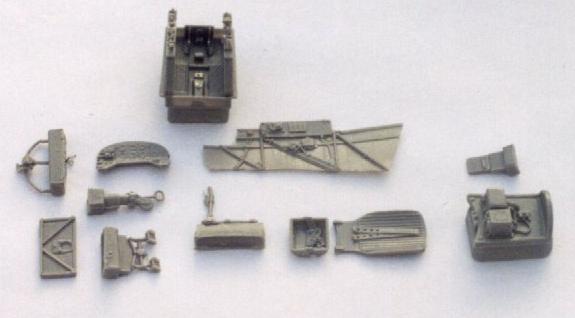
This is the first time that I have purchased a resin detail set by this Russian
company and if this is the normal level of detail I can only hope that the range
is expanded, it is a pleasure to behold. All parts are detailed to the highest
standard and almost free of any flash, you get a complete cockpit, side walls,
seat, gun sight on mount, rudder pedals, control column, bulk head the lot.
The fit is without doubt first class and although the basic kit leaves little
to be desired this set adds that little special bit ( see photo). My only complaint
is that there are no instructions or painting guide included with the parts.
Assembly
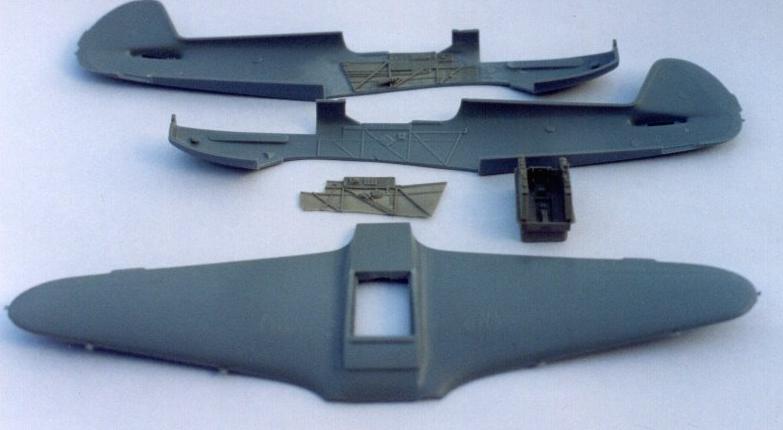
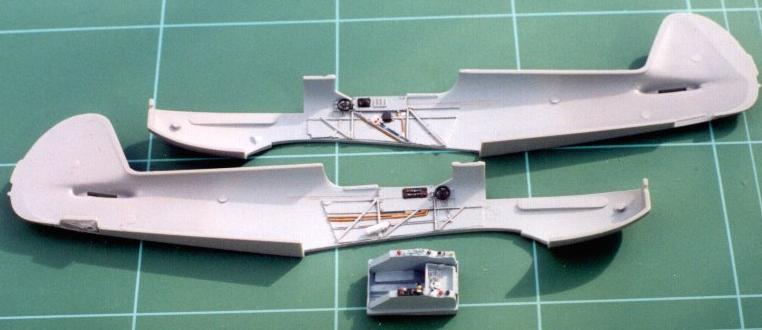
The use of the detail set requires a little surgery, no you dont have to be a brain surgeon it is quite simple. The two fuselage halfs must have the moulded detail removed from the cockpit area before the resin side walls can be fixed into place. I did this by using a modelling drill with a dental tool, do not ask me the name but it looks like a ball with teeth machined into it, be careful as you only want to remove the raised detail ( do not remove the bar moulded onto the interior above the radio equipment). I then flattened the surface down with course wet and dry. The side walls are easy to position as they have a raised section that fits at one end against the lower edge of the fixed forward canopy the other lining up with the small step were the rear fixed canopy goes. Both side walls were fixed into place by running super glue along the edges using a scalpel blade dipped into the adhesive.
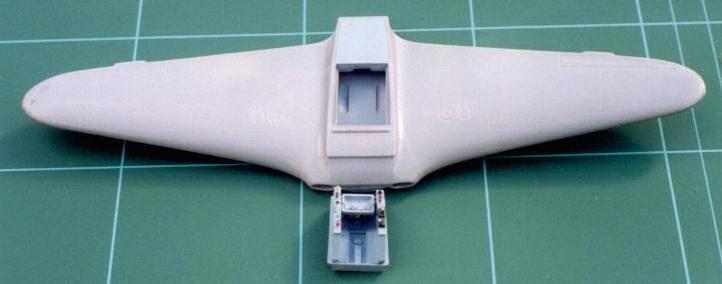
The new resin cockpit bath tub requires you to cut a section out of the kit
cockpit floor which is moulded with the upper wing ,part number 35. To locate
the new resin cockpit you will have to leave a lip, see drawing No 1 & 2
for details on where to cut and what to remove. This is a simple operation which
can be done with a new scalpel blade, but as with most cutting operations be
careful not to slip ( deep cuts in the model are hard to remove, your fingers
if not amputated will heal in time)
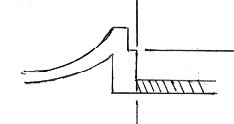
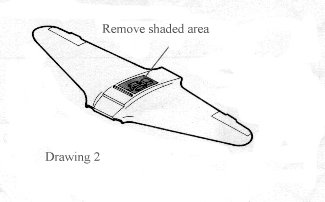
Drawing 1
The rest of the resin set was cleaned up as required and washed along with all the kit parts before being primed with Halfords Grey primer .
You will have to entertain me for a while as I will now prattle on about VVS colours, but believe me I am only trying to be helpful. These primers had different functions, one was for wood ( later used as an exterior colour, again refer to the VVS web site) and the other for metal basically, it does get a little more complicated than this and I would strongly recommend that you visit this site and read up on this subject. The interior colour of any Soviet aircraft depended to a great extent on which factory built it and who was carrying out the sub assembly work. Some factories primed the component with the correct paint for the material used, some used one primer irrespective of material, others used no primer and left the material bare (A number of MIG-3`s are reported with cockpits of bare metal). To further complicate the matter some component manufactures would paint their assemblies in what ever paint they had to hand, a lot of the sub-assembly work being carried out by rolling stock or tractor factories, hence the use of Tractor Green, as some production plants would not repaint these assemblies.
Any way having conversed with Erik I decided to have a go at mixing up "Metal Use Primer" and then paint the interior with this colour. The VVS site states that MUP was a Blue/ Grey/Green colour and some batches were more of a blue shade than others. With this in mind I mixed Aero Master French Light Blue with Miniature Paints Blue Grey (50/50) and finally added a little Light Green, I am not saying that this mix is 100% accurate but I think it is nearer than RLM 02. Now I know that the interior of a YAK is a mixture of wood and metal and there will be those among you who are at this moment asking why did I only mix up MUP, well this aircraft is from one of the production plants that used one primer ( Show me a photograph that proves I am wrong, Erik and Matt excluded).
The interior was dry brushed and a black wash applied by brush to the areas that would be in shadow, the detail painting was then done using a number of references, most of which are probably copyrighted so I can not show them here.
The instrument panel which had been pre painted and the instrument lens represented
with gloss varnish ( Johnsons Klear) was then fixed into place using the engine
cowling aperture as access .
Now one of the only areas with a slight fit problem on both the kits I have built is with the engine top cowling, it is slightly too long. This cowling (kit part number 28) has rivet detail on its forward end so to correct the length remove the excess from the rear ward end ( nearest to the cockpit) by careful sanding. The machine gun apertures in the engine cowling are now drilled out , as is the point in the tail fin for the later to be added aerial wire. On both of the kits I have built the fuselage curved in around the area that the cowling was to be fitted, to over come this I drilled a hole in the exhaust location slot on one side, the cowling was then fixed with adhesive on the opposite side to the drilling and allowed to set overnight. The other side is then glued and a cocktail stick is pushed through the hole to hold the fuselage out in the correct position while setting.. At this stage I also added a plastic card a divider into each wing root air intake, you want to split the intake so that about two thirds are outboard of the divider. The tail planes are then added, I have had to use a small amount of filler (super glue) in this area on both of the kits I have built. The under belly radiator unit is now fitted having pre-painted the grills and interior of the unit.
The job of cleaning up the joint lines was then carried out using various grades of wet & dry paper and flexi files by Aero Club, finally being polished with a piece of denim. At this stage I spend a lot of time checking the joints from all angles to ensure there are no pin holes or such, any pin hole can be quickly filled using Tipex which is again polished when dry.
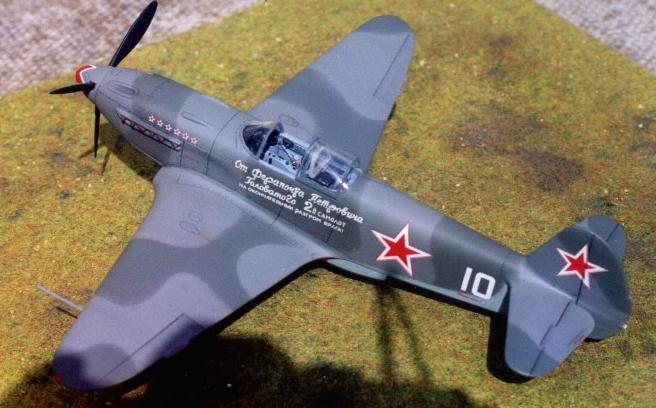
The resin seat back can now be fixed into place, before the bullet proof glass is fitted behind the seat check that the canopy will fit flush, I have had to reduce the size of this item (Part No 34) on both kits. Before fixing the rear section of the canopy into place I drilled a 0.3 mm hole into the aerial lead box that is cast on the resin radio shelf, into this I super glued a length of fishing line. The rear canopy is then taped into place and the position of the aerial lead is drilled. The fishing line is then threaded through this hole and the rear canopy fixed into place, I leave just a little poking out of the hole held in place with some tape ( I also tie a large knot in it to stop it slipping back into the radio compartment). The gun sight and mounting which had already been painted is now fitted and the forward section of the canopy fixed into place, very carefully rub down the joints having filled if required.
The kit supplies Express Masks for the canopy, these fit perfectly and when totally masked the whole model was primed with Halfords Grey. Having given the model one last check over and carried out the correction of any faults that the primer has exposed, it is time to paint.
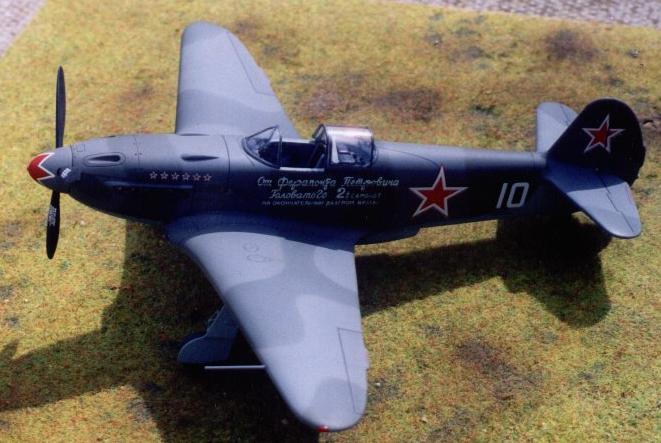
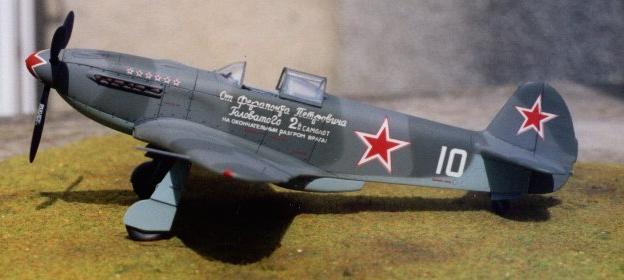
The underside was sprayed first using Aero Master 1194 Russian Light Blue. The technique I use for weathering is as follows, having covered the area to be painted in a solid base colour I mix in a little white to lighten it, this colour is then used on areas such as fabric covered elevators to lighten them and give contrast and life to a other wise dull single colour. Having done this, I mix in a little grey to darken the colour and with this I spray selected panels ( on soviet aircraft which are mostly of wooden construction I select those panels which would have been metal) again to bring life to the single colour, I then mix up a black glaze ( more thinner than paint) and spray the odd streak here and there remembering to follow the direction of air flow on the real aircraft. Post-it notes are then stuck along the forward edges of panel lines and the same black glaze is sprayed along the note, (The thinnest spray line you can get is required) the idea being to get 50% of the spray onto the note and the other 50% onto the model The final thing to do is to mix a glaze of the original colour and to lightly spray this over the whole area to blend the lot in.
Having masked where required the upper surface was given a coat of Aero Master Russian Dark Grey 1191, the same weathering technique being applied. The areas that I wanted to now spray with the Aero Master Russian Dark Grey 1195 were outlined with rolled out Blue Tack, the paint being sprayed at 90 degrees to the Blue Tack, this will result in a very fine soft edge. This was again weather and when dry the whole aircraft was gloss varnished using Halfords Clear Lacquer.
At this stage I applied very thinned black or dark grey paint to any panel line that I wish to stand out a bit bolder and to areas such as rudder hinge lines. The big advantage is, that if spills out of the panel line you can let it dry and then polish the over spill out. Having allowed 24 hours drying time the model was washed and again allowed to dry before spraying with Aero Master Matt varnish.
I would recommend this kit to any one, the resin cockpit set is not a must have as the kit item is very well detailed but it does add that little bit extra. The fit of the kit parts second to none and the decals apart from the problem with them pulling down are excellent, generally for value this model will take some beating.