It'll Be All White...
Building the Accurate Miniatures Yak-1 in 1:48 Scale
by Peter Vill
It'll Be All White...Building the Accurate Miniatures Yak-1 in 1:48 Scaleby Peter Vill |
|
For me, the great things about our hobby are:
The fact that none of us are ever satisfied with our latest creation no matter
what others think of it .
The way in which most of us are prepared to help and advise others no matter
where in the world they live.
The inspiration that comes when you see an excellent example of our art form.
I have always liked winter schemes, but to be honest I have shied away from them in the belief that they were just too difficult. Enter one Aleksandar Sekularac and his beautifully done MiG-3. Aleksandar was kind enough to share with us all the methods he used to create that piece of art; if you have not seen it, look it up on the VVS web site it is a must see.
The methods Aleksandar employed were used when I painted my own MiG-3. Such were the kind comments I received about that model that I decided to attempt another aircraft in white.
 It
was during one of my many discussions with Erik that I raised the idea of completing
the Accurate Miniatures Yak-1 in a winter scheme and he was asked if he could
supply any details of aircraft so painted. Erik did his usual trick on pulling
a number of schemes out of his hat along with photographs to back them up. Most
of them it must be said were heavily worn; in fact some looked like accident
victims. Although I was accused of being awkward he eventually declared
that he had found the aircraft I was looking for-- Blue 9. When Erik started
to discuss the aircraft concerned, I informed him that this was in fact the
subject of the kit decals (Erik must be forgiven as he models not in 1/48).
Having examined the painting instructions, Erik convinced me that they were
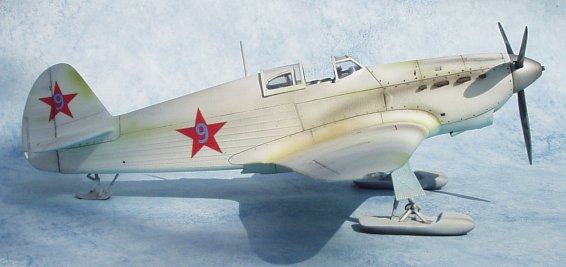
incorrect. It appears that Blue 9 was photographed just after having had the
white applied, and that the ground crew concerned got a little carried away
with their task. The photograph indicates that the application of the white
winter camouflage was not restricted to the upper surface alone, in fact it
appears to show that the white over spray was carried underneath onto the lower
surfaces, albeit in a haphazard method of application that resulted a very patchy
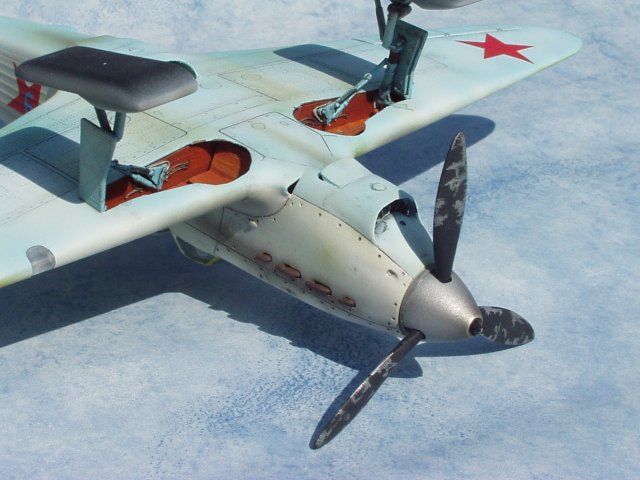
and varied change in colouration. One final point is that the photograph shows
that the propeller spinner was apparently left in unpolished natural metal and
not white as indicated in the kit instructions.
It
was during one of my many discussions with Erik that I raised the idea of completing
the Accurate Miniatures Yak-1 in a winter scheme and he was asked if he could
supply any details of aircraft so painted. Erik did his usual trick on pulling
a number of schemes out of his hat along with photographs to back them up. Most
of them it must be said were heavily worn; in fact some looked like accident
victims. Although I was accused of being awkward he eventually declared
that he had found the aircraft I was looking for-- Blue 9. When Erik started
to discuss the aircraft concerned, I informed him that this was in fact the
subject of the kit decals (Erik must be forgiven as he models not in 1/48).
Having examined the painting instructions, Erik convinced me that they were
incorrect. It appears that Blue 9 was photographed just after having had the
white applied, and that the ground crew concerned got a little carried away
with their task. The photograph indicates that the application of the white
winter camouflage was not restricted to the upper surface alone, in fact it
appears to show that the white over spray was carried underneath onto the lower
surfaces, albeit in a haphazard method of application that resulted a very patchy
and varied change in colouration. One final point is that the photograph shows
that the propeller spinner was apparently left in unpolished natural metal and
not white as indicated in the kit instructions.
 At
the same time, along with the research into the external finish of the aircraft,
I decided to finish the interior in an un-painted form: natural metal skinning
over a MUP fuselage frame, and un-painted wood where applicable (namely the
fuselage decking, radio shelf, as well as the undercarriage gear bays).
At
the same time, along with the research into the external finish of the aircraft,
I decided to finish the interior in an un-painted form: natural metal skinning
over a MUP fuselage frame, and un-painted wood where applicable (namely the
fuselage decking, radio shelf, as well as the undercarriage gear bays).
The Kit
 The
kit used for this project was the Accurate Miniatures Yak-1 (on Skis). Now at
this point I had better come clean-- I don't really like Accurate Miniatures
models. I love the finished article, whether it is a YAK or an IL-2, but I just
do not enjoy making them, and I can't tell you why. Sure they are expensive;
sure they have some build / fit problems; but, so do other manufacturer's products
(maybe Im just mean and lazy)....
The
kit used for this project was the Accurate Miniatures Yak-1 (on Skis). Now at
this point I had better come clean-- I don't really like Accurate Miniatures
models. I love the finished article, whether it is a YAK or an IL-2, but I just
do not enjoy making them, and I can't tell you why. Sure they are expensive;
sure they have some build / fit problems; but, so do other manufacturer's products
(maybe Im just mean and lazy)....
One other thing that annoys me about this kit--and this time I can put my finger straight on the reason--is the fact that part C49 (Wing root Carburetor intake) is usually missing from the kit if anyone has opened the box and looked at the contents at any time. I can tell you exactly what happens: Part C49 is held to the sprue by a very thin injection gate and during transport around the world C49 becomes detached. Not a problem you think, as all the parts are sealed within a clear plastic bag. WRONG, SUCKER! I have purchased 4 of these models and every time the bag containing the sprue on which C49 should be attached has not been heat sealed correctly; on 3 of the kits C49 was missing (noticed when I became aware of the problem). Now, it could have been me that did not notice C49 drop onto the floor, or it could have been anyone who opened the box and looked at the kit. I even warned Andy at E. D. Models who opened the last remaining kit in stock to find C49 detached and the bag not sealed. BE WARNED.
To be fair to the model it builds up as per the instructions, but there are
a number of areas that I had minor problems with. As I recall these were:
Fit of C49 to wing/ wing root
Fit of wing to wing fillet
Fit of cockpit tub into fuselage
Fit of D4 & C50 Aileron onto wing
Fit of D57 & 10 undercarriage doors to landing leg
And, finally, that good old favourite of mine--with every A/M kit I have made,
the fit of the spinner to fuselage if trying to use the peg D6.
Before any one out there starts a hate mail campaign against me I am prepared to accept that it might be me. Maybe Im expecting too much from this much praised manufacturer? Maybe Im the type of modeler who likes working with ICM kits and does not say nasty things about this Ukrainian company (yes, I have read the odd immature comment)? I will say in my defense that I get on very well with both Tamiya and Eduard kits.
Cockpit Finish
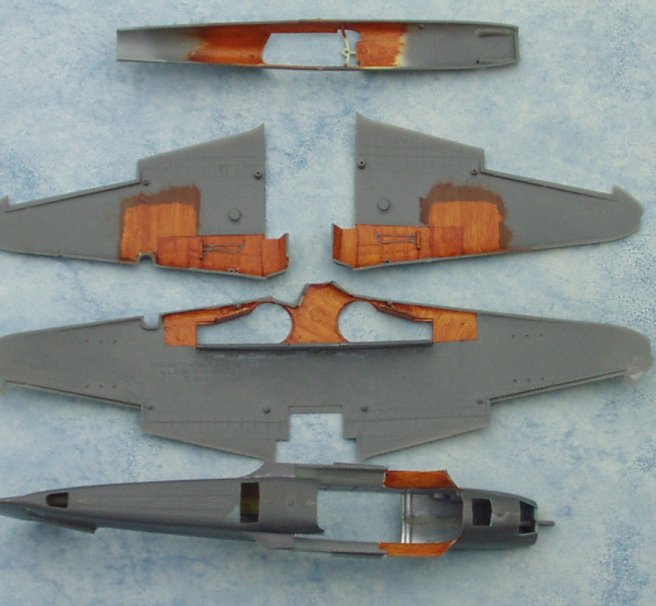 |
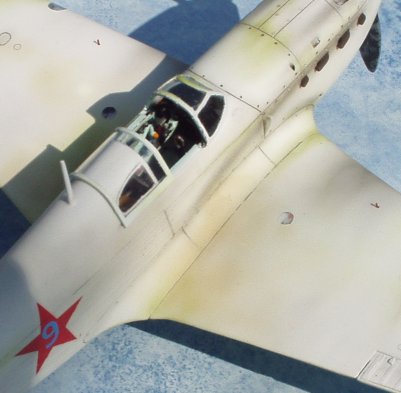
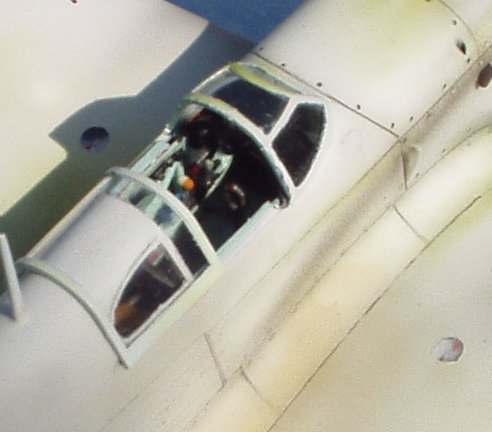
The model's interior was painted as I was building it; this, I believe, is how most of us do it. The fuselage interiors were painted either natural metal or wood. The areas that would be finished in wood were primed in Polly Scale Doped Linen. Over this I brushed Burnt Sienna oil paint. The oil paint was gradually removed with a soft brush until the colour/shade required was achieved. Then, the final act is to either use your finger or a stiff brush to apply the simulation of wood grain. Try it--with practice you will be amazed how good an effect you can get, and it looks great on wooden propellers (also). The areas finished in this 'wood effect' were the fuselage spine, radio shelf and wheel wells. The cockpit bathtub was painted in MUP with details picked out in various colours. The accompanying photographs should illustrate the points discussed and provide a clear explanation if my literary ramblings have confused the reader. | 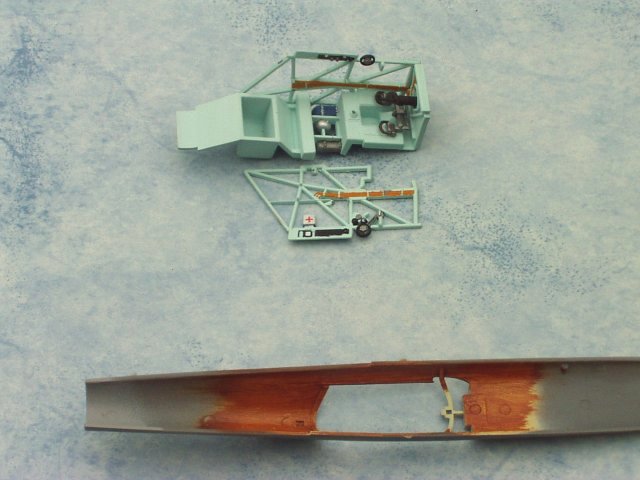 |
External Painting
![]() When
assembled to a point ready for painting the model, any sub assemblies were given
a coat of Halfords Grey plastic primer. This time I had decided to try a different
approach to painting winter cammo. Firstly, the underside was painted AII Blue.
Then, instead of painting the top side Black & Green" and over-painting
this with white, I applied the white first and then weathered this with the
Black / Green to try and get the effect of a moderately worn aircraft.
When
assembled to a point ready for painting the model, any sub assemblies were given
a coat of Halfords Grey plastic primer. This time I had decided to try a different
approach to painting winter cammo. Firstly, the underside was painted AII Blue.
Then, instead of painting the top side Black & Green" and over-painting
this with white, I applied the white first and then weathered this with the
Black / Green to try and get the effect of a moderately worn aircraft.
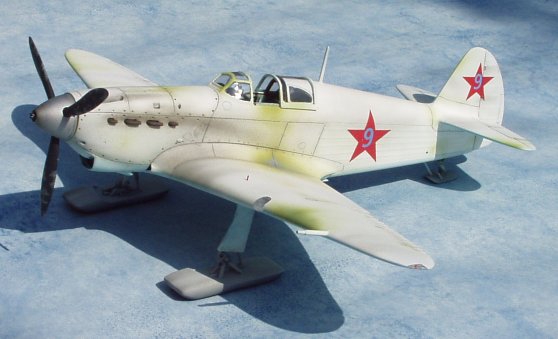
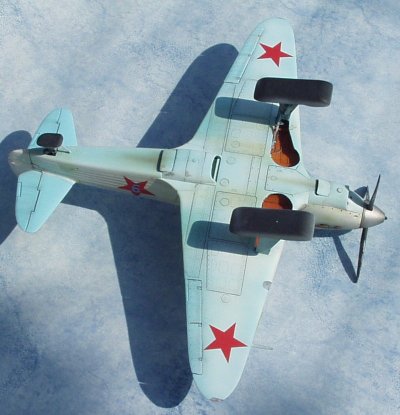 Having
applied the under surface blue, I masked off the underside and applied the white
top surface colour. I removed much of the masking, leaving the tail plane masking
in place, as this was the one area that the photo indicated avoided the attention
of the man with the white paint. Having removed the masking, I over sprayed
the under surface and demarcation line between upper and lower surface colours
with white. The under wing centre line received a heavier covering than the
leading and trailing edges. When happy with the effect, the whole model was
Post-it Note shaded [Ed Note: this is a method
whereby a Post-It Note is stuck in place to act as a mask for shading and other
line work] using very thinned down black, more like a dirty thinner than
thinned paint.
Having
applied the under surface blue, I masked off the underside and applied the white
top surface colour. I removed much of the masking, leaving the tail plane masking
in place, as this was the one area that the photo indicated avoided the attention
of the man with the white paint. Having removed the masking, I over sprayed
the under surface and demarcation line between upper and lower surface colours
with white. The under wing centre line received a heavier covering than the
leading and trailing edges. When happy with the effect, the whole model was
Post-it Note shaded [Ed Note: this is a method
whereby a Post-It Note is stuck in place to act as a mask for shading and other
line work] using very thinned down black, more like a dirty thinner than
thinned paint.
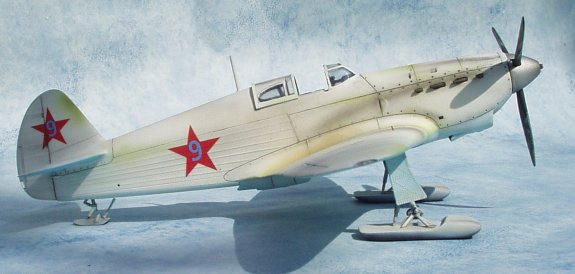
 The
model now looked something like the photo, but was to my eye too clean. So,
a decision to weather the model was taken. The real aircraft would have been
painted Black / Green before the white was applied, so a very thin mix of
both colours was prepared. These were then applied in certain areas (be sure
to refer to an actual camo pattern-- these can be found on the VVS web site,
and in the near future in E. Pilawskii`s new book) in such a manner to suggest
their presence under the white; some areas that would have worn more having
a heavier coat of either
The
model now looked something like the photo, but was to my eye too clean. So,
a decision to weather the model was taken. The real aircraft would have been
painted Black / Green before the white was applied, so a very thin mix of
both colours was prepared. These were then applied in certain areas (be sure
to refer to an actual camo pattern-- these can be found on the VVS web site,
and in the near future in E. Pilawskii`s new book) in such a manner to suggest
their presence under the white; some areas that would have worn more having
a heavier coat of either 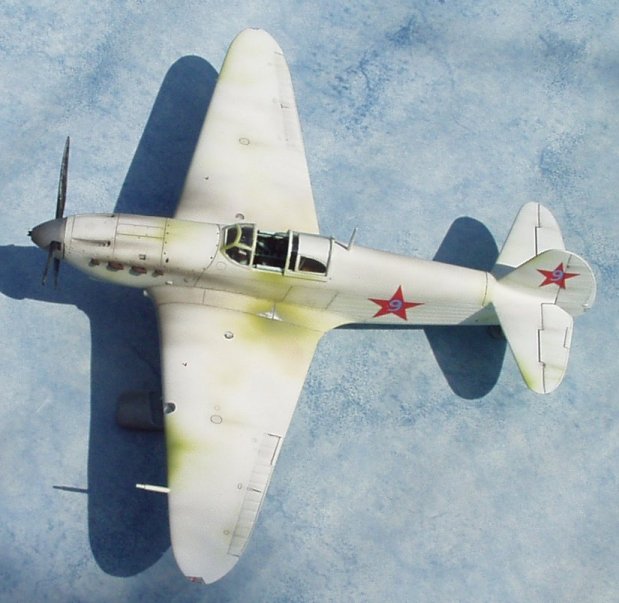 black
or green (wing leading edge, wing root). The complete model was then over
coated with Klear and allowed to dry before the application of the kit decals.
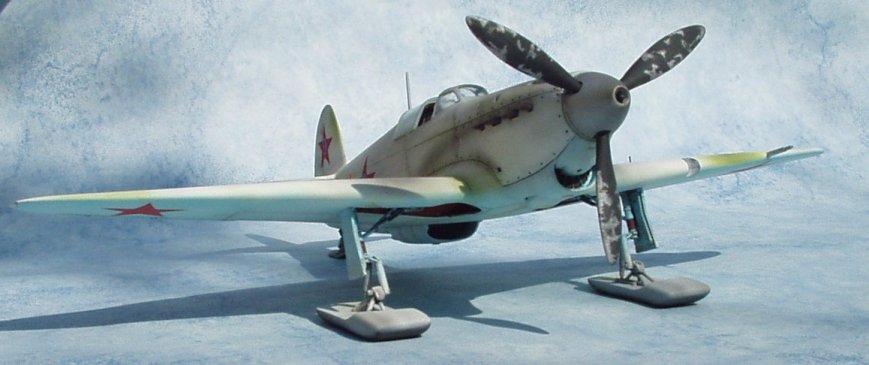
Having applied the decals, and while still in gloss, any panel lines that required
high-lighting had thinned black paint run into them. When dry the model was
washed and allowed to dry again before a matt coat was applied. At this stage,
an artist's silver pencil was used to indicate any areas that I wished to represent
worn-through or chipped paint. If at this time you consider any areas over-stated,
you can blend them in and reduce the contrast by simply over spraying a very
thin mix of white. The underside was weathered with various colours to represent
air flow from oil and coolant radiators, mud thrown up or coming off the skis,
blow back from the various inspection panels and grease stains from the control
surface hinges. Final weathering touches such as exhaust stains and gun muzzle
blast were applied with the aid of ground up artist pastels.
black
or green (wing leading edge, wing root). The complete model was then over
coated with Klear and allowed to dry before the application of the kit decals.
Having applied the decals, and while still in gloss, any panel lines that required
high-lighting had thinned black paint run into them. When dry the model was
washed and allowed to dry again before a matt coat was applied. At this stage,
an artist's silver pencil was used to indicate any areas that I wished to represent
worn-through or chipped paint. If at this time you consider any areas over-stated,
you can blend them in and reduce the contrast by simply over spraying a very
thin mix of white. The underside was weathered with various colours to represent
air flow from oil and coolant radiators, mud thrown up or coming off the skis,
blow back from the various inspection panels and grease stains from the control
surface hinges. Final weathering touches such as exhaust stains and gun muzzle
blast were applied with the aid of ground up artist pastels.
Last Bits
Final assembly was now carried out, and when complete the whole model was again matt coated. The last act was to fix the sliding canopy section, and the landing gear indicator rods into the wings.
During the latter stages of painting I was not totally happy with the model. Now that it is finished I am content with it, but still think I could have done better. Those who have seen it in the flesh have all passed very favourable comments for which I am grateful. I intend to do more aircraft in worn winter schemes, and who knows--maybe I will produce that ONE that all modelers dream of, the ONE WE ARE HAPPY WITH.
 |
 |
 |
My thanks to:
Aleksandar Sekularac
Erik Pilawskii
Bob Partridge
E. D. Models