The Flying Club Fighter
Making Neomega`s 1/48 YAK-UT 1
By Peter Vill

The Flying Club FighterMaking Neomega`s 1/48 YAK-UT 1By Peter Vill |
|
Having been pushed back to within sight of Moscow and with a large percentage of their reported air force strength destroyed (albeit a large number of obsolete types caught on the ground in the first few weeks) the Soviet armed forces had to stop the invader with every means available, so was born the aero-club attack fighter, the YAK-UT1.
The YAK- UT1 single seat and -UT2 twin seat aircraft had been designed during the 1930s as a trainer come light sports aircraft, just prior to the opening of hostilities an attack version of the UT2 had been built and tested by the VVS, but at that time there was no need for such an aircraft.
At the start of the war with Nazi Germany some of these pretty little aircraft were transferred to act in the liaison role, but due to the predicament that the Soviets found themselves in it soon became necessary to consider them for ground attack missions, a case of when the Devil drives I suppose.
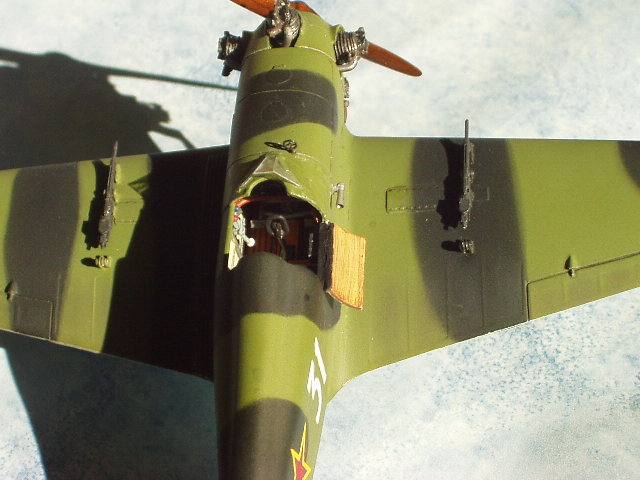
The conversion from trainer to ground attack consisted of fixing 2 hard points under each of the wings to allow for 4 RS-82 rockets to be carried and the bolting on of 2 7.62mm ShKAS machine guns, one mounted on top of each wing out side of the propeller arch, to compensate for this increase in weight the under carriage spats were removed. This resulted in what must be the smallest ground attack aircraft of the whole conflict.
It appears that several regiments used the YAK-UT1 to terrorise the invader during the hours of darkness, the Germans and their allies soon nick named them "Russian Mosquitoes". These little aircraft and their almost suicidal pilots would roam around the skies at night dropping down upon any one foolish enough to show their position. Nothing was safe from their attention and subsequent bite, airfields, troop concentrations, convoys, fuel dumps, artillery units and individual soldiers.
 One
regiment the 46th was instrumental in saving the naval units cut off on the
Tamansky peninsula on the Black Sea coast. During the last days of August 1941
the Germans had cut through to the Black Sea coast on the left flank of the
North Caucasian front trapping some naval units. The terrain made it impossible
for conventional bombers to attack the German troop and armour columns moving
up at night to finish the encirclement. The 46th was given the job of flying
down the narrow gorges and valleys with the sole purpose of stopping the German
columns. Around the clock for three whole days these little aircraft attacked
and lingered above the columns to direct artillery fire, at the end the danger
the Naval units had been was removed.
One
regiment the 46th was instrumental in saving the naval units cut off on the
Tamansky peninsula on the Black Sea coast. During the last days of August 1941
the Germans had cut through to the Black Sea coast on the left flank of the
North Caucasian front trapping some naval units. The terrain made it impossible
for conventional bombers to attack the German troop and armour columns moving
up at night to finish the encirclement. The 46th was given the job of flying
down the narrow gorges and valleys with the sole purpose of stopping the German
columns. Around the clock for three whole days these little aircraft attacked
and lingered above the columns to direct artillery fire, at the end the danger
the Naval units had been was removed.
The tactics used by the units so equipped ranged from bombing roads known to be used by convoys to baiting a trap, this latter tactic involved some poor pilot flying around over known enemy positions until they opened fire at the sound of his engine, having given their positions away the rest of the flight would drop down firing rockets, machine guns and even tossing out hand grenades.
With the large-scale introduction of the IL-2 Shturmovik in early 1942 the YAK-UT1`s combat career came to an end.
 Small
it is, but cheap it is not. I had originally purchased the civil version at
something like £35.00, but Hector Mirasol having purchased the fighter
version talked me into swapping (I believe he paid a lot less, I have now been
informed that Hector paid £20.00). I must say that it is worth every penny
and is the finest example of the resin caster art I have seen to date. Well
what do you get, 49 pieces of the best resin casting this side of the Urals,
1 clear sheet of thin plastic card, 2 rubber tyres, photo negative instrument
gauges, a decal sheet and no instructions, this last point is not too much of
a worry as the location of most of the parts is easy to work out.
Small
it is, but cheap it is not. I had originally purchased the civil version at
something like £35.00, but Hector Mirasol having purchased the fighter
version talked me into swapping (I believe he paid a lot less, I have now been
informed that Hector paid £20.00). I must say that it is worth every penny
and is the finest example of the resin caster art I have seen to date. Well
what do you get, 49 pieces of the best resin casting this side of the Urals,
1 clear sheet of thin plastic card, 2 rubber tyres, photo negative instrument
gauges, a decal sheet and no instructions, this last point is not too much of
a worry as the location of most of the parts is easy to work out.
I must say that when I opened the box containing the parts most of which are resin I was a little concerned (this is the first resin kit I have built), the castings are so delicate that I honestly believed that I would never be able to separate them from the casting blocks without breaking them. My worries were ill founded, not only are Neomega`s castings extremely fine but so are the block to part joints, run a new scalpel blade carefully along them and they come off as good as gold. The parts once removed were carefully washed and the very slight amount of cleaning up required carried out. Now all is ready for assembly, or should I say snapping together.
 The
interior gave me a little concern until Erik Pilawskii of the "Modelling
the VVS" web site came to my aid. Erik was kind enough to supply some ideas
on the interior finish as well as the location of the various parts, it appears
that you have 2 choices for painting the interior, plain old grey (I understand
the actual VVS term is "A14 Steel") or unpainted material. I choose
the latter, the floor and cockpit doors are wood, seat aluminium/steel, frame
work steel, bleached linen sides, throttle quadrant and control column in MUP
(Metal Use Primer).
The
interior gave me a little concern until Erik Pilawskii of the "Modelling
the VVS" web site came to my aid. Erik was kind enough to supply some ideas
on the interior finish as well as the location of the various parts, it appears
that you have 2 choices for painting the interior, plain old grey (I understand
the actual VVS term is "A14 Steel") or unpainted material. I choose
the latter, the floor and cockpit doors are wood, seat aluminium/steel, frame
work steel, bleached linen sides, throttle quadrant and control column in MUP
(Metal Use Primer).
 The
wood effect on the cockpit doors was achieved by painting the surface with Polly
Scale doped linen, when this was dry oil paint was brushed over it and then
dragged off to achieve the grain effect using my fingers, the cockpit floor
being finished in a similar manner but using a dry paint brush instead of my
finger. The remaining details being painted in the normal manner, sprayed with
small detail pick out with the paintbrush. When all was completely dry the entire
cockpit assembly was gloss varnished prior to applying a thin wash, this was
done to bring out the detail. When totally dry the cockpit and floor area was
sprayed with a matt coat.
The
wood effect on the cockpit doors was achieved by painting the surface with Polly
Scale doped linen, when this was dry oil paint was brushed over it and then
dragged off to achieve the grain effect using my fingers, the cockpit floor
being finished in a similar manner but using a dry paint brush instead of my
finger. The remaining details being painted in the normal manner, sprayed with
small detail pick out with the paintbrush. When all was completely dry the entire
cockpit assembly was gloss varnished prior to applying a thin wash, this was
done to bring out the detail. When totally dry the cockpit and floor area was
sprayed with a matt coat.
 The
throttle quadrant was fitted to the port side (left) of the fuselage just in
front of the cockpit door opening, while the other box (rocket firing device??)
was fitted to the starboard side of the cockpit wall below the door opening.
The rear of the photonegative instruments having been painted white was attached
to the pre-painted (Black) instrument panel. Having assembled the seat and rudder
pedals etcetera onto the floor/wing assemble the wing was fitted into place
(good old super glue was run into the very fine join line with the aid of a
scalpel blade), so good is the fit of the castings that NO FILLER was required.
The fitting of the horizontal tail surfaces require you to drill out two locating
holes on each side of the fuselage, be careful as the tail planes are sided
due to the position of both holes and pins, oh yes remember when fitting the
tail planes that resin is brittle. At this stage it might be an idea if you
pre-drill the hole in the vertical tail fin to take the wire that runs from
it to the horizontal tail plane, this will be fitted later and will be represented
with fishing line.
The
throttle quadrant was fitted to the port side (left) of the fuselage just in
front of the cockpit door opening, while the other box (rocket firing device??)
was fitted to the starboard side of the cockpit wall below the door opening.
The rear of the photonegative instruments having been painted white was attached
to the pre-painted (Black) instrument panel. Having assembled the seat and rudder
pedals etcetera onto the floor/wing assemble the wing was fitted into place
(good old super glue was run into the very fine join line with the aid of a
scalpel blade), so good is the fit of the castings that NO FILLER was required.
The fitting of the horizontal tail surfaces require you to drill out two locating
holes on each side of the fuselage, be careful as the tail planes are sided
due to the position of both holes and pins, oh yes remember when fitting the
tail planes that resin is brittle. At this stage it might be an idea if you
pre-drill the hole in the vertical tail fin to take the wire that runs from
it to the horizontal tail plane, this will be fitted later and will be represented
with fishing line.
 The
fuselage/ wing assembly was now ready for painting as I intended to attaché
the tail plane supports later, this was done to aid masking. If you keep the
pug that you have to cut out to open up the cockpit this can be used as a ready
made mask, just position some strips of masking tape along the inside and push
it gently back into place. The engine cowling was painted as a separate item
and fitted later after the cylinders were fitted and weathered, this also allows
you to drill 2 holes into the rebate and place some suitable sized wire in to
act as a hand hold when painting.
The
fuselage/ wing assembly was now ready for painting as I intended to attaché
the tail plane supports later, this was done to aid masking. If you keep the
pug that you have to cut out to open up the cockpit this can be used as a ready
made mask, just position some strips of masking tape along the inside and push
it gently back into place. The engine cowling was painted as a separate item
and fitted later after the cylinders were fitted and weathered, this also allows
you to drill 2 holes into the rebate and place some suitable sized wire in to
act as a hand hold when painting.
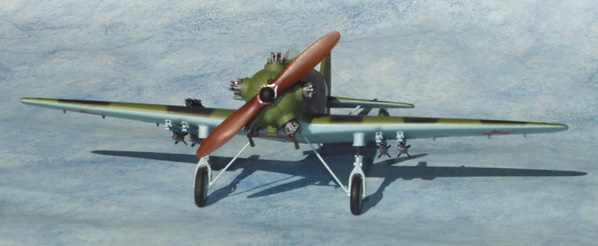
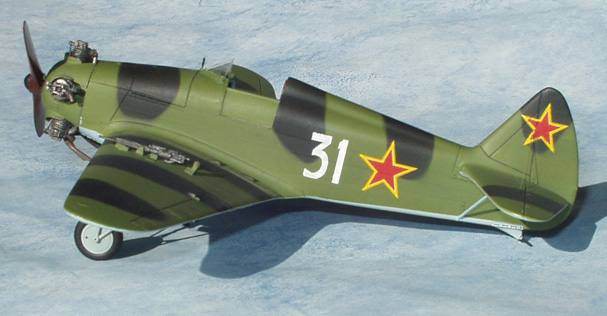
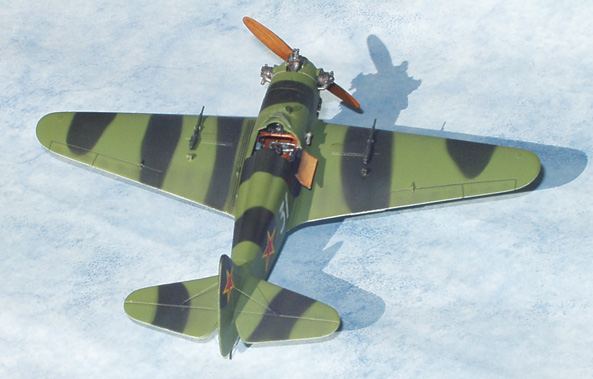
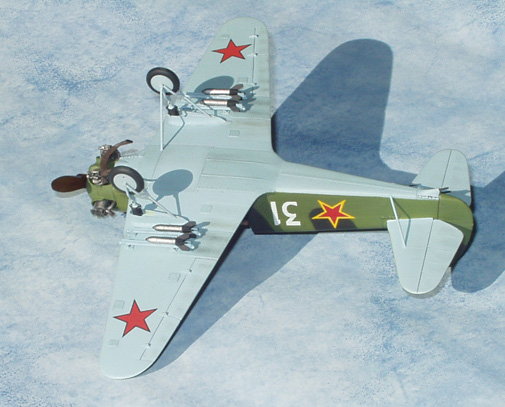
The YAK-UT1`s were painted AII Blue underneath, the top surface being painted
in AII Green and AII Black, for more information on colours used by the VVS
please visit the "Modelling The VVS" web site. The Aircraft I had
chosen to represent was "White 31", the scheme being supplied by Erik
Pilawskii who also informed me that it was used by11 SAD in the 202 ORAP during
the defence of Moscow in early 1942. The model was prepared for painting  with
"Halfords" grey primer, checked for faults and when all was done the
under surface was painted with a weathered version of AII Blue (Polly Scale
do a relatively accurate paint in their acrylic range - USSR Underside Blue).
When this was dry I weathered the underside with my normal technique, dark and
light glazes on selected areas. The under side was then masked and the AII Green
applied all over the top surface, when totally dry the areas to remain green
were masked off, the outer edge being defined with rolled out "Blue Tack"
and then simply sprayed AII Black. Items that still need fitting were also painted
at this stage, engine cowling, engine cylinders; tail plane and under carriage
supports (made from brass rod) wheels and so on.
with
"Halfords" grey primer, checked for faults and when all was done the
under surface was painted with a weathered version of AII Blue (Polly Scale
do a relatively accurate paint in their acrylic range - USSR Underside Blue).
When this was dry I weathered the underside with my normal technique, dark and
light glazes on selected areas. The under side was then masked and the AII Green
applied all over the top surface, when totally dry the areas to remain green
were masked off, the outer edge being defined with rolled out "Blue Tack"
and then simply sprayed AII Black. Items that still need fitting were also painted
at this stage, engine cowling, engine cylinders; tail plane and under carriage
supports (made from brass rod) wheels and so on.
 Having
removed the masking and checked the paintwork it was time to finish the assembly,
take you time and treat the parts gently. The cockpit doors were added followed
by the under wing rocket rails and the most beautiful representations of RS82
projectiles I have ever seen. The under carriage is also cast in resin and is
about the most detailed I have seen, complete with coil spring and tension bolts,
you will have to add a support to each side, mine were made from "Struts"
brass rod. The last items to be added before coating the whole model with "Halfords"
Gloss were the 2 machine guns, again works of art, this done the gloss coat
was applied.
Having
removed the masking and checked the paintwork it was time to finish the assembly,
take you time and treat the parts gently. The cockpit doors were added followed
by the under wing rocket rails and the most beautiful representations of RS82
projectiles I have ever seen. The under carriage is also cast in resin and is
about the most detailed I have seen, complete with coil spring and tension bolts,
you will have to add a support to each side, mine were made from "Struts"
brass rod. The last items to be added before coating the whole model with "Halfords"
Gloss were the 2 machine guns, again works of art, this done the gloss coat
was applied.
Having left the model to dry for 24 hours the decals which Erik Pilawskii had
supplied were put into place, the "White 31`s" went on with no trouble
but the yellow back grounds onto which the red stars were to be placed just
disappeared when put on.
To over come this problem I applied victory stars of the correct size and then
set about cutting yellow decal strips to provide the yellow boarder to the stars.
The Yellow decal strip was applied in such a manner as to cover up the red and
white outline to the victory star, 10 pieces to each star, what a job that was.
Having allowed 24 hours for the decals to dry out completely the model was  then
gently washed to remove any sign of the decal solution and again given time
to dry. The undercarriage and all remaining items were then fitted with the
exception of the engine cowling, the hand hold is still required at this point
in time as the first matt coat was now applied. When dry the model was given
one more look over and any touching up or further weathering required being
carried out prior to fixing the engine cowling and cylinders into place, the
second coat of matt was then applied. The last items to be fitted (well at least
they are the way I put this thing together) were the wind shield which was made
from the clear plastic sheet supplied, the tail plane support wires that run
from the vertical fin, these were represented with fishing line and finally
the propeller.
then
gently washed to remove any sign of the decal solution and again given time
to dry. The undercarriage and all remaining items were then fitted with the
exception of the engine cowling, the hand hold is still required at this point
in time as the first matt coat was now applied. When dry the model was given
one more look over and any touching up or further weathering required being
carried out prior to fixing the engine cowling and cylinders into place, the
second coat of matt was then applied. The last items to be fitted (well at least
they are the way I put this thing together) were the wind shield which was made
from the clear plastic sheet supplied, the tail plane support wires that run
from the vertical fin, these were represented with fishing line and finally
the propeller.
There it is aYAK-UT1 for my model collection and very pleased I am to have it sit along side models of its bigger brothers. The kit itself is testimony to the art of the master pattern maker and of the resin caster, the fit and detail is unbelievable. My only criticism of the kit is the price and even this appears to vary, the fact that there are no painting guides or assembly instruction. These very minor negative points may put people off purchasing this little gem, it should not do so as help is out there if you look and ask, the price, well only you can answer that or justify it, but if you model the VVS of the G.P.W. you will at some time have to add a Yak-UT1.
Anyway it's my money and be dammed if I'm leaving any behind when its time for me to go!
My thanks go to:
Erik Pilawskii
Hector Mirasol
NeOmega
E. D. Models
Red Stars
Soviet Combat Aircraft of W. W. II (Vol II)