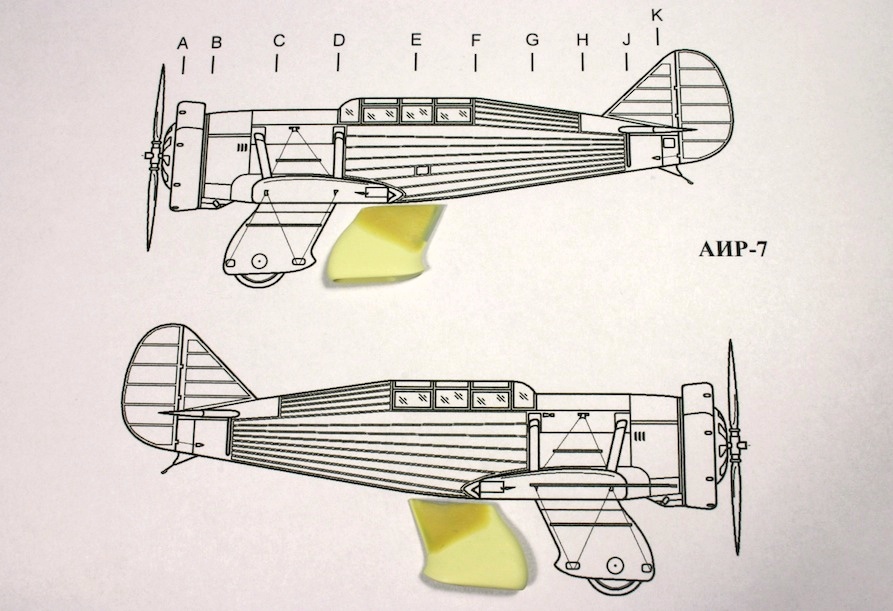
Yakovlev AIR-7, 1/72 scale model
By Aleksandar Šekularac
Back in the days...
…when “fly-by-wire” meant the whistle of the rigging in the wind and pilot’s equipment included a long scarf and supply of goose-fat, life of an aeronautical engineer was quite different. In April of 1932 Yakovlev Design Bureau set off to create a small aircraft to carry two people and fly faster than contemporary fighter planes propelled by the same engine. In the present day a similar project would likely involve a sizeable budget, development time of at least several years and brutal amount of computing power. Back then the machine was ready to fly by the end of the summer.
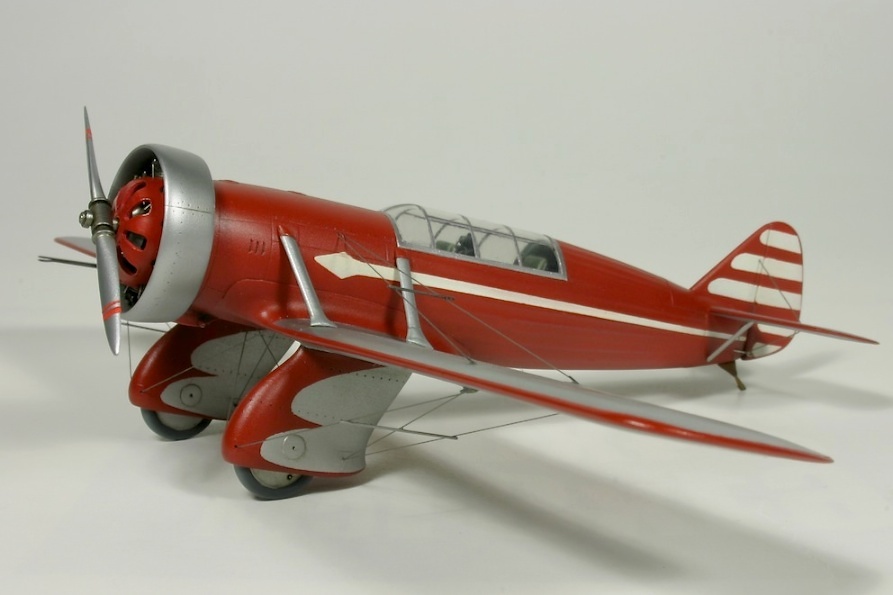
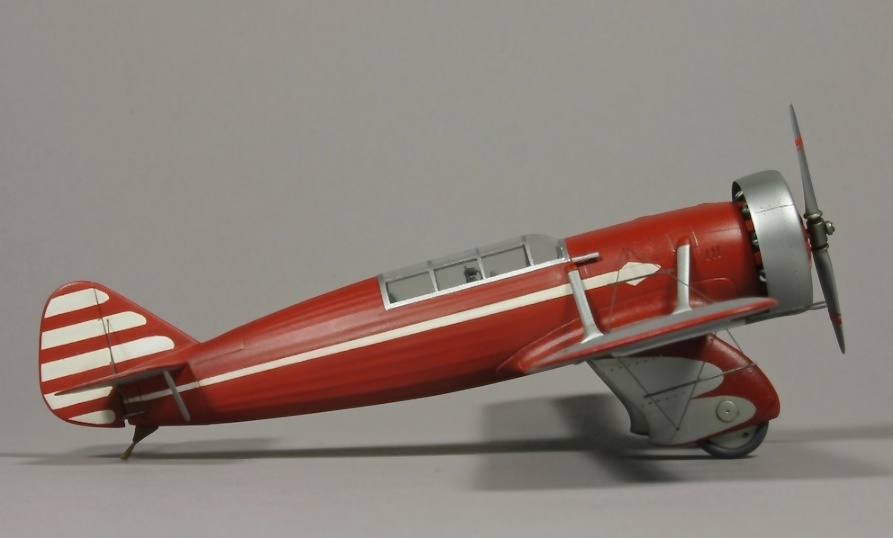
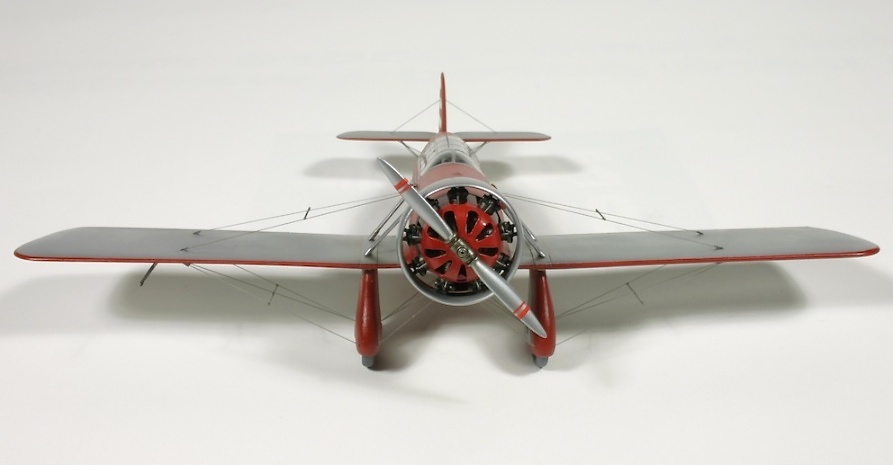
M-22 power plant was covered in Townend-Ring, the fixed landing gear dressed in streamlined spats and the cockpit for two weatherproof under an enclosed canopy. Teardrop-shaped fuselage consisted of stressed steel-tubing skinned in canvas and metal sheeting for the nose section. The low-wing monoplane had an 8% thin air foil with mixed construction, canvas clad and secured by a system of braces and tension wires.
AIR-7 achieved speed of 325km/h on 19. November 1932. An impressive accomplishment, but still not what Yakovlev was striving to. By the spring of 1933 few modifications were made to the airframe, most noticeable the redesigned wheel spats and additional lateral glazing for the pilot. The engine performance was reportedly also improved. New result was at the same time the national speed record: 332km/h. The attention of the powers that be was secured.
Test and demonstration flights continued till 1934, when an accident struck. More than a decade before the word Aero-elasticity was first uttered the AIR-7 encountered an aero-elastic phenomenon called the “flutter”, resulting in a loss of an aileron during a high-speed demonstration flight. Test-pilot Piontkovski managed to avoid the worst and brought the damaged aircraft to a forced landing, hence saving the lives of his passenger and himself.
The said passenger happened to be the vice-president of the “OSOAVIAKhIM” -Union of Societies of Assistance to Defence and Aviation-Chemical Construction of the USSR. Other high associates of the VVS were sitting aside the runway and watched closely as the events unfolded.
Yakovlev Bureau was promptly put under investigation and a government commission sent to examine the aircraft. After exhaustive study “a mistake was revealed in calculations” and Yakovlev was forbidden to continue the design work - his career hanging on a thin thread. AIR – 7 was never to fly again.
Yakovlev prototype was the harbinger of the things to come - symbolizing the great leap into the cutting-edge technology that the aviation was about to make, but still carrying the naivety of the pioneering days of flying and oozing with the flair of the golden age.
My attention is typically drawn to the bigger scale when considering such minute subjects, but in this case I was happy to make an excursion to the land of 1/72. To be honest, with such unique aircraft, anything this side of scratch-building is a cause to rejoice.
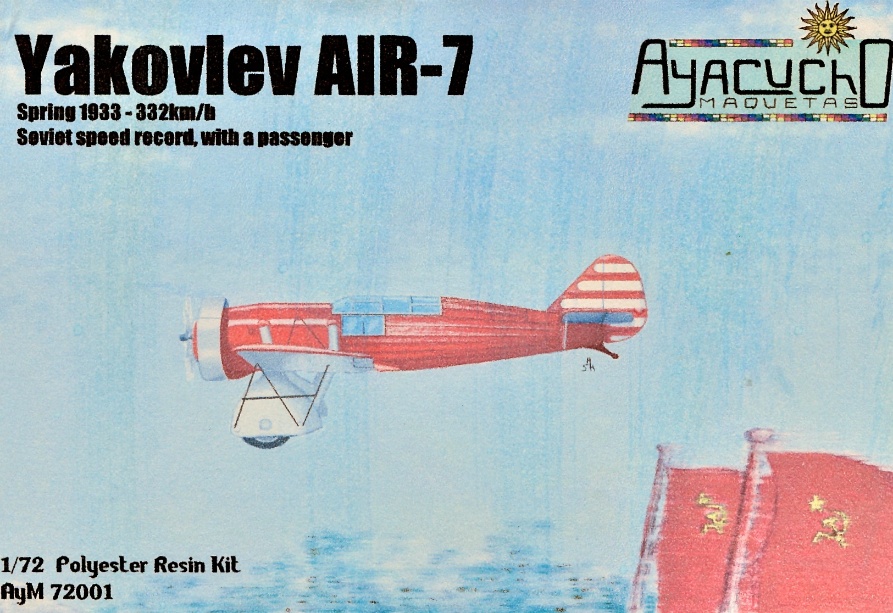
“Ayacucho Maquetas”…
…is a new Argentinian kit maker, premièring here with the lovely Yak AIR-7. I can only applaud to the subject selection. The kit is made in polyester resin with great level of detail. Quality and finesse of the parts is first rate, but the material itself holds some surprises. More on this later.
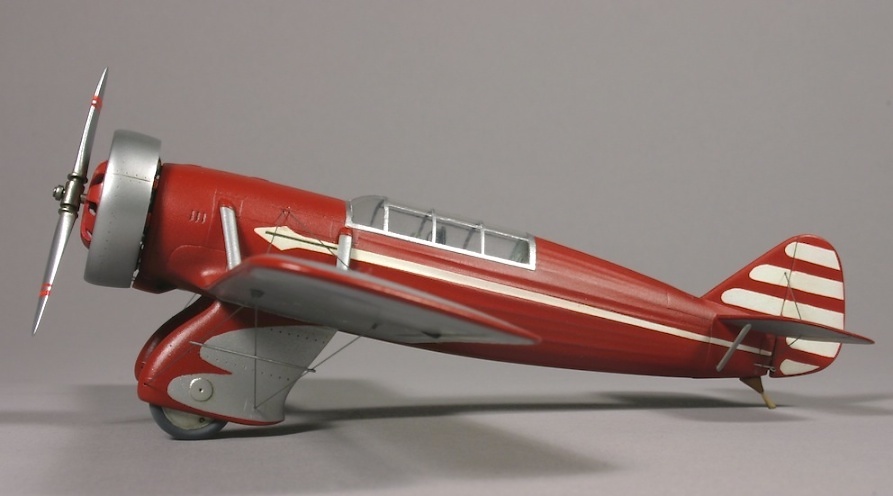
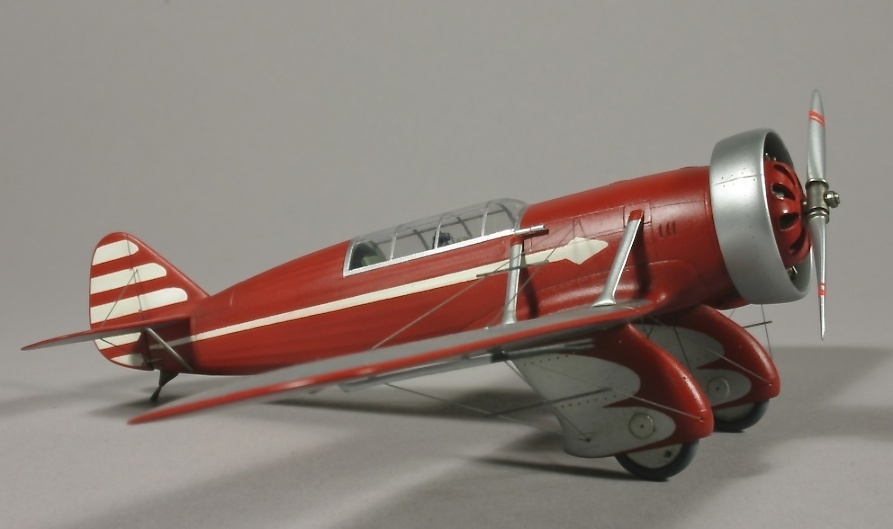
The kit represents the Yak AIR-7 as it appeared at the time of the record setting flight; i.e. after the mentioned modifications to the airframe. The references on this subject are few and far between, but the kit follows closely all that is available. There are no decals, as no marking or stencilling could be seen on the aircraft. The handsome red, silver and white paint scheme is at modeller's discretion.
Early on I decided that I’d actually like to represent the early appearance of the AIR-7, as it came out of the construction. This implied much more work on the kit, but the impulse was there so I went with it.
The work started...
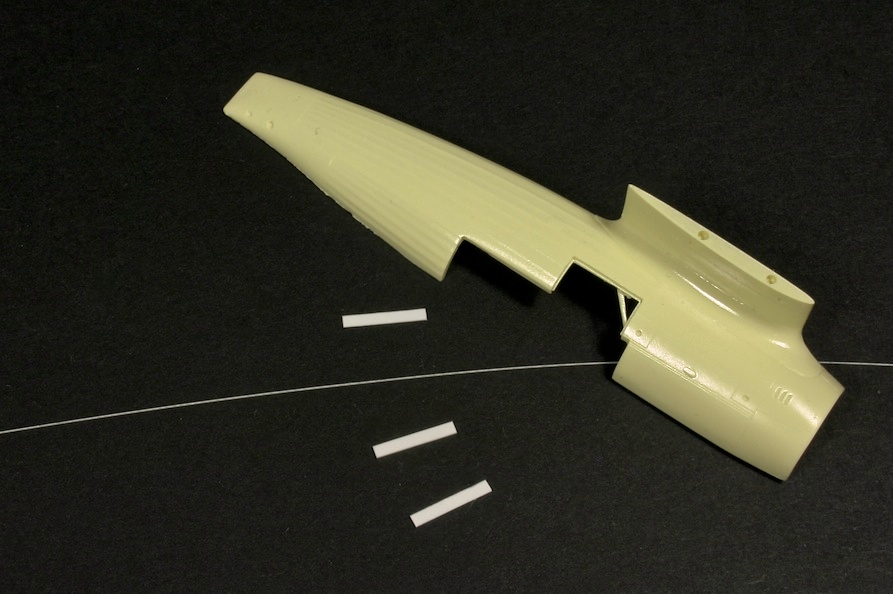
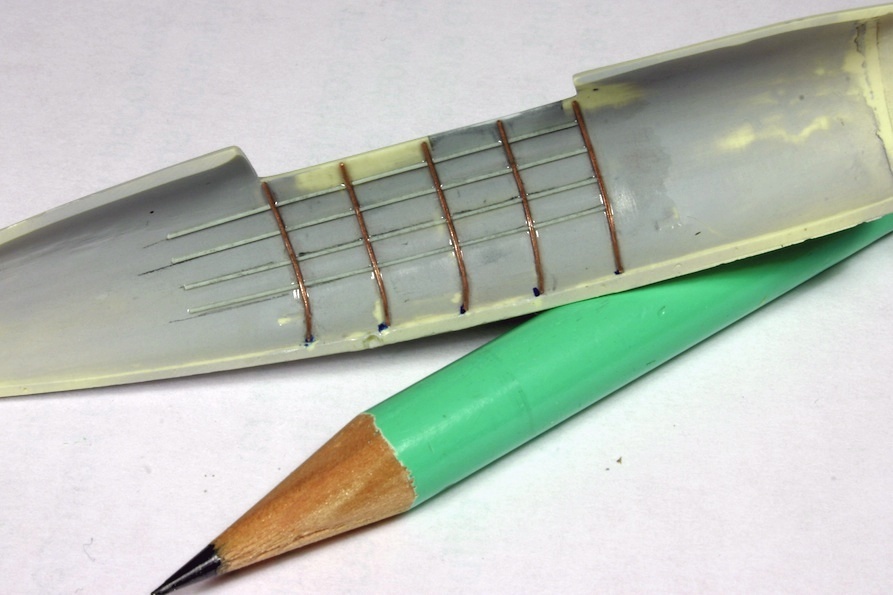
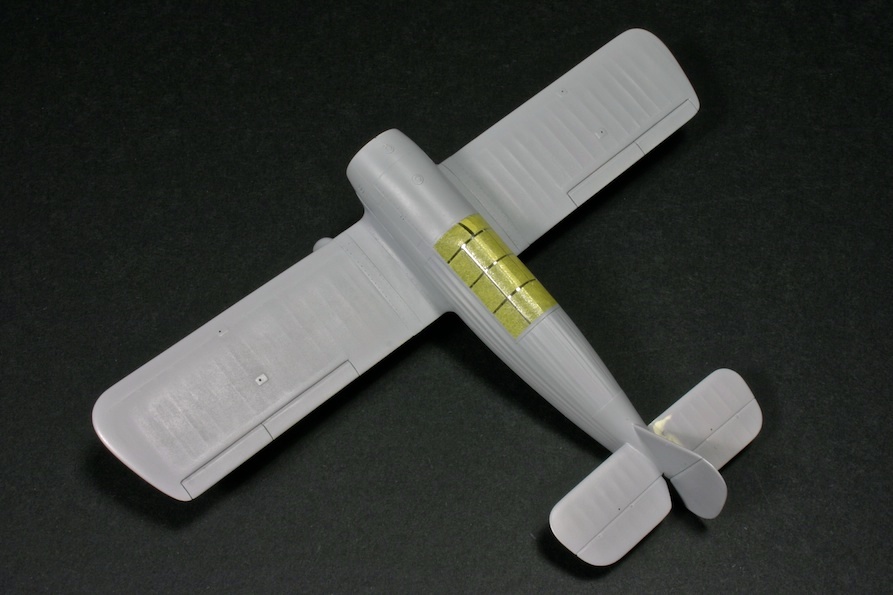
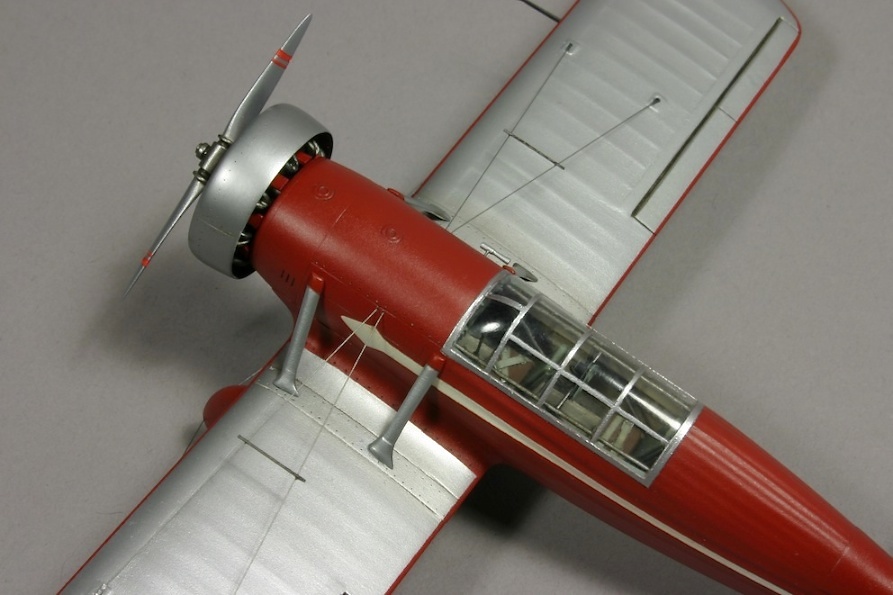
…by closing the opening for the additional lateral windows in the fuselage halves. This step was deemed the most difficult and therefore critical for the whole build. If I succeed I could continue with the model, if not there would be no point in investing more effort in it. The said windows were placed in the region originally covered in canvas. To close them properly I would need to recreate this canvas effect and fuse it seamlessly to the very fine detail of the kit.
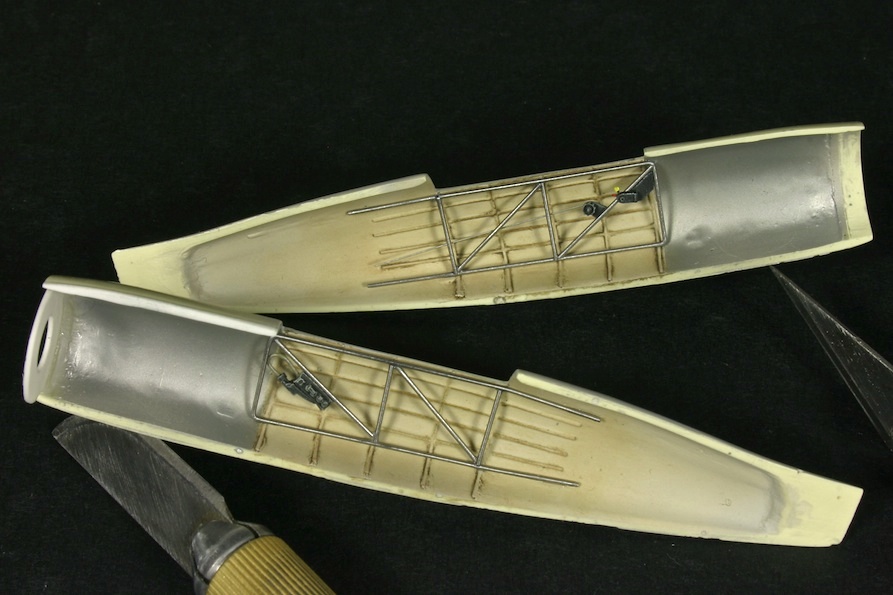
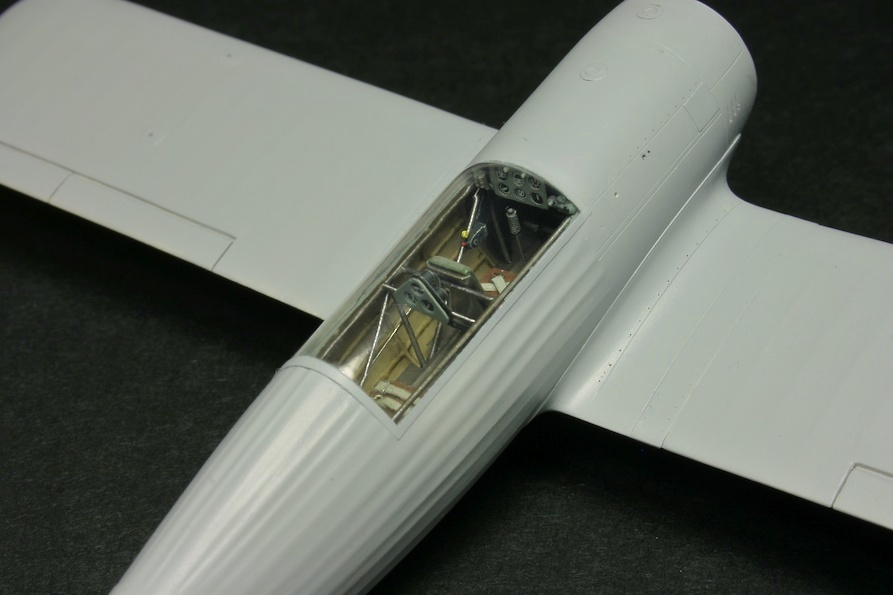
Additionally, all the interior structural detailing cast on the fuselage sides had to be lost and later recreated.
First, I cut to length the strips of styrene to create the faceted surface that more or less agreed with the existing canvas detailing of the fuselage. They were dry fitted in position and then super-glued from the inner side. Lengths of stretched sprue were glued at the position of each fuselage stringer, again aligned to the already existing detail. Styrene welder helped to bind the stretched sprue bits to the underlying surface. When all was cured I continued to sculpt with iterative applications of putty and then careful sanding of the affected area. The coat of Mr. Surfacer followed in several thin layers, to show and then fix any remaining issues with the surface smoothness.
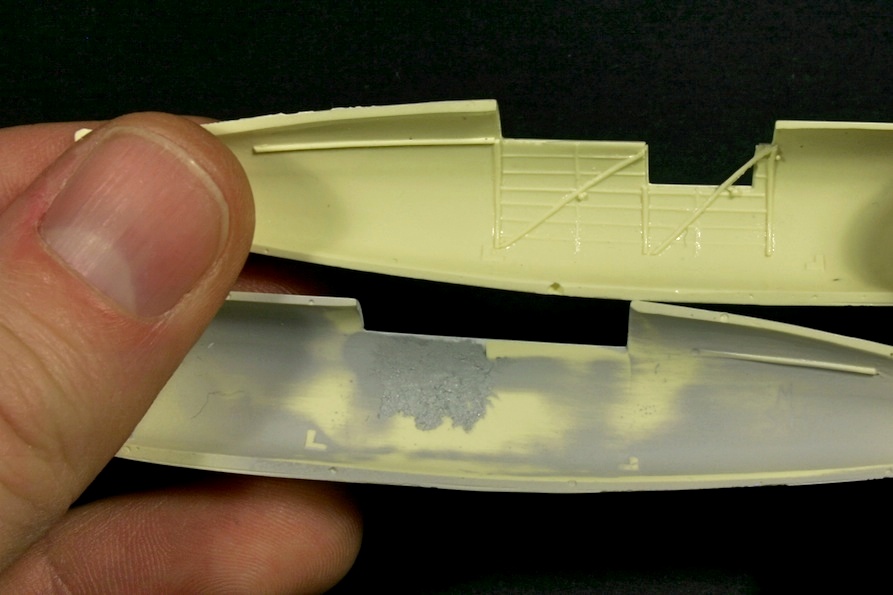
At this point I discovered some uncomfortable properties of the polyester resin. The curing time for this type of material is very slow and bigger surfaces in the kit may stay sticky even months after the casting process. This was indeed the case with my sample when it came. Kit instructions advise that this is to be expected and that a coat of primer will seal the parts and make them easier to handle. Mr. Surfacer primer is usually an excellent medium for such a task and I did not expect it to be any different here. But some 48 hours after coating the model with the primer small irregular cracks started to appear. As if the miniature rivers carved their beds over the surface. In some places I was able to use solvent to remove the paint, but in other I tried to sand the problematic area locally. Several such iterations of priming and sanding were necessary until all the major parts were finally set. The process was tricky due to the fine detailing of the kit, in particular where the said cracks traversed the canvas-covered structures. As usual, patience and determination yield good results in the end.
Inner structure of the cockpit was now rebuilt using wire, styrene strips and small bits from my “junk-yard box”. To bind the structural elements to the inner walls I used Future. For the seats I just added some home-made safety belts.
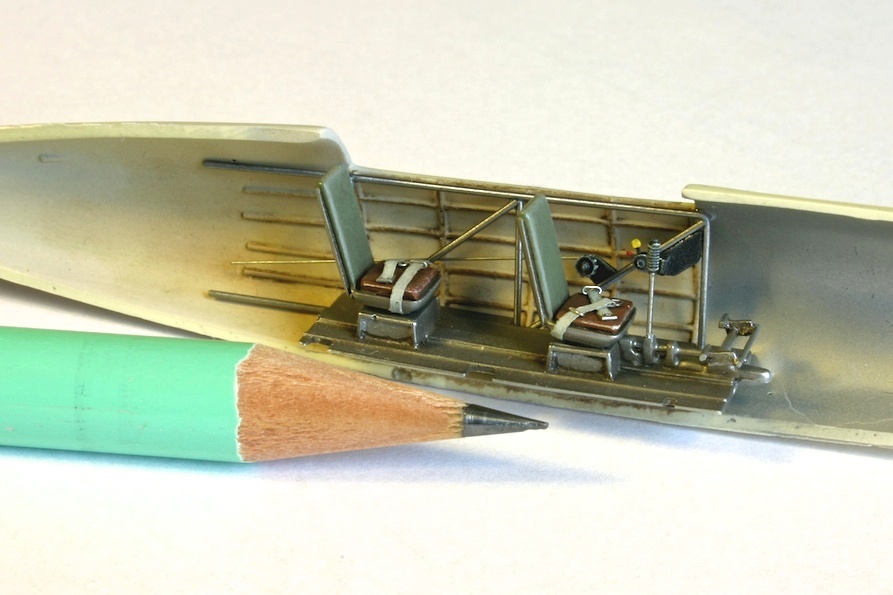
Instrument panel was made from brass sheet – instrument holes were drilled through and then instrument faces (cut out from spare decals) applied from the back.
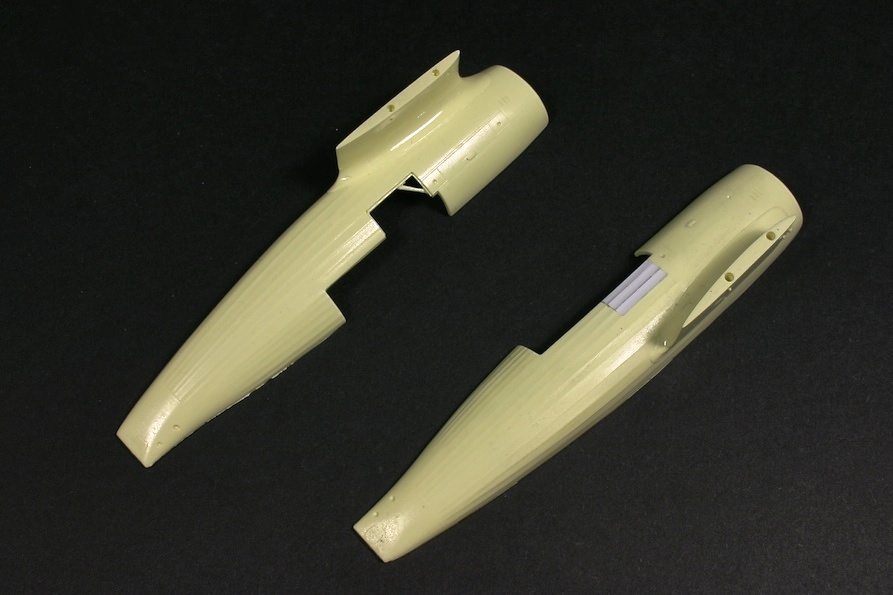
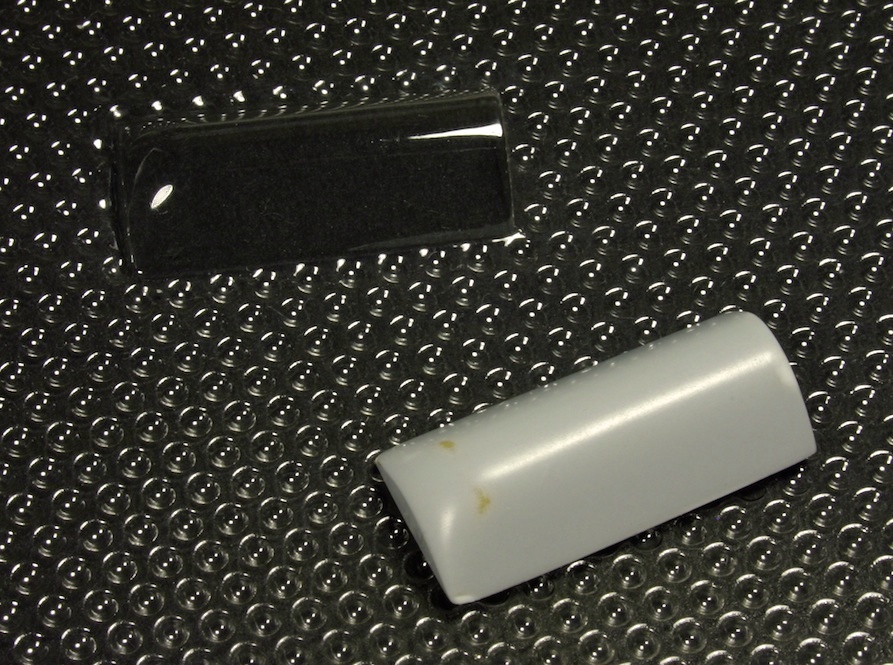
The early version of the AIR-7 had a different canopy frame, so the canopy was also due for a remake. I used kit supplied canopy as the mold - filled it up with Tamiya epoxy putty. When it cured I removed the acetate and then sanded and repaired the surface of the newly made master. New canopies were vacuum-formed using this tool.
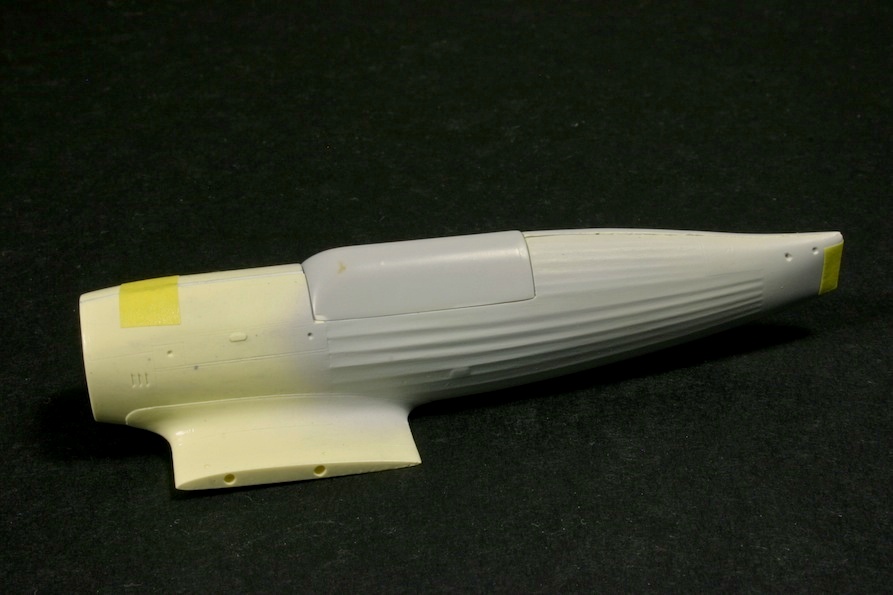
Next were the wheel spats. For my early version I had to fill the gap between the main leg and the rear strut of the landing gear fairing. First the two halves of the both spats were glued together and the styrene triangle fitted in the said gap. On top of this I blended the surface using again the epoxy putty. With this done all the backdating was done. The rest of the kit just needed assembly and some detailing.
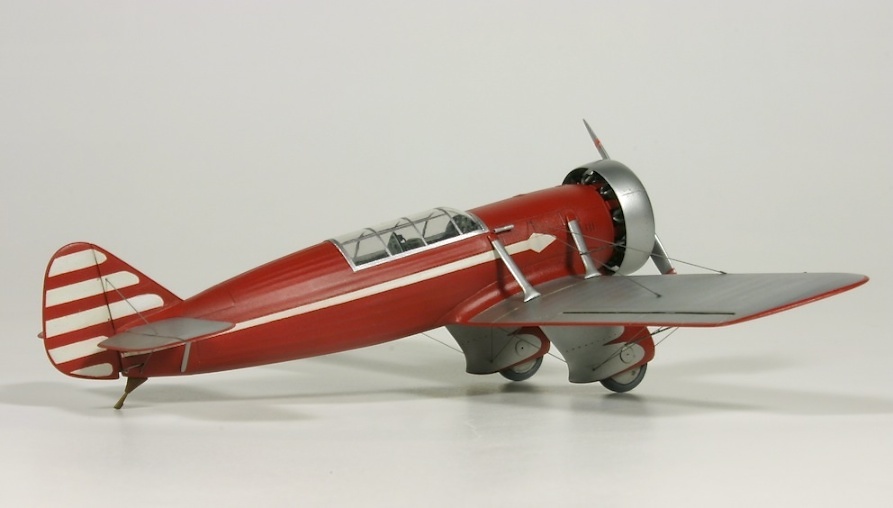
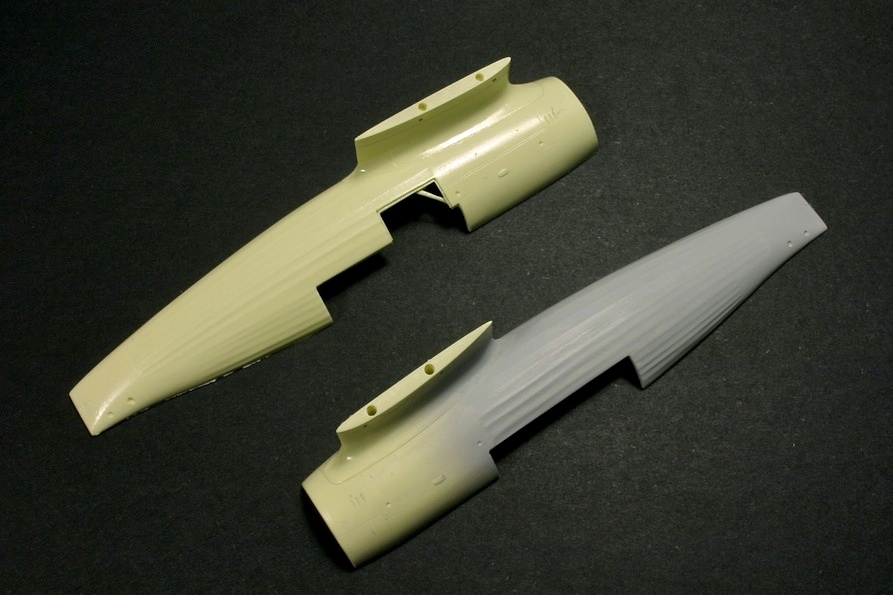
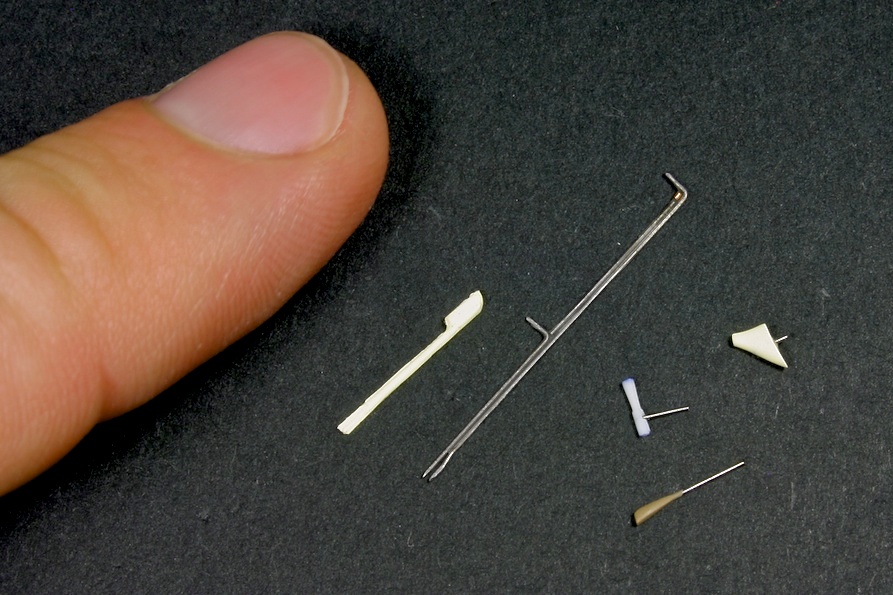
Joint of the wing and the fuselage was reinforced with two steel pins slotted in appropriate holes. The same was made for the vertical and horizontal tail units. All the rigging holes were also drilled through with a fine drill in the wings, fuselage, wheel spats and tail. Additionally, I made two blind holes on the starboard wing undersurface for mounting of the Pitot - tube and one just in front of the starboard side of the wind shield, for the Venturi – probe. Both of these instruments were scratch-build using wire and styrene bits. Tail-skid assembly was also thoroughly reworked from the kit part.

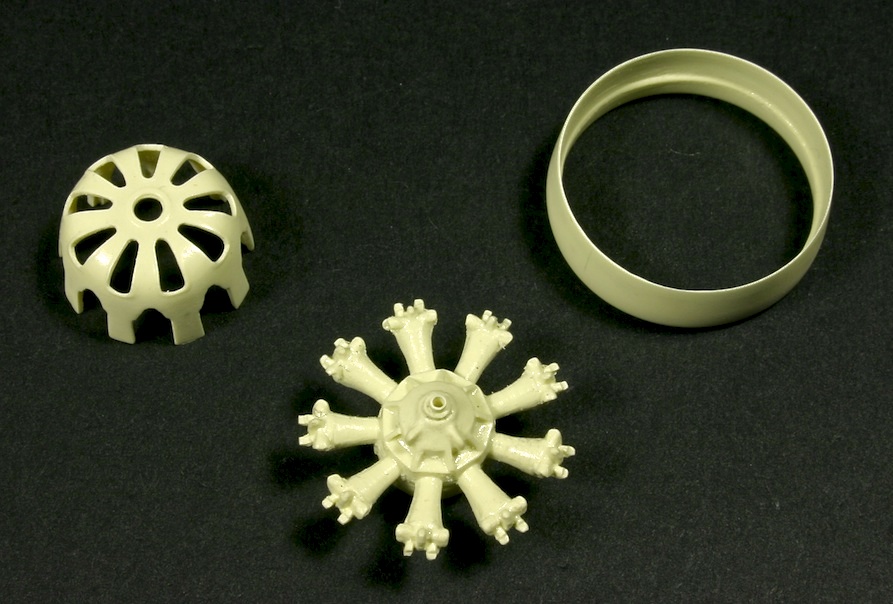
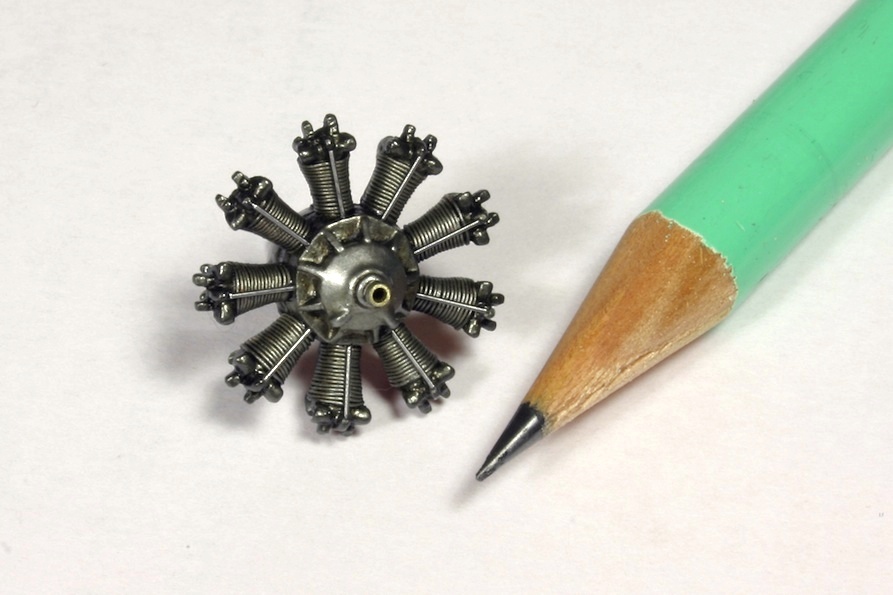
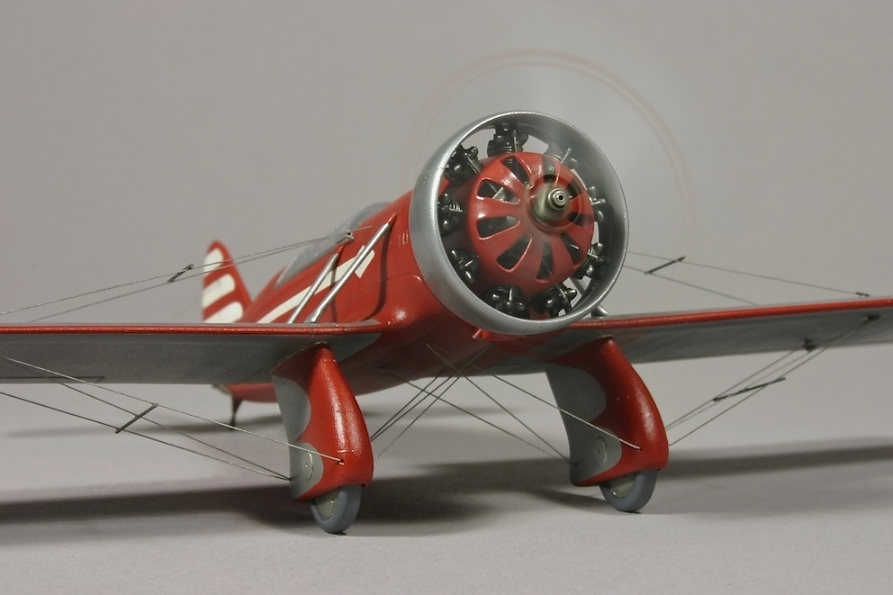
The M-22 engine received some upgrades as well. The cylinders were lacking the cooling fins detail, typical for air-cooled engine, so I reproduced these by wrapping tightly thin copper wire around each of the nine cylinders. Push-rods were also made using steel wire. The central hole was drilled through the housing so that the brass tube could be inserted – to act as the bearing for the propeller shaft.
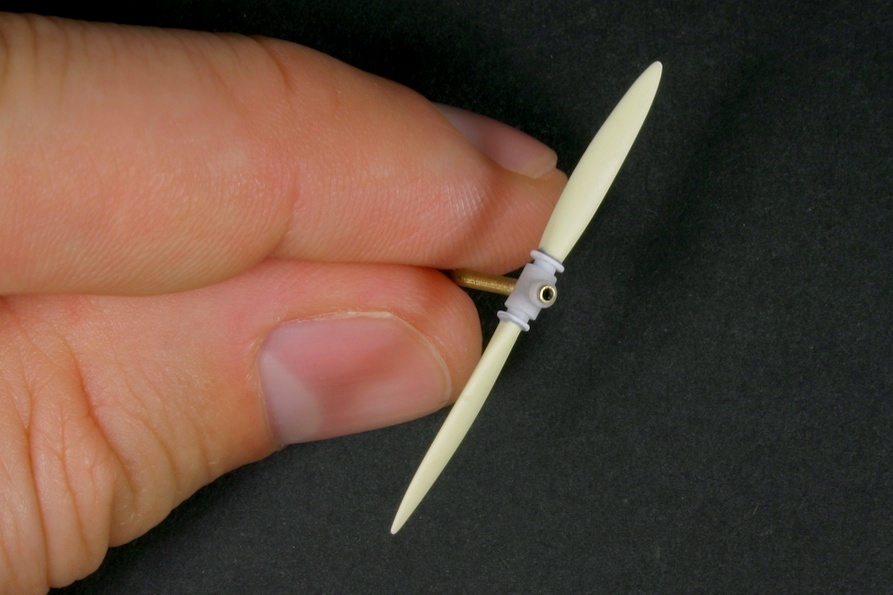
Propeller itself was cut out of its casting wafer and then the blades were separated and cleaned. I scratch built the hub, as original piece was not round in cross-section. The blades were again fixed to the hub with metal pins and the whole propeller assembly mounted on syringe tube that could slide inside the bearing system of the engine and freely rotate. I’ve added a small drop of motor oil inside this system to minimize friction.
Painting of the model could finally commence. The canopy framing was isolated using masking tape. I actually positioned very thin (0,75mm) strips of tape where the framing should run and then masked everything in between with yellow Tamiya tape. Then I removed the framing strips to expose the area that will actually receive the paint. Final thin layer of Mr. Surfacer could be now sprayed over the whole model.

I mixed few drops of light gray in a thinned white paint to achieve an acceptable off-white tone and sprayed this on the fuselage. I feel that pure white would produce too much contrast in this scale. When this dried the fuselage was masked off and the wings and horizontal tail sprayed with Alclad Aluminium. Alclad dries almost instantaneously, but I still gave it one day before starting the painstaking masking for the final crimson colour: the tail bands, the fuselage spear, wheel spat scallops and the elegant trim along the edges of the wing and tail surfaces were all demarcated using masking tape. Crimson colour was made by adding drops of dark green paint in the Insignia Red to further deepen it. This was then sprayed in several thin layers on all exposed parts of the model.
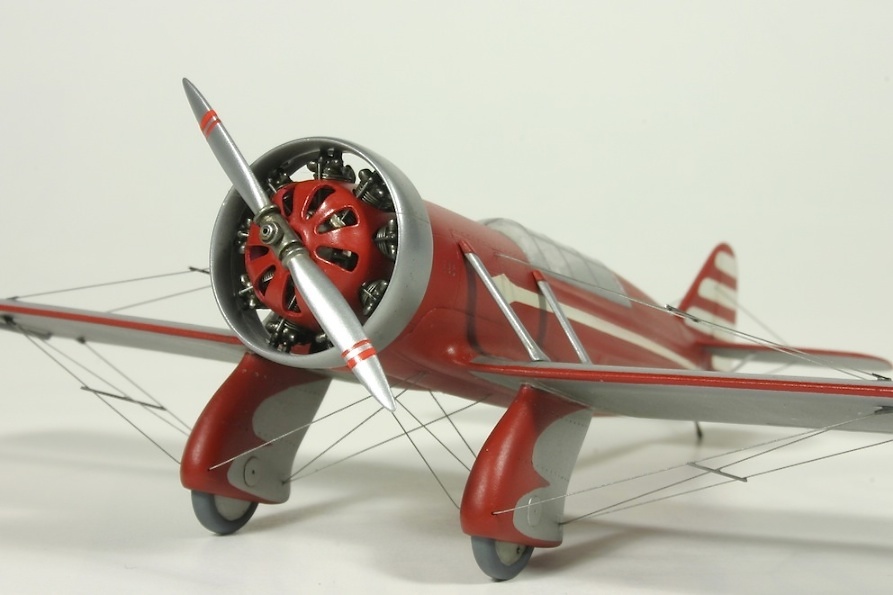
When the masks came off there were inevitably few correction to be made, few corners to be repaired due to chipping, but overall the painting scheme was very successfully applied. I quickly followed with a coat of Future, to seal the finish and prepare it for a very light oil wash. Weathering was to be kept at a minimum, in accordance to the low flying hours of this prototype.
I made rigging wires in the usual way: nylon mono-filament stretched over the cardboard jig and pre-painted before installation. This time I used Alclad “Magnesium” for this job. After allowing enough curing time the rigging strings could be now laced through all the pre-drilled holes on the model. Drops of thin super-glue secured the wires in place.
Final assembly of the wheels, tail skid, and other small bits marked the end of this build. The model was ready for some glamour photography…
The little AIR-7…
…provided an interesting exercise in small scale modelling for me. All the 1/72 related muscles are again in tone. Not only this, but working on something this unique offers notable distinction to the usual modelling platitudes and the great finesse of the kit means that it can be approached without the riot-gear usually associated with an all resin project. One and only warning is to test the compatibility of the polyester with different primers, or simply allow the resin some more time to cure before exposing it to paint and thus prevent the problems I encountered.
I would like to thank Matias Hagen for sending me this lovely kit and wish Ayacucho Maquetas many more such scale-modelling gems.
. . . . . . .