An Officer and a Gentleman Spitfire Mk.
Vb Under the Red Star
|
The Airplane
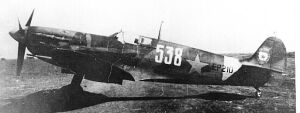 The
Soviet Union was very interested in Spitfire Mk. VC fighters. They were requested
in March 1942. Six squadrons with 160 pilots and 700 ground personnel were expected
to arrive with WS 18 convoy on April 15 1942. But despite Churchill’s promises
they did not arrive that year. Only in January 1943 first of the 150 shipped
Spitfires Mk. Vb landed at the Soviet aerodromes. One of these machines with
the serial EP 210 is the subject of this story. (Note: the image of the original
comes from a private collection, and was not taken from the newly released book
Red Stars 4.)
EP210 was manufactured in Castle Bromvich in June 1942 after which it was sent to maintenance units 9 and 82. Since October 23 it was on the ship "Bandar Shapure" and on January 11, 1943 was sent to the USSR.
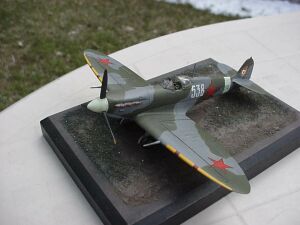 After
that it was likely to be assigned to the 36 IAP (36 fighter regiment), which
became 57 GvIAP (57 Guards fighter regiment) on February 8 1943. Only two Guards
regiments were equipped with Spitfire Mk. Vb – 26 GvIAP of the Leningrad Air
Defense (this unit was later equipped with Spitfire Mk. IX) and 57 GvIAP in
the Kuban’ region.
The Model
When I saw a photo of this machine with a large guards emblem on the fin and white numeral “538” on the fuselage I realized it would be my next project. (Sorry, no photograph. It was not allowed by the owner to be published).
What to start with? The Airfix kit was the most accurate at the time but below today standards. Other kits resemble the Spitfire only remotely, especially looking from the top. Some nice advice was given to bash Revell’s nose from Mk.V with Hasegawa’s Mk.IX. That would be the way to go but at this time Tamiya announced their future release of Mk.Vb in 72nd scale and I decided to wait for it. Few months later I impatiently opened the box. The model is manufactured from gray plastic, pleasant to work with. Panel lines are recessed and very nicely done. The cockpit is very well detailed indeed.
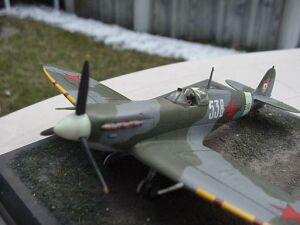 The
decals are done for four different versions with excellent stencils and yellow
leading edges.
Fuselage
I started the assembly with the cockpit. As I mentioned, it is very well detailed and after some considerations I decided not to substitute it with the resin. I mean it is very well done. I thinned down the side walls of the seat and added photo-etched seat belts. Since I am a superdetailing addict I decide on Eduard PE Zoom set for Revell’s Mk.V. I used the harnesses and the instrument panel from this inexpensive set. Since the Eduard’s set was designed for a different kit I had to make some adjustments inside the fuselage to make it fit. Otherwise no problems were encountered. The cockpit interior was painted and washed appropriately and the fuselage halves were glued together. The cockpit subassembly (the floor, the seat, the instrument panel, and the back wall) was installed (or should I say snapped?) inside the fuselage. I decided to add Eduard’s bulkhead right after the canopy to add a bit more realism. The result was awesome (at least to my eyes).
Wings and Further Assembly
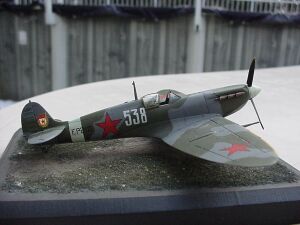 It
is too boring to write about it. The kit is so well engineered that everything
fits without any adjustments. I even did not use any putty between the wings
and the fuselage! The horizontal stabilizer was added (a bit of superglue treatment
at the joint was applied). According to the photograph the canopy was of the
late type. Both, earlier and late type front canopy parts are provided in the
model. I decided to open the sliding canopy to show nicely detailed interior.
The kit’s parts are nice but a bit thick and would distort the view if left
closed. I decided to use Squdron vacuumform canopy (the aft and sliding parts).
Painting and Markings
The model was painted in corresponding colors. I used PolyScale paints and enjoyed them as usual. The sky band in front of the fin was painted since the suggested kit’s decal is too dark and too greenish to my eyes. I used Eduard’s express masks for camouflage purposes. This greatly facilitated the process of painting but care should be taken at this stage: these masks are too tacky and leave some glue residue, which is hard to remove. The model received a shower of Future, this modeler’s “magic water” and the wash was applied in the panel lines. This operation was repeated to achieve the desired depth and uniformity. One more coat of Future was applied to prepare the model for decal application.
The prototype sported red stars with black outlines in six positions. The
photograph of the original as well as other photos of the Spitfire Mk. Vb made
in Abadan show no overpainting of the RAF roundels. It is clear that the red
stars were applied in the Maintenance 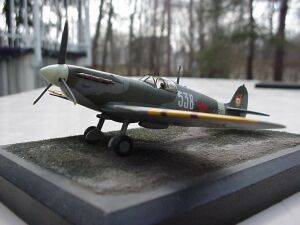 Unit
prior to the delivery. I used the stars from the RPM’s MiG-3 kit and the big
size guards emblem from the Aeromaster ® Lavochkins set. The numerals “538”
and the serials “EP 210” were printed on the ALPS printer, many thanks to Erik
Pilawskii. The yellow leading edges were represented by the kit’s decal, which
went on in a record time and is unbelievably easy to apply. The stencils from
the kit decal added to the appearance of the model. The model was sprayed with
flat coat, the landing gear and the aerial were installed. Paint chipping was
simulated with silver paint around the walking area on the wing and around some
hatches and panels.
In my opinion the Tamiya’s Spitfire Mk.Vb is the best model available today. Despite it’s price (in the range of $14 - $20) it is more economical than kitbashing of at least two kits. It is an excellent model of a beautiful plane. And, yes, an important but yet absolutely undiscovered page in the VVS history.