Special Hobby 1/32 Polikarpov I-16 Type 5
By Aleksandar Šekularac
Special Hobby 1/32 Polikarpov I-16 Type 5By Aleksandar Šekularac |
|
(Note: You can also see how the kit went together in Aleks' Workbench article.)
It seems to me that each scale has its advantages and disadvantages. Call me eclectic, but I find it refreshing to change gears and work in another volume every now and then. Instead of relentlessly following one fixed numeric ratio, I’d rather try to find the balance between the size, appearance, scope and desired level of detail. So, after a few models in the ubiquitous 1/48 it was time for such a change…
It just so happens that the Azur/Special Hobby “kolkhoz” first came to the idea that bigger may indeed be better when the petite form of Polikarpov I-16 is in question. And it just so happens that I agree with them fully.
Azur made a simple kit that reflects the straightforwardness of the I-16 design. Few resin and photo-etched bits merit the “multimedia” label, but no one should be daunted by the complexity contained in this box. Let me add that it is the most accurate Polikarpov I-16 kit to date.
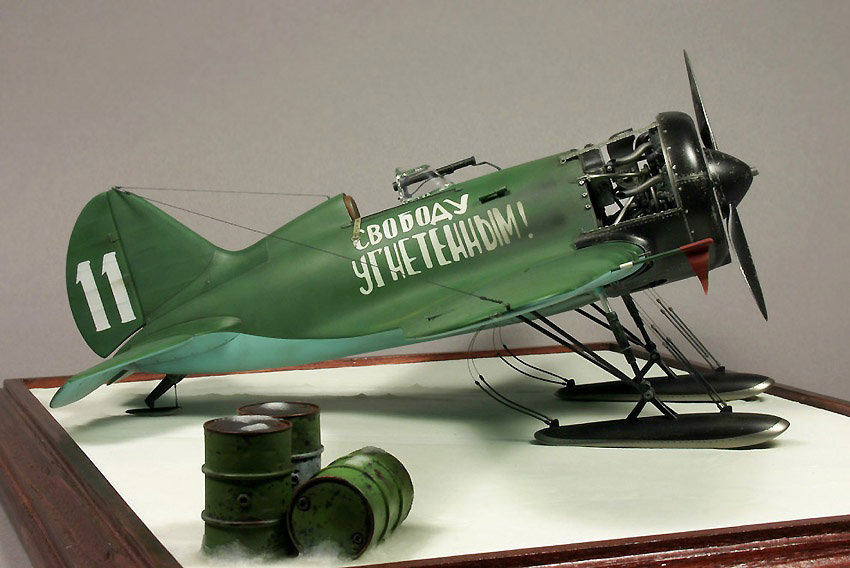
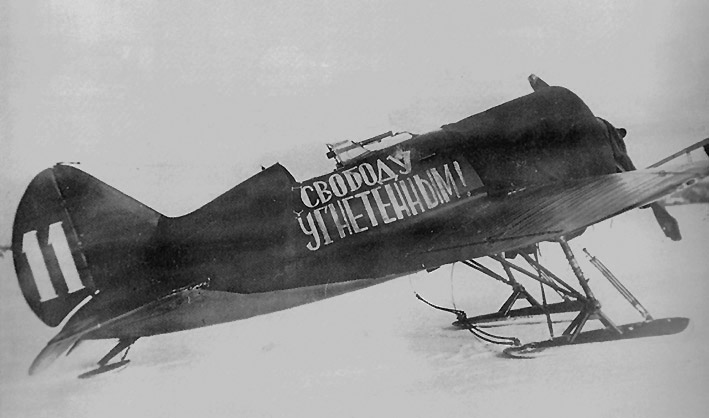
This is the fourth “Ishka” on my shelves and strangely all four are “type-5s”. I didn’t plan it that way, it just happened. This time I chose one distinctive “late” type-5 machine on skies, the white “11”, captured on two photographs during the Winter War in 1940 (published in the “Soviet Air Force Fighter Colors 1941-45”, by Erik Pilawskii). Apart from the very bold personal markings, this aircraft shows amalgamate of modifications that happened in transition from the type-5 to type-10. No lack of character with this one, to be certain!
 Ailerons
are long, as per the early standard, but the wing structure is reinforced -
22 ribs on the upper surface (post 1938 production). The fixed windshield is
retrofitted, yet the rails of the original sliding canopy remain, as does the
prominent telescopic gun-sight. Radio antenna stretches from the fuselage spine
behind the head–rest to the tip of vertical tail and from there to the
starboard wing tip. No radio hatch is visible. Fixed, non-retractable skies
replaced the wheels at some point to enable operations in snow. From pictures
of few other similar planes of the same unit, I concluded that the gear-bays
are most probably closed for aerodynamic gain. Engine cowling is obscured by
warmers on both available photographs, leaving the exact appearance of this
area completely to my best judgment (or fancy).
Ailerons
are long, as per the early standard, but the wing structure is reinforced -
22 ribs on the upper surface (post 1938 production). The fixed windshield is
retrofitted, yet the rails of the original sliding canopy remain, as does the
prominent telescopic gun-sight. Radio antenna stretches from the fuselage spine
behind the head–rest to the tip of vertical tail and from there to the
starboard wing tip. No radio hatch is visible. Fixed, non-retractable skies
replaced the wheels at some point to enable operations in snow. From pictures
of few other similar planes of the same unit, I concluded that the gear-bays
are most probably closed for aerodynamic gain. Engine cowling is obscured by
warmers on both available photographs, leaving the exact appearance of this
area completely to my best judgment (or fancy).
 Comparing
the contents of that quirky, side-opening box from Azur with what I had planed,
it became obvious that this was no weekend mission. At that point I had motivation
and the basic kit in my inventory; the rest came one step at the time, keeping
good faith in the power of improvisation – could this be the reason I
like this hobby?
Comparing
the contents of that quirky, side-opening box from Azur with what I had planed,
it became obvious that this was no weekend mission. At that point I had motivation
and the basic kit in my inventory; the rest came one step at the time, keeping
good faith in the power of improvisation – could this be the reason I
like this hobby?
 I
was already well into obliterating the kit’s cockpit – bits of plastic
in my hair - when a small box arrived from Russia, to raise the stakes to a
new level, and appreciably change the look of the finished model…
I
was already well into obliterating the kit’s cockpit – bits of plastic
in my hair - when a small box arrived from Russia, to raise the stakes to a
new level, and appreciably change the look of the finished model…
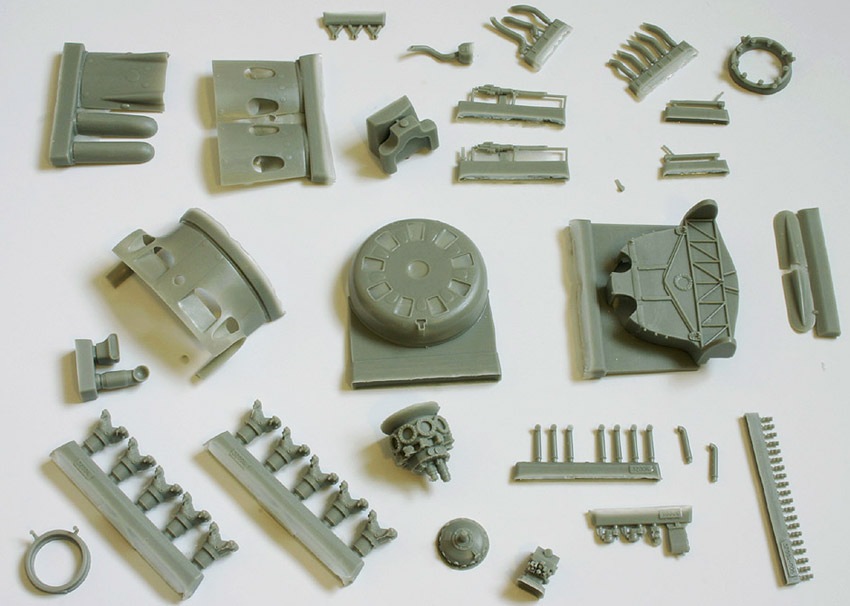
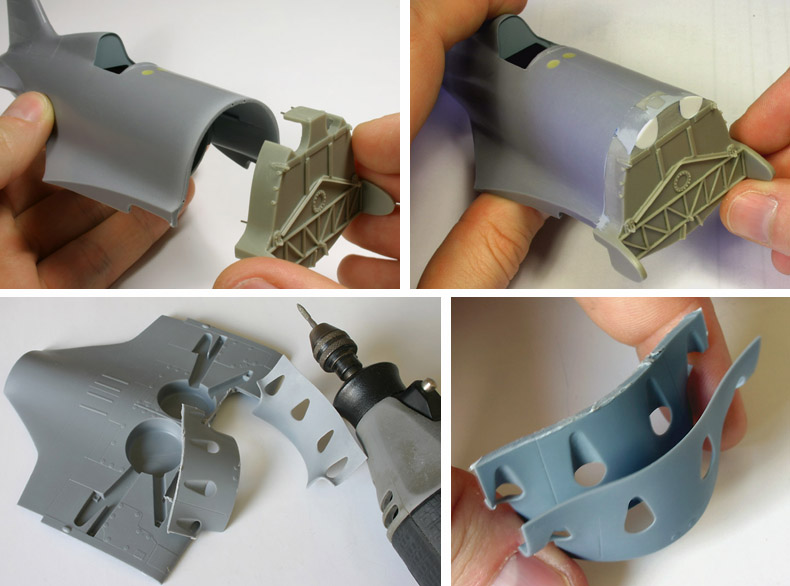
Only a handful of aftermarket accessories emerged for Azur’s kit since its first appearance, but the most impressive one by far is the “Engine & Armament” set by Vector. Opened cowling and bare engine details make for quite a contrast to the stock kit, so naturally I couldn’t resist the urge. Off came the front part of the kit’s fuselage... As my Dremel slowed down I had an uncomforting moment, thinking how the Vector set is really designed for I-16 type-17. But then a small plastic bit fell into my carpet, I went after it and the thought was lost.
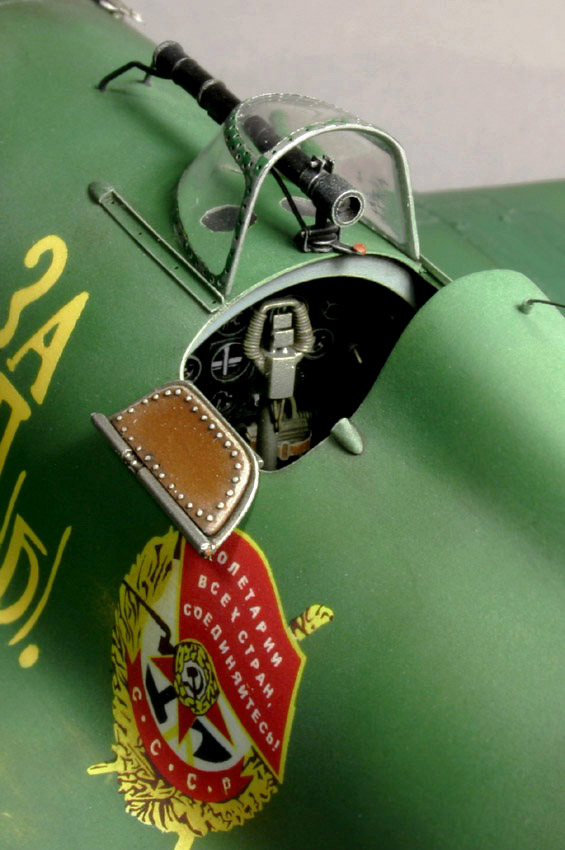
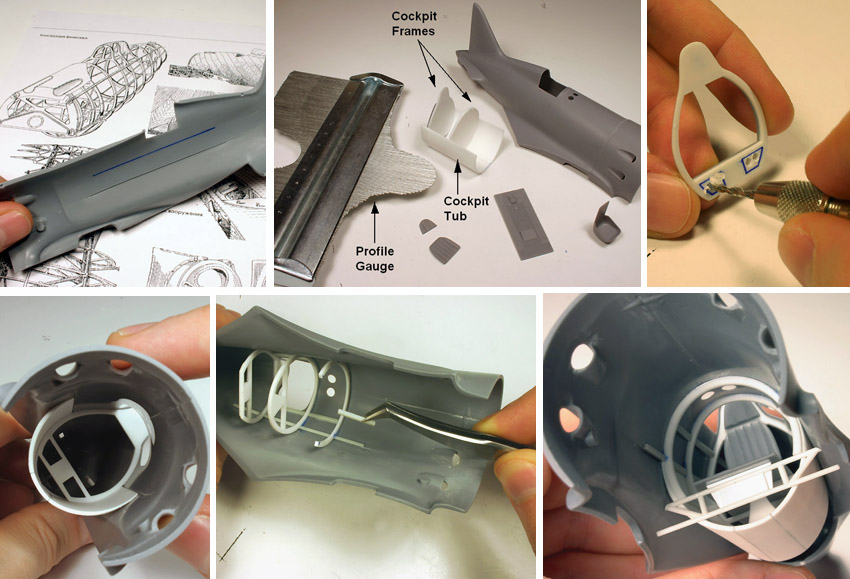 Back
in the kit’s cockpit, the thickness of the sidewalls would make any T-34
crewman feel safe. I don’t get to use 100 grit sandpaper a lot in scale
modeling, but now I found a perfect task for it. No I-16 kit provides for an
authentic detail of the inner structure, and this one is no different. The spurious
full floor is there, as well as imaginary solid wall behind the seat. Rest of
the details doesn’t inspire enthusiasm either. In 1/32 scale however there’s
really no excuse to leave things amiss, as I see it, so the cockpit had to be
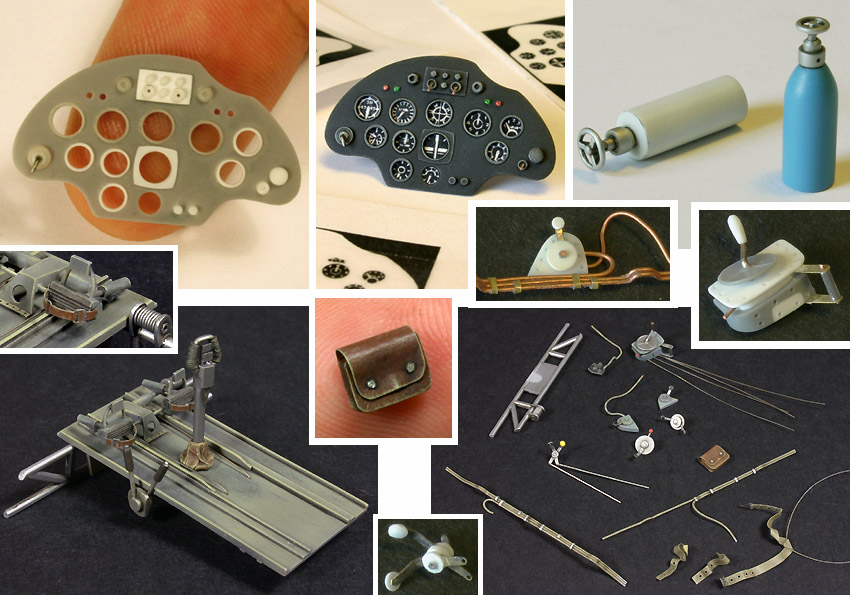
rebuilt from scratch. From fuselage frames, stringers and floor supporting elements,
to the instrument panel, armored backrest, all the controls and levers, cables
and pulleys and one complimentary small leather bag, “the office”
was slowly brought up to the aviation standard.
Back
in the kit’s cockpit, the thickness of the sidewalls would make any T-34
crewman feel safe. I don’t get to use 100 grit sandpaper a lot in scale
modeling, but now I found a perfect task for it. No I-16 kit provides for an
authentic detail of the inner structure, and this one is no different. The spurious
full floor is there, as well as imaginary solid wall behind the seat. Rest of
the details doesn’t inspire enthusiasm either. In 1/32 scale however there’s
really no excuse to leave things amiss, as I see it, so the cockpit had to be
rebuilt from scratch. From fuselage frames, stringers and floor supporting elements,
to the instrument panel, armored backrest, all the controls and levers, cables
and pulleys and one complimentary small leather bag, “the office”
was slowly brought up to the aviation standard.
 I
chose AE-10 (a.k.a. “Wood Aerolack”) for the main color of the inner
walls, instrument panel I painted black, and mixed the “perhaps unpainted”
and “definitely dirty” look for various smaller bits.
I
chose AE-10 (a.k.a. “Wood Aerolack”) for the main color of the inner
walls, instrument panel I painted black, and mixed the “perhaps unpainted”
and “definitely dirty” look for various smaller bits.
The cockpit took me a while, and I hope I won’t have to do it all over again for the other 1/32 I-16 kit I have. C’mon Sergey “Vectorskii”, if you can make that beautiful engine, a replacement cockpit is surely within the scope!
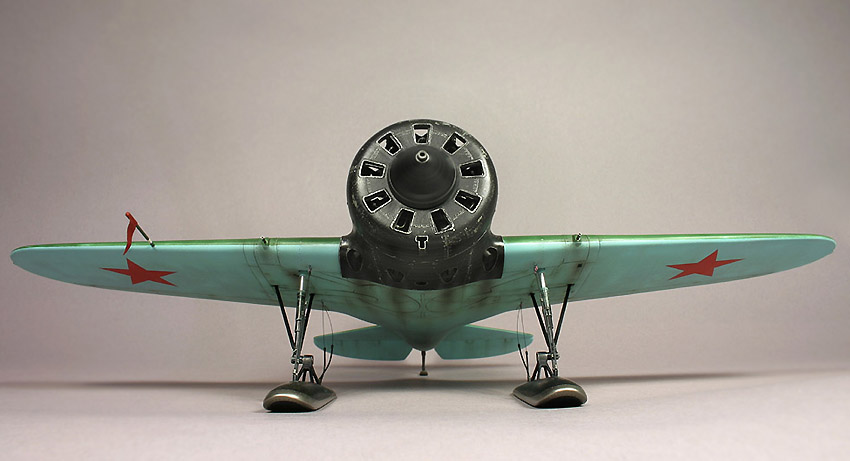
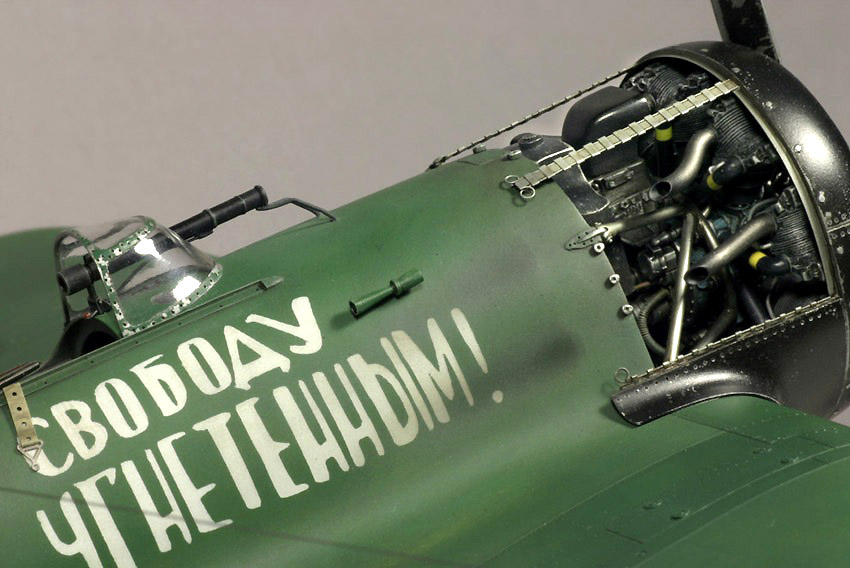
 Let
us now consider the said engine up close. Standard type-5 aircraft was equipped
with the radial M-25A unit (725 H.P.) apparently without an oil-cooler. The
front cowling was therefore void of any air-scoops and 8 teardrop exhaust outlets
were present. Experience in hot Mediterranean climate gained during the Spanish
Civil War advanced the introduction of the oil-cooler, manifested in a small
“T”-shaped inlet at the center bottom of the front cowling, as well
as the circular vent at the underside cowling element between the two inner
exhaust outlets. These became standard features of the type-10 aircraft, but
the introduction of the said improvements actually started on some late type-5
machines.
Let
us now consider the said engine up close. Standard type-5 aircraft was equipped
with the radial M-25A unit (725 H.P.) apparently without an oil-cooler. The
front cowling was therefore void of any air-scoops and 8 teardrop exhaust outlets
were present. Experience in hot Mediterranean climate gained during the Spanish
Civil War advanced the introduction of the oil-cooler, manifested in a small
“T”-shaped inlet at the center bottom of the front cowling, as well
as the circular vent at the underside cowling element between the two inner
exhaust outlets. These became standard features of the type-10 aircraft, but
the introduction of the said improvements actually started on some late type-5
machines.
 Reportedly,
there were also cases where the type-5 aircraft received the upgraded M-25V
unit (750 H.P.). Considering that the photos of this particular aircraft couldn’t
give me a definitive answer, I decided to go with my preference and model the
“hot-rod” version. The oil-cooler was to stay, and I was also not
worried about the shape of the oil-reservoir and its scalloped form (provision
for a pair of upper ShKAS guns on type-10 aircraft).
Reportedly,
there were also cases where the type-5 aircraft received the upgraded M-25V
unit (750 H.P.). Considering that the photos of this particular aircraft couldn’t
give me a definitive answer, I decided to go with my preference and model the
“hot-rod” version. The oil-cooler was to stay, and I was also not
worried about the shape of the oil-reservoir and its scalloped form (provision
for a pair of upper ShKAS guns on type-10 aircraft).
 There
were still modifications required to the Vector’s set, to adapt it for
use on my model. Mainly, the gun bay scallops on the main firewall were filled
out, and the lower cowling element needed to be backdated to the four exhaust
vents and no ski-recesses. For this I used the central bottom panel of the kit’s
part and combined it with resin flanks of the Vector cowling. Tricky business
but one that paid off in the end.
There
were still modifications required to the Vector’s set, to adapt it for
use on my model. Mainly, the gun bay scallops on the main firewall were filled
out, and the lower cowling element needed to be backdated to the four exhaust
vents and no ski-recesses. For this I used the central bottom panel of the kit’s
part and combined it with resin flanks of the Vector cowling. Tricky business
but one that paid off in the end.
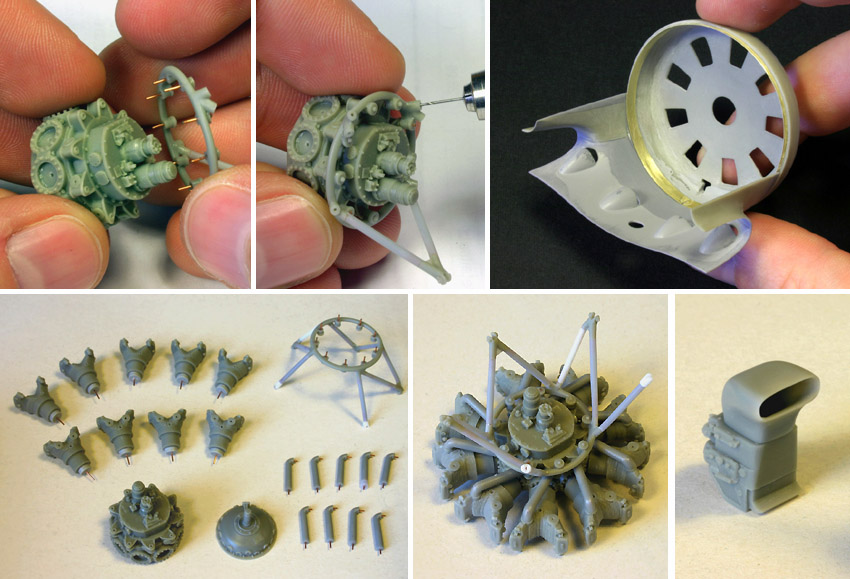
 The
resin engine is a jewel and should be handled thusly. I added extra wires, pushrods
and numerous connection pins to piece it all together. Exhaust stubs needed
some attention to make them fit properly, especially the ones for the lower
cylinders, where the cowling elements are kept in place. I hollowed out the
big carburetor intake as well as the heat exchanger element of the oil-cooler,
adding a small grill inside. The central engine hull was also drilled out to
make place for “bearing system” of the propeller shaft.
The
resin engine is a jewel and should be handled thusly. I added extra wires, pushrods
and numerous connection pins to piece it all together. Exhaust stubs needed
some attention to make them fit properly, especially the ones for the lower
cylinders, where the cowling elements are kept in place. I hollowed out the
big carburetor intake as well as the heat exchanger element of the oil-cooler,
adding a small grill inside. The central engine hull was also drilled out to
make place for “bearing system” of the propeller shaft.
…And to do both of those activities safely in snow one needs skies. Putting skies on an aircraft usually implied sacrificing some performance, but on the other hand it often made a difference between flying and rusting on the ground, waiting for spring. This particular I-16 did not wait for spring…
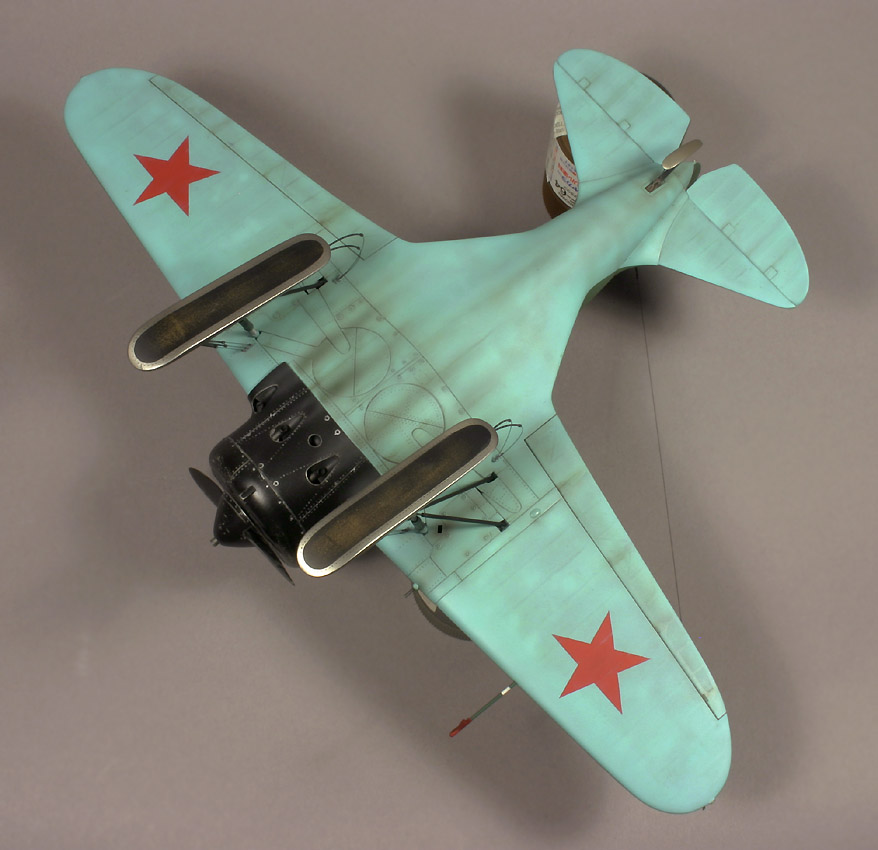
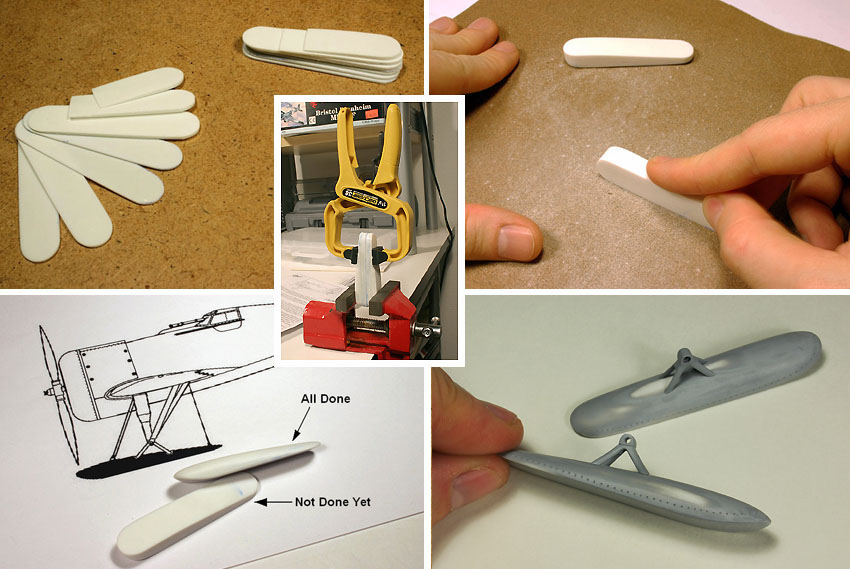 The
main skies that come as an option in the kit are not the type I needed for the
chosen variant. Teardrop-shaped non-retractable skies were used here to reduce
drag in flight. Weighing my options, I finally chose to build them using stacked
plastic wafers glued together, and then to further profile them by sanding.
The method is actually a crude approximation of the “rapid prototyping”
technique, where a 3-D object is built up from 2-D layers. I sourced the plastic
from the blank areas of another vacuum-formed kit (speaking of recycling). Making
the pair of skies to be identical in shape took some effort, but I didn’t
want to experiment with casting resin as an alternative.
The
main skies that come as an option in the kit are not the type I needed for the
chosen variant. Teardrop-shaped non-retractable skies were used here to reduce
drag in flight. Weighing my options, I finally chose to build them using stacked
plastic wafers glued together, and then to further profile them by sanding.
The method is actually a crude approximation of the “rapid prototyping”
technique, where a 3-D object is built up from 2-D layers. I sourced the plastic
from the blank areas of another vacuum-formed kit (speaking of recycling). Making
the pair of skies to be identical in shape took some effort, but I didn’t
want to experiment with casting resin as an alternative.
 Each
ski is balanced in flight by five tension cables. Three cables on the front
and two more on the back connect the ski body with the underside of the wing.
When on ground, front cables are under tension, while the back ones are relaxed.
I created these using some nylon monofilament with the stripped wire insulation
for the thicker “elastic” elements; and cut-off syringe tubing for
the end-bushings. Small fairings visible on the photos, where cables connected
with the ski, were made from aluminum sheet.
Each
ski is balanced in flight by five tension cables. Three cables on the front
and two more on the back connect the ski body with the underside of the wing.
When on ground, front cables are under tension, while the back ones are relaxed.
I created these using some nylon monofilament with the stripped wire insulation
for the thicker “elastic” elements; and cut-off syringe tubing for
the end-bushings. Small fairings visible on the photos, where cables connected
with the ski, were made from aluminum sheet.
 It
is suggested that devil hides in details, but lacking shelf-space for the god’s
grander scale what is a modeler to do? Contemplating implications of this incongruity,
I had to abandon formal dualism and focus at problem at hand: my Pollikarpov.
It
is suggested that devil hides in details, but lacking shelf-space for the god’s
grander scale what is a modeler to do? Contemplating implications of this incongruity,
I had to abandon formal dualism and focus at problem at hand: my Pollikarpov.
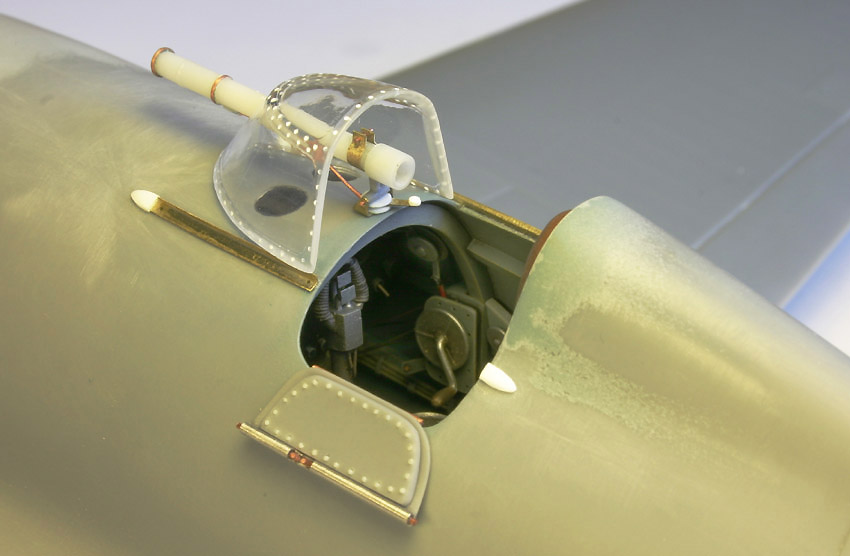
The rails remaining from the old sliding canopy were made out of aluminum sheet. Plastic tubing, wire and more aluminum bits made up the telescopic gun-sight. Small bits of transparent sprue sanded to shape and polished double as lenses.
 Venturi-probe
on the starboard side of the fuselage was fashioned out of drilled-out cylindrical
plastic bits, wire and syringe needle. Gun muzzles are also syringes, with small
fairing blisters (at the wing’s leading edge) scavenged from an old Hobbycraft
I-16 kit (it has oversized gun fairings for 1/48 scale, but just right in 1/32).
Venturi-probe
on the starboard side of the fuselage was fashioned out of drilled-out cylindrical
plastic bits, wire and syringe needle. Gun muzzles are also syringes, with small
fairing blisters (at the wing’s leading edge) scavenged from an old Hobbycraft
I-16 kit (it has oversized gun fairings for 1/48 scale, but just right in 1/32).
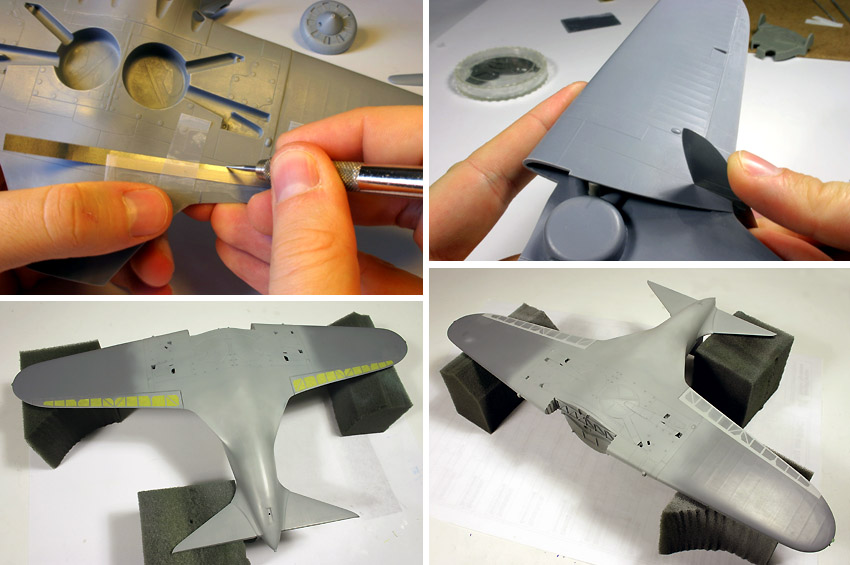
Long ailerons had to be re-scribed and while at it, I decided to free the aileron side edges completely by cutting through with a fine saw. Then I restored the proper structural details by masking and spraying a thick coat of Mr. Surfacrer 500 in several layers.
One characteristic feature of all I-16s is that when at rest their elevators are drooping. So, I cut them from the horizontal fins and repositioned them appropriately. Small covers for the hinge cutouts were made of aluminum sheet. I’ve added the rivets on all metal surfaces, mainly the cowling elements and central upper and lower wing panels.
 Landing
gear tripods were replaced with steel. Only the main legs have plastic tubing
of various diameters as the facade, but through them also run heavy gauge syringe
needles.
Landing
gear tripods were replaced with steel. Only the main legs have plastic tubing
of various diameters as the facade, but through them also run heavy gauge syringe
needles.
Pitot-tube is also a syringe needle, and the small protective sleeve with the “remove before flight” flag is fashioned out of aluminum foil. Such anti-icing covers can be seen on several period photographs, including the one shown at the beginning of this text.
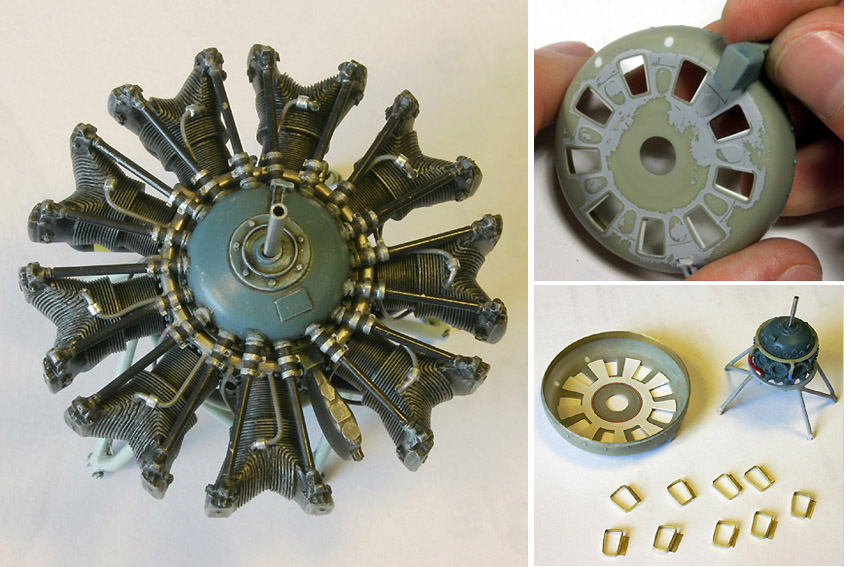
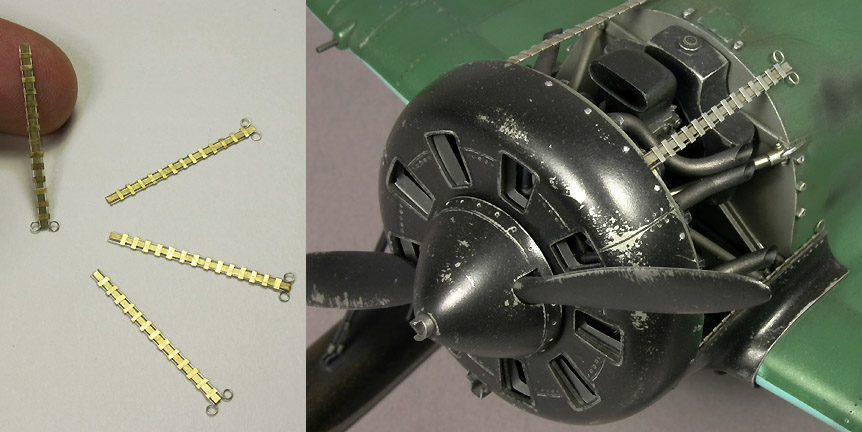 The
longitudinal cowling mounts are prominent details when the engine is uncovered.
These are not included in the detail set, probably because the parts would be
too fragile in resin. I decided to make four of them: two for the upper cowling
elements that are completely removed, and two more for the side edges, where
the wing root cowling is in place. In reality there’s an additional pair
that holds in place the bottom cowl, but this would be almost completely hidden
in the depth of the engine bay, and therefore I deemed the effort too great
for diminishing returns. A lot of repetitive cutting and bending of the minute
aluminum bits was involved. There are altogether 64 small pieces held by superglue
in those four strips of metal! After that bait-fishing comes easy…
The
longitudinal cowling mounts are prominent details when the engine is uncovered.
These are not included in the detail set, probably because the parts would be
too fragile in resin. I decided to make four of them: two for the upper cowling
elements that are completely removed, and two more for the side edges, where
the wing root cowling is in place. In reality there’s an additional pair
that holds in place the bottom cowl, but this would be almost completely hidden
in the depth of the engine bay, and therefore I deemed the effort too great
for diminishing returns. A lot of repetitive cutting and bending of the minute
aluminum bits was involved. There are altogether 64 small pieces held by superglue
in those four strips of metal! After that bait-fishing comes easy…
 The
time came to cover the plastic with some pigments. First in action was Mr. Surfacer.
Priming the surfaces has many advantages and no disadvantage that I can immediately
think off, and abovementioned product does this job excellently.
The
time came to cover the plastic with some pigments. First in action was Mr. Surfacer.
Priming the surfaces has many advantages and no disadvantage that I can immediately
think off, and abovementioned product does this job excellently.
The usual suspects for the main camouflage were AII Blue for undersurfaces and AEh-15 dark green for the upper. The dark green was a bit of a guess, but after some researching I’ve settled on FS 34092 by Model Master for the base color.
 In
trying to bring to life this monochromatic scheme I experimented with several
techniques described by the air-brush experts: achieving depth by layering and
modification of the base paint inspired by Hector Mirasol’s work, as well
as post shading as schooled by Chris Wauchop. Additionally, the glossiness of
clear coats was varied for different materials: wood, metal and canvas. Heavier
wear at the wing roots was achieved by first spraying an ocher paint to represent
the puttied wooden surface. After the main green camouflage was applied and
cured I started rubbing the area with micro-mash until the underlying layer
started to show up. Same technique was used for the “metal” cowling,
only with Allclad “Dark Aluminium” as a base and Tamiya semi-gloss
Black on top.
In
trying to bring to life this monochromatic scheme I experimented with several
techniques described by the air-brush experts: achieving depth by layering and
modification of the base paint inspired by Hector Mirasol’s work, as well
as post shading as schooled by Chris Wauchop. Additionally, the glossiness of
clear coats was varied for different materials: wood, metal and canvas. Heavier
wear at the wing roots was achieved by first spraying an ocher paint to represent
the puttied wooden surface. After the main green camouflage was applied and
cured I started rubbing the area with micro-mash until the underlying layer
started to show up. Same technique was used for the “metal” cowling,
only with Allclad “Dark Aluminium” as a base and Tamiya semi-gloss
Black on top.
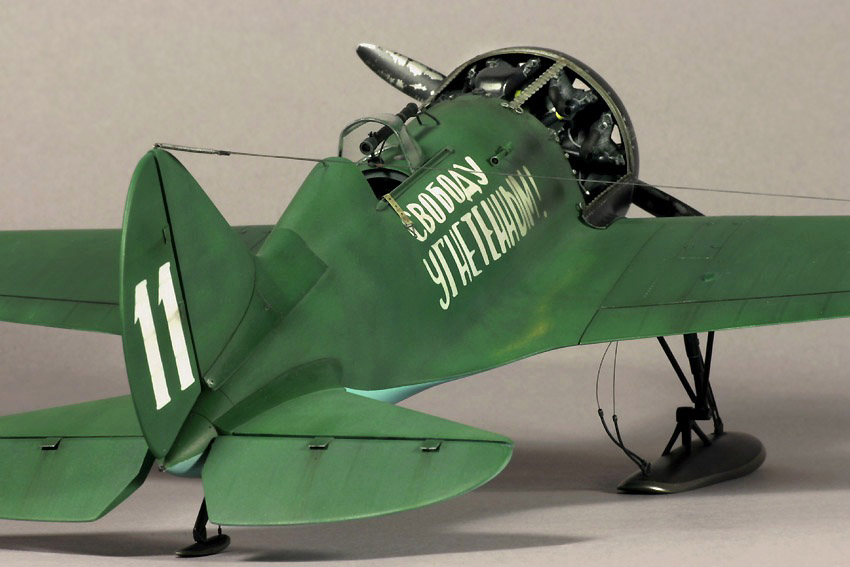
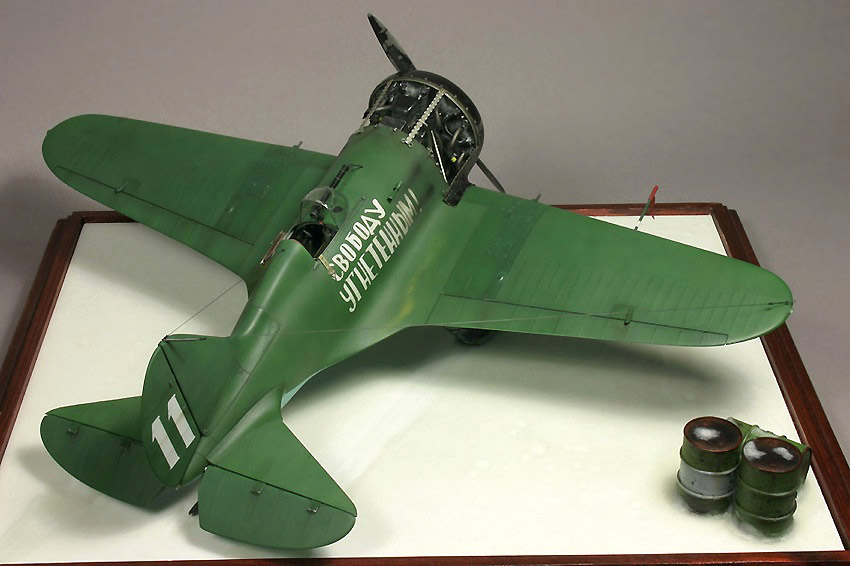
 The
big slogans on both fuselage sides were spray-painted using custom masks produced
by Saša and Aleksej of Gremlin Models. No better way to represent painted
markings then by painting… National stars on the underside of the wings
were also masked using some Tamiya tape and then airbrushed.
The
big slogans on both fuselage sides were spray-painted using custom masks produced
by Saša and Aleksej of Gremlin Models. No better way to represent painted
markings then by painting… National stars on the underside of the wings
were also masked using some Tamiya tape and then airbrushed.
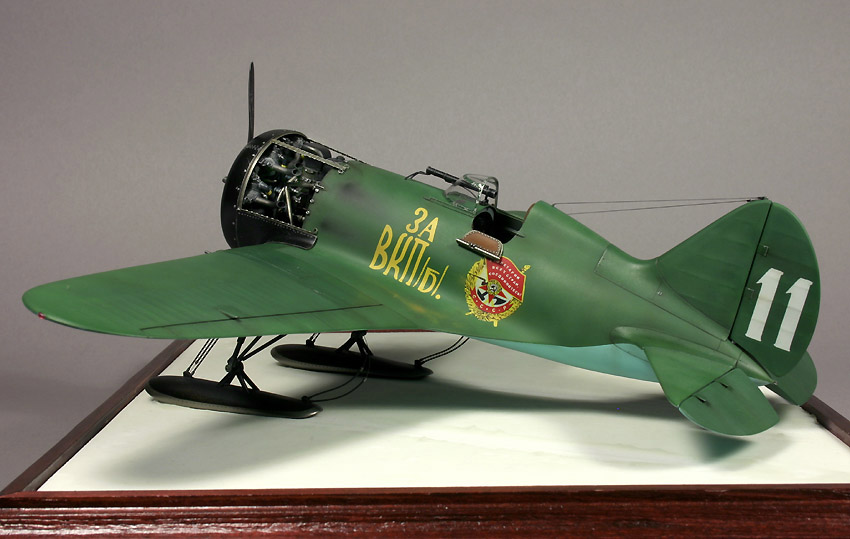
So, the only remaining marking to be applied was the lush emblem of the “Red Banner”. I turned for aid to Terry of Aviaeology, who generously agreed to draw this art anew and then print it for me. There are no less than five layers of ALPS-borne decal in this one, yet it is impossible to tell that the image was not painted on. Truly remarkable!
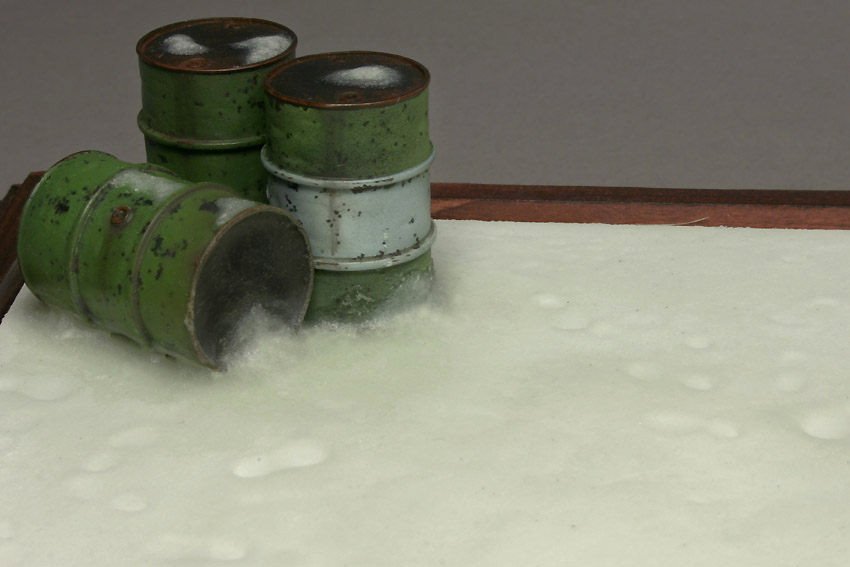 For
the end, a simple wintry base with few abandoned fuel drums was put together,
using a wooden frame with a sheet of white styrene covered in artificial snow.
As the mix of water, white glue and “snow powder“ started to harden
I impressed footprints and ski tracks where appropriate. This is the first time
that I experiment with such scenery, so despite some smaller mistakes I’m
quite content with the result.
For
the end, a simple wintry base with few abandoned fuel drums was put together,
using a wooden frame with a sheet of white styrene covered in artificial snow.
As the mix of water, white glue and “snow powder“ started to harden
I impressed footprints and ski tracks where appropriate. This is the first time
that I experiment with such scenery, so despite some smaller mistakes I’m
quite content with the result.
Help for this model came from many corners of the world as it were. A true tribute to the internet revolution; some of these people I know in person, the others only through the web, but without a doubt this powerful medium and generous hobby comradery made the project possible. Matt Bittner, Erik Pilawskii, Sergey Kosachev, Ilic brothers, Peter Vill, Terry Higgins, Peter Toth, thank you kindly! This one goes to all of you.
Azur I-16 Type-10, 1/32 – courtesy of Internet Modeler
Vector I-16 Engine & Armament Set, 1/32 - courtesy of Vector
Custom “Order of Red Banner” decal – courtesy of Aviaeology
Custom vinyl masks – courtesy of Gremlin Models
 |
 |
 |
 |