Warning: include(/usr/local/psa/home/vhosts/vvs.hobbyvista.com/httpdocs/top.php): failed to open stream: No such file or directory in /home/hobbyvis/public_html/vvs.hobbyvista.com/Modeling/Polikarpov/I-16/Aftermarket/Airwaves/Cockpit/Sekularac/index.php on line 15
Warning: include(): Failed opening '/usr/local/psa/home/vhosts/vvs.hobbyvista.com/httpdocs/top.php' for inclusion (include_path='.:/usr/lib/php:/usr/local/lib/php') in /home/hobbyvis/public_html/vvs.hobbyvista.com/Modeling/Polikarpov/I-16/Aftermarket/Airwaves/Cockpit/Sekularac/index.php on line 15
Airwaves 1:48 I-16 Cockpit Set
Review by: Aleksandar ekularac
Manufacturer: E.D. Models, Solihul, England
[Tel. + 44 121-744-7488, or 0121-744-7488 in the UK]
WWW.airwaves.org.uk
 They
say you can get high on tea as much as on anything else. I have not tried this
myself, and as the prospects are I wont have to, since the old devils Peter
Vill and Bob Partridge have a new delicacy for all of us resin junkies.
They master-modeled, and Airwaves produced, a most needed cockpit set for the
Hobbycraft Polikarpov I-16 in 1:48 scale.
They
say you can get high on tea as much as on anything else. I have not tried this
myself, and as the prospects are I wont have to, since the old devils Peter
Vill and Bob Partridge have a new delicacy for all of us resin junkies.
They master-modeled, and Airwaves produced, a most needed cockpit set for the
Hobbycraft Polikarpov I-16 in 1:48 scale.
I have a problem with in-the-box / out-of-a-bag reviews. I admire those
people that can, cool as champagne, take all the sprues, examine them, photograph,
and then neatly tuck them back in the box. I cant do it. My instincts take
over, and before you know, there is a scalpel in my hand, smell of solvent in
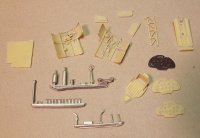
the air, and something gets cut, drilled, painted, or worse. In the picture
above you may notice that this happened to one of the unsuspecting instrument
panels. [Ed Note: Treatment is now available, and
very soon Aleks will be sent to Europe for evaluation by a Specialists; we wish
him the best.] There is also a fuselage frame behind the pilots seat
missing from that picture. Where is it? Well, installed in the fuselage, of
course. I had to see if it fits. Yes it does, like a glove! 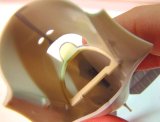
Let me back track, and start with a proper introduction of the set. As far
as I can count, it consists of thirteen resin pieces, and some 25 white metal
bits and bobs on three sprues. The resin is my favorite vanilla colored Airwaves
brew that sands and cuts just as styrene plastic. It is completely bubble-free,
and with very little flash. White metal parts are, well, just that, and they
are also nicely cast (I would prefer these in resin too). All the parts came
to me primed, so I rinsed them in thinner, and that actually helped to emphasize
details in the photos, as some pigment remained in recesses.
This cockpit set is very extensive, well researched, and accurate. It will
allow you to build authentic interior for any of the versions of this historic
aircraft, from types 4 to 29. Once you delve into details of this set, you will
realize that it is all there: early telescopic and later reflective gun sights,
oxygen and nitrogen bottles, flare pistol and set of cartridges, central part
of the wing spar, even a template for shaping a wire for front support of the
telescopic gun-sight, and a block that serves for 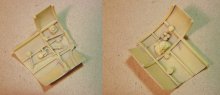 achieving
the correct angle (not straight) between the cockpit floor and fuselage former-frame.
Amazing!
achieving
the correct angle (not straight) between the cockpit floor and fuselage former-frame.
Amazing!
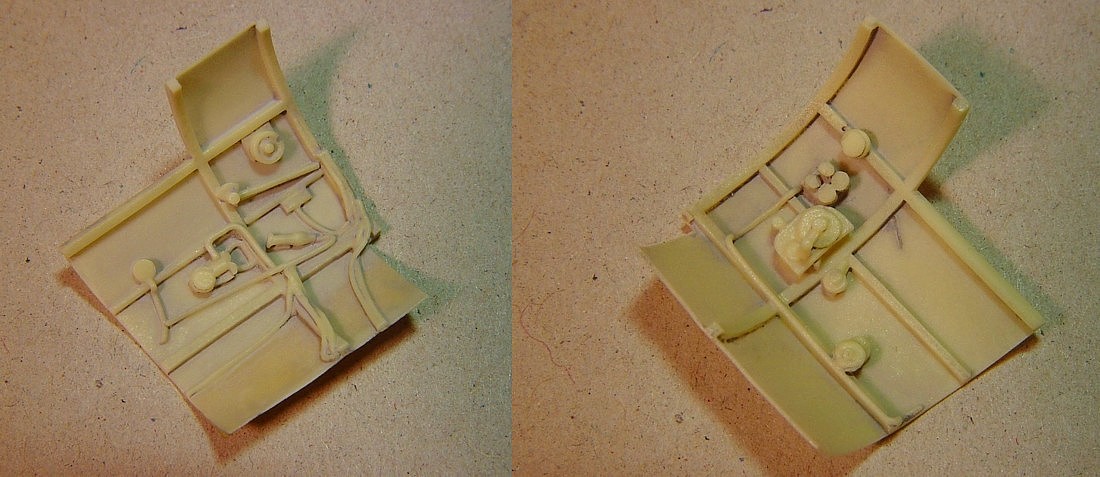
Central parts of the set are the two side panels. They are really more than
that, as they fold under the elevated cockpit floor, as well as under the top
in front of the cockpit, creating a sense of completeness.
These contain all the structural details, engine controls, landing gear winch,
and all of the pipes and hoses. Modelers just need to add control levers, and
these are given as white metal parts (with some spares as well). This makes
for very convincing cockpit. All details are crisp and the walls are very thin.
Care must be taken as they could warp or brake easily, but on the other hand
this flexibility helps when fitting these parts to the curvature of the inner
fuselage sides.
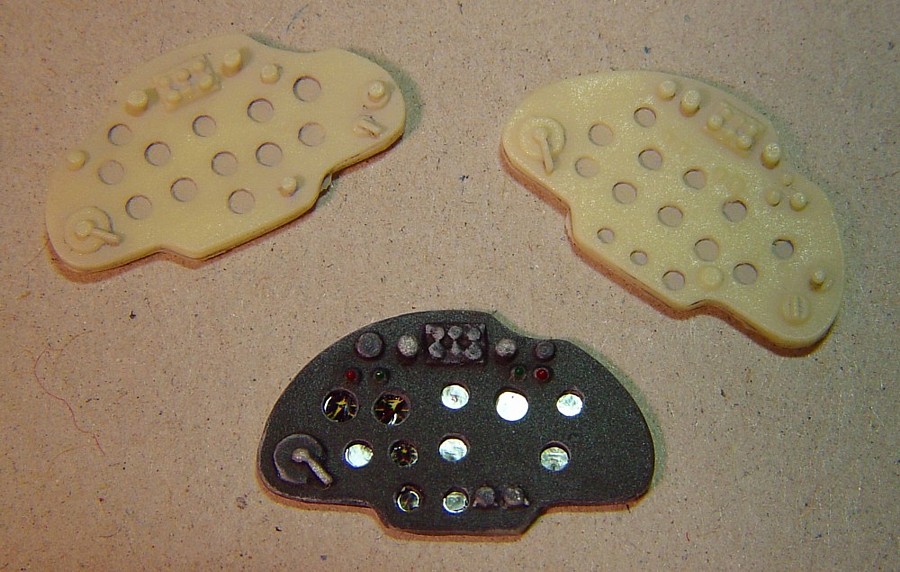
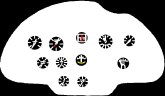
There are three different instrument panels given in the set. They are marked
"4", "10" and late on the back of the part, relating to the specific type
of the aircraft.
I have mixed feelings about these. While it is commendable that one can differentiate
between various instrument layouts, panels themselves are somewhat spartan.
Instrument faces are blank and given as just recesses in the panel surface.
The other knobs present on the panels are also somewhat fuzzy, although undoubtedly
accurate in their position. I would have preferred instrument panels as photo-etched
parts with acetate film for instrument faces. This method became an industry
standard, and it produces most convincing results on the model. With this said,
it is not hard to achieve similar results with the resin pieces given in this
set. I drilled through holes for all of the instruments with drill bits
of the proper diameter. Then I laid the piece with its back down on the sheet
of sand paper, and sanded off most of its thickness. After this I scanned this
part (face down) to get a computer image of the instrument placement. With the
magnified image I created simple instrument faces in a program for manipulating
bitmaps, MS-Paint.
|
|
 |
|
This mask may look crude, but its actually optimized to show details when
scaled down. If you try to add much finer detail to the instrument face, youll
just end up with a black dot when you scale it to size; believe me, I tried....
After this is finished, print the scaled version of this mask on glossy photo
paper. You may need to try it couple of times on regular paper to get just the
right size. When the print dries, cover it with a cote of Future (Kleer
in Europe), for that reflective glass look. Now, all that is left is to
paste that mask on the back of pre-painted resin panel, just like you would
do with photo-etched/acetate combination. Voila, home made instrument panel!
This process may sound complicated but its actually very easy to do.
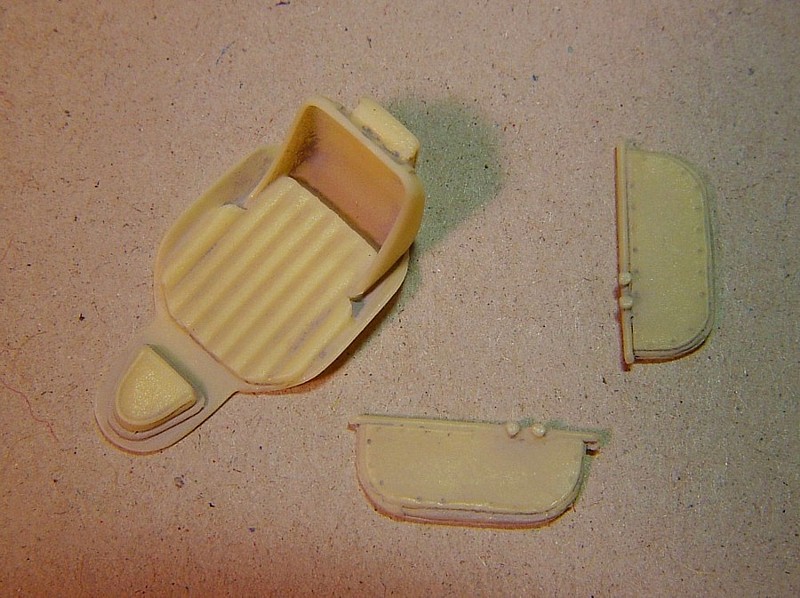
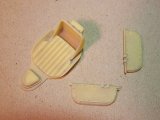 The
pilots seat is given as one piece with the headrest and the back armor, and
it is a very fine casting. Again, it would be nice to have a pilots harness,
either in photo-etch, or cast-on, but it wont be hard to make one. Two cockpit
doors are given in the set. The modeler needs to consult the references whether
to install starboard door, or not, as this one did not exist prior to Type 24.
The
pilots seat is given as one piece with the headrest and the back armor, and
it is a very fine casting. Again, it would be nice to have a pilots harness,
either in photo-etch, or cast-on, but it wont be hard to make one. Two cockpit
doors are given in the set. The modeler needs to consult the references whether
to install starboard door, or not, as this one did not exist prior to Type 24.
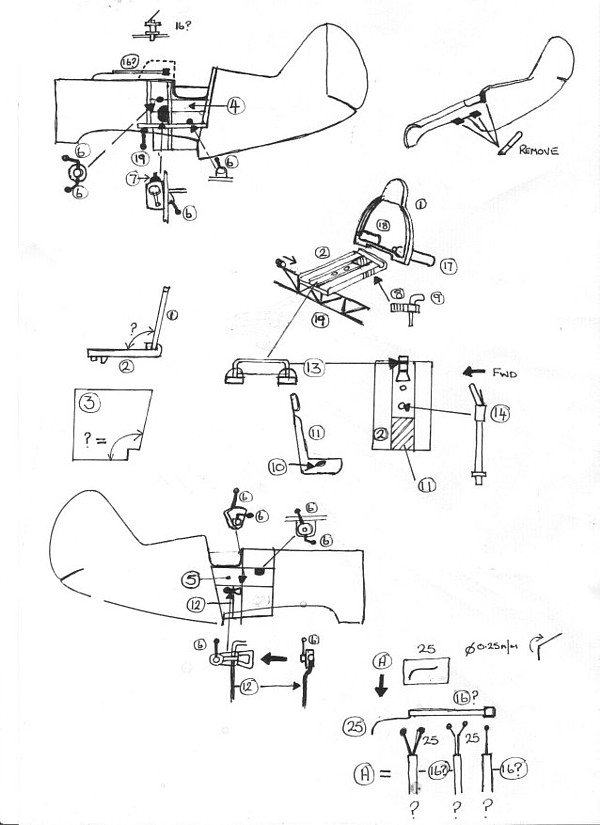
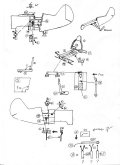
And so far as the instructions are of concern, I tried to be a pain in the
back-end for Peter Vill, and make him improve these as much as possible. I think
instructions are important, and there are many fine kits that fall on the nose
due to poor instructions. Well, after some grumbling, this is the newest version
that Peter sent me fresh from the print. In the production sets there may
even be something more.
 One
thing that is lacking is some painting guidance, especially for these much-confused
VVS subjects. But fear not, as if you are reading this you will get it from
the expert. Not me of course, but the man himself, Erik Pilawskii. With
his permission, I will quote an answer that Ive got from him to my query on
this very topic. So here it is:
One
thing that is lacking is some painting guidance, especially for these much-confused
VVS subjects. But fear not, as if you are reading this you will get it from
the expert. Not me of course, but the man himself, Erik Pilawskii. With
his permission, I will quote an answer that Ive got from him to my query on
this very topic. So here it is:
For I-16 early types, the likely internal finishes would be three options:
1. A-14 (steel), with unpainted structural bits
2. AII Blue, with unpainted structural bits
3. No internal painting at all.
The last option is the most difficult, but the most interesting. The finishing
practices for some of the the internal bits are:
- Control Stick - black (A-12 primer), or unpainted
- Fuel cell and tubing - yellow (DM, or A-6 primer)
- Oil tank and lubrication system - brown (A-8)
- Radio - black (A-12), or dark green (A-7, 4BO, or other)
- Undercarriage wells - as underside (AII Blue, AMT-7, A-28m), or unpainted
- Landing gear/oleo struts - as underside (AII Blue, AMT-7, A-28m)"
Some say--and Id agree--that the Hobbycraft I-16 without Airwaves resin is
like bread without Nutella. Really, if you are building Polikarpov
I-16s in 1:48 scale there are four alternatives for you (and only three are
good):
1. Scratch-build the whole cockpit
2. Get Airwaves cockpit set (probably the best choice)
3. Get NeOmega set (this is also an option, although I havent seen it in flesh)
4. Resort to old lame excuse: it is so tight in there you cant see anything,
anyway. Yeah, right...
I would like to thank Peter Vill for providing the cockpit set, Erik Pilawskii,
as always, for his unmatched VVS color expertise, and Airwaves for producing
this wonderful set.
 They
say you can get high on tea as much as on anything else. I have not tried this
myself, and as the prospects are I wont have to, since the old devils Peter
Vill and Bob Partridge have a new delicacy for all of us resin junkies.
They master-modeled, and Airwaves produced, a most needed cockpit set for the
Hobbycraft Polikarpov I-16 in 1:48 scale.
They
say you can get high on tea as much as on anything else. I have not tried this
myself, and as the prospects are I wont have to, since the old devils Peter
Vill and Bob Partridge have a new delicacy for all of us resin junkies.
They master-modeled, and Airwaves produced, a most needed cockpit set for the
Hobbycraft Polikarpov I-16 in 1:48 scale.