GAZ Starter Truckby James Gray |
|
GAZ Starter Truckby James Gray |
|
C T A P T E P !
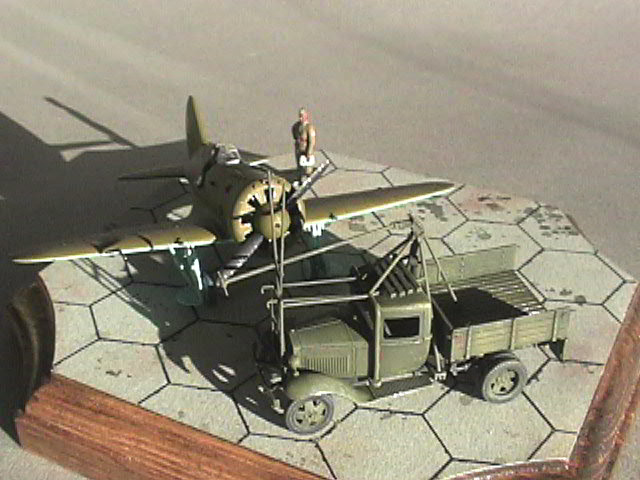
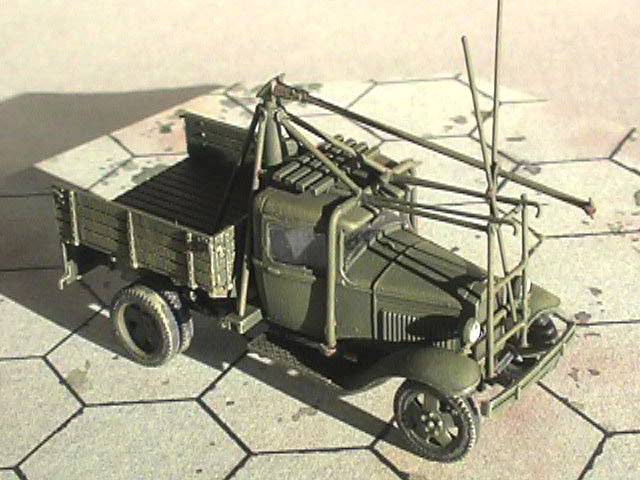
A few years ago I became interested in the VVS (the Soviet Air Force, that
is) and I started reading everything I could find on that subject. There was
surprisingly little. Still, I dug into what I could find, and I began to notice
the frequent appearance of what we in the west would call a "Huck's starter
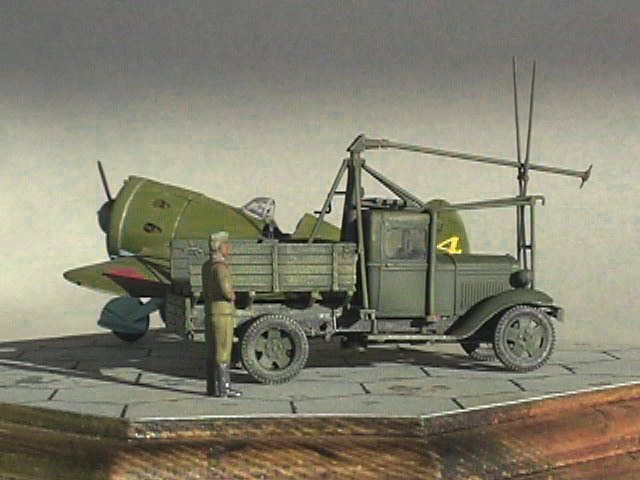
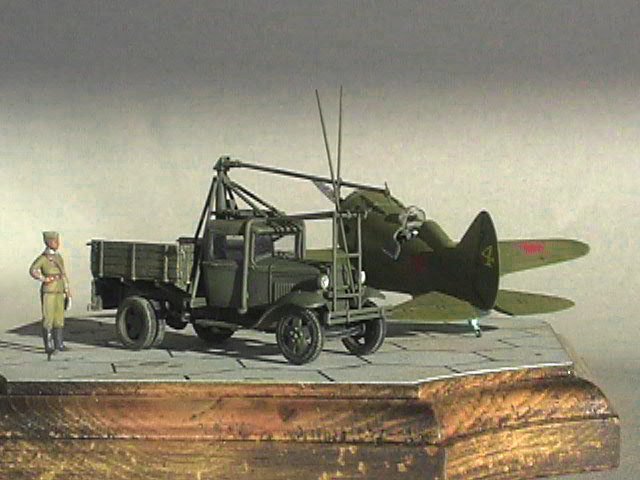
truck." This vehicle is a GAZ truck, a licence-made version of the Ford
Model AA truck, modified to have a power takeoff which comes up the back of
the cab and then out over the front. This engaged a fitting or "dog"
on the propeller boss, and it was used to spin-start aircraft engines. Early
Soviet aircraft lacked self-starters, and so the starter truck is a very common
feature in the early part of the war. You see them with I-153 and I-16 fighters,
and sometimes even with later aircraft like the Il-2 Shturmovik. Even though
I have never seen any pictures of these trucks starting such aircraft as the
Yak-1, Yak-7, Yak-9, and the La-5FN, nevertheless they retained the starter
dog; only in the latter part of the war do the Yak-3 and La-7 abandon it. I
decided I wanted one of these vehicles as an accessory to my Soviet aircraft,
and also as a really unusual model in its own right.
 There
were only a few problems. One was that there was no kit in 1/72nd available
for a GAZ truck, even of other versions suitable for a conversion. Sure, there
were some crude white metal miniatures for wargamers, but my experience with
this sort of "model" was that they were too primitive to serve even
as a starting point.
There
were only a few problems. One was that there was no kit in 1/72nd available
for a GAZ truck, even of other versions suitable for a conversion. Sure, there
were some crude white metal miniatures for wargamers, but my experience with
this sort of "model" was that they were too primitive to serve even
as a starting point.
The other problem was that there were no plans available. I just had an ill-assorted
set of photos from various publications, mostly in the background of the airplanes,
and mostly of poor quality. None of them showed the whole truck. Starter trucks
were not apparently of any interest to Soviet wartime photographers.
 It
seemed unlikely that I would ever be able to satisfy this particular ambition.
Then there was a little light at the end of the tunnel; I heard over the internet
that a new model of a GAZ-AA truck was available from a company called, of all
things, Komintern Models. This was supposed to be a really nice kit. Of course,
Komintern Models didn't suddenly sprout on the shelves of my local K-Mart, but
I managed to get several from Earl at NKR Models in Australia. Six, to be exact.
Hey, you never know when you'll need a GAZ truck! They were indeed very nice
little kits; no shaking the box here, but with a little use of common modelling
skills, the first one I built turned out very nice. That was for practice, before
I turned to the Main Event.
It
seemed unlikely that I would ever be able to satisfy this particular ambition.
Then there was a little light at the end of the tunnel; I heard over the internet
that a new model of a GAZ-AA truck was available from a company called, of all
things, Komintern Models. This was supposed to be a really nice kit. Of course,
Komintern Models didn't suddenly sprout on the shelves of my local K-Mart, but
I managed to get several from Earl at NKR Models in Australia. Six, to be exact.
Hey, you never know when you'll need a GAZ truck! They were indeed very nice
little kits; no shaking the box here, but with a little use of common modelling
skills, the first one I built turned out very nice. That was for practice, before
I turned to the Main Event.
 Once
the first kit was complete, I couldn't avoid my second problem any more. I knew
it was coming, but I kept putting it off. Now there was no longer any excuse;
I had to draw my own plans. I made copies of every photo of a starter truck
in my various books, no matter how fuzzy or dim or incomplete, and I sat down
and studied them. I traced a drawing of the truck from the kit instructions,
and messed with it, and fiddled, and redrew it, until after several different
versions I was satisfied. Perhaps I should say, not too dissatisfied. There
were a lot of points which were still incomplete, so I had to fudge those; I
had no expectations of ever getting any better information, so I had to go with
what I had. It didn't help that there seemed to be several different versions
of the starter truck in use. It was hard to tell since I couldn't see the whole
truck in any of the photos.
Once
the first kit was complete, I couldn't avoid my second problem any more. I knew
it was coming, but I kept putting it off. Now there was no longer any excuse;
I had to draw my own plans. I made copies of every photo of a starter truck
in my various books, no matter how fuzzy or dim or incomplete, and I sat down
and studied them. I traced a drawing of the truck from the kit instructions,
and messed with it, and fiddled, and redrew it, until after several different
versions I was satisfied. Perhaps I should say, not too dissatisfied. There
were a lot of points which were still incomplete, so I had to fudge those; I
had no expectations of ever getting any better information, so I had to go with
what I had. It didn't help that there seemed to be several different versions
of the starter truck in use. It was hard to tell since I couldn't see the whole
truck in any of the photos.
 I
decided to bring the incomplete model to the next Seattle IPMS meeting, mainly
since I'd never show anything if I had to wait to finish it. During show-and-tell,
I said a few words about the model, and about making my own plans. I was really
shocked to be asked to provide these for our club newsletter! I never thought
they were that good. Well, anyway, I said I'd do it, but there might be problems
about copyright, since I traced the basic truck from the instructions, and this
drawing seemed to come in turn from the Russian modelling magazine, M-Hobby.
I
decided to bring the incomplete model to the next Seattle IPMS meeting, mainly
since I'd never show anything if I had to wait to finish it. During show-and-tell,
I said a few words about the model, and about making my own plans. I was really
shocked to be asked to provide these for our club newsletter! I never thought
they were that good. Well, anyway, I said I'd do it, but there might be problems
about copyright, since I traced the basic truck from the instructions, and this
drawing seemed to come in turn from the Russian modelling magazine, M-Hobby.
 I
hunted around, and after a session or two on the computer I came up with an
e-mail address for M-Hobby, and I wrote them a letter and asked them for permission
to use their GAZ-AAA drawing. I hoped that somebody there spoke English. And
I got lucky, I got a reply from the artist himself, Mr. N. Polikarpov. He said,
sure, but why didn't I use his drawings? Well, of course I asked him if he could
E-Mail me copies, and he did. I was curious how they might differ from my own
drawings; I thought there might be some fairly minor discrepancies. Of course,
I was wrong! My drawings were useless; I had the visible details down fairly
well, but I had never realized that the takeoff shaft was not centered behind
the cab at all. It comes up well to the right, perhaps by as much as a foot.
When I went back to the photographs I could see this, once I knew what to look
for. I guess if it isn't obvious, we always assume that things like this are
centered.
I
hunted around, and after a session or two on the computer I came up with an
e-mail address for M-Hobby, and I wrote them a letter and asked them for permission
to use their GAZ-AAA drawing. I hoped that somebody there spoke English. And
I got lucky, I got a reply from the artist himself, Mr. N. Polikarpov. He said,
sure, but why didn't I use his drawings? Well, of course I asked him if he could
E-Mail me copies, and he did. I was curious how they might differ from my own
drawings; I thought there might be some fairly minor discrepancies. Of course,
I was wrong! My drawings were useless; I had the visible details down fairly
well, but I had never realized that the takeoff shaft was not centered behind
the cab at all. It comes up well to the right, perhaps by as much as a foot.
When I went back to the photographs I could see this, once I knew what to look
for. I guess if it isn't obvious, we always assume that things like this are
centered.
 Mr.
Polikarpov most generously agreed that I could publish his plans in our newsletter,
so long as I give him a copy. He also requested that I write an article for
M-Hobby magazine! I was pleased at the idea of being a published author, even
in a language I could not read.
Mr.
Polikarpov most generously agreed that I could publish his plans in our newsletter,
so long as I give him a copy. He also requested that I write an article for
M-Hobby magazine! I was pleased at the idea of being a published author, even
in a language I could not read.
Mr. Boris Megorski, of St. Petersburg, Russia, assisted me in translating the
captions. His technical English wasn't too good, and I have no Russian at all,
but together we managed to sort out what the captions meant. Interestingly enough,
in Russian the word for starter is…starter! Or in the Cyrillic alphabet,
CTAPTEP.
 The
Komintern Model GAZ-AA and GAZ-AAA is a good little kit. The mold-makers seem
to have been very well aware of the limitations of their injection-molding process,
so the parts are broken down into the smallest pieces possible, to minimize
problems with sinkholes. The ejector pins are carefully laid out so that few
of them are visible when the model is complete, and all of these are on the
bottom. Unlike many of the new kits from Eastern Europe, the flow gates are
very small indeed. Some assemblies are quite complex, and there are a few short-shot
pieces (of a sort that are easily replaced) but the only major defect in the
kit is that the cross-ways suspension part (for the GAZ-AAA only, connecting
the two rear axles and bearing the rear spring assemblies) is warped in most
of my kits. Or, since it is the only part which is not flat with the sprue,
perhaps it is distorted by crushing of the box in storage or transportation.
The
Komintern Model GAZ-AA and GAZ-AAA is a good little kit. The mold-makers seem
to have been very well aware of the limitations of their injection-molding process,
so the parts are broken down into the smallest pieces possible, to minimize
problems with sinkholes. The ejector pins are carefully laid out so that few
of them are visible when the model is complete, and all of these are on the
bottom. Unlike many of the new kits from Eastern Europe, the flow gates are
very small indeed. Some assemblies are quite complex, and there are a few short-shot
pieces (of a sort that are easily replaced) but the only major defect in the
kit is that the cross-ways suspension part (for the GAZ-AAA only, connecting
the two rear axles and bearing the rear spring assemblies) is warped in most
of my kits. Or, since it is the only part which is not flat with the sprue,
perhaps it is distorted by crushing of the box in storage or transportation.
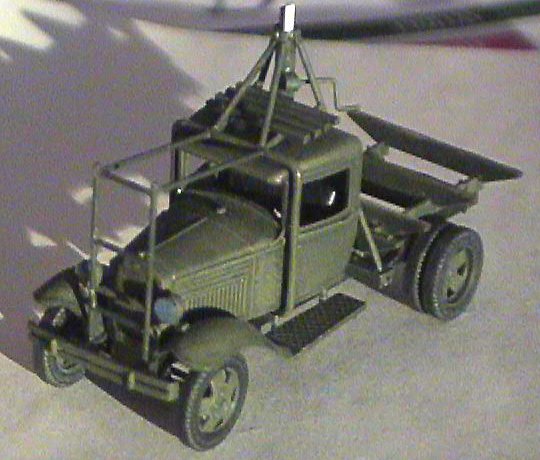
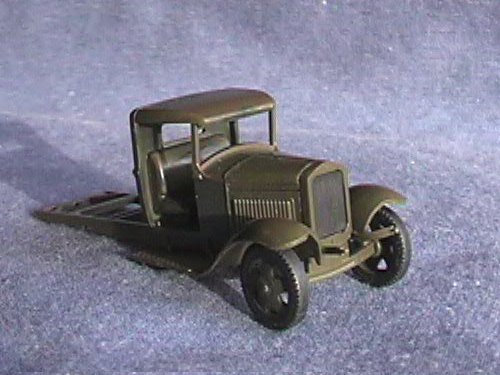 The
cab is a complex assembly. First, I installed very thin plastic strips at the
rear window, and the top of the windshield, to provide a positive location for
the later installation of the window glass. I glued the base of the cab to the
frame and left it to dry hard; when it was done, I built up the whole rest of
the cab at once with a slow-setting glue so that I could adjust all the parts
to fit properly with each other. I only put the steering wheel and shaft into
the cab after the cab was complete, which was awkward, but the only way I could
see how to do this. The cab is the most impressive part of the kit, the fit
is very good. So good that the doors (which are separate parts) are a neat press-fit
into their places. I put these into their places when I assembled the cab to
ensure that everything fit properly, without getting any glue on the doors.
That way I could remove them and install the steering wheel, and paint the cab
interior.
The
cab is a complex assembly. First, I installed very thin plastic strips at the
rear window, and the top of the windshield, to provide a positive location for
the later installation of the window glass. I glued the base of the cab to the
frame and left it to dry hard; when it was done, I built up the whole rest of
the cab at once with a slow-setting glue so that I could adjust all the parts
to fit properly with each other. I only put the steering wheel and shaft into
the cab after the cab was complete, which was awkward, but the only way I could
see how to do this. The cab is the most impressive part of the kit, the fit
is very good. So good that the doors (which are separate parts) are a neat press-fit
into their places. I put these into their places when I assembled the cab to
ensure that everything fit properly, without getting any glue on the doors.
That way I could remove them and install the steering wheel, and paint the cab
interior. 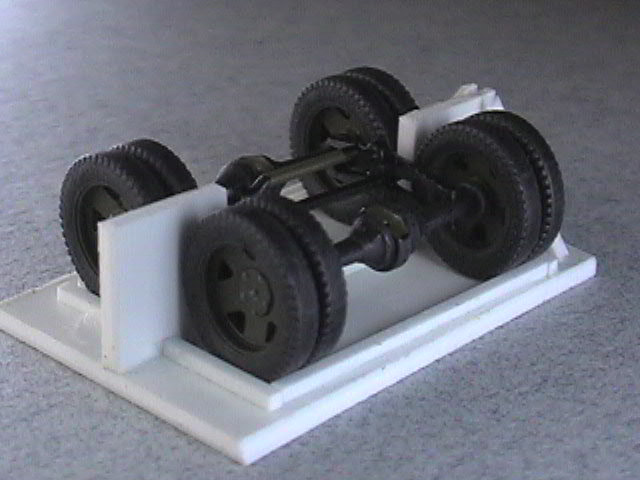 It
would probably have been better to paint the inside of the cab first, but I
didn't want to get paint on the gluing surfaces, and it was not hard to paint
in there later. It was harder to get the steering wheel shaft installed, but
I managed somehow.
It
would probably have been better to paint the inside of the cab first, but I
didn't want to get paint on the gluing surfaces, and it was not hard to paint
in there later. It was harder to get the steering wheel shaft installed, but
I managed somehow.
The most difficult part of the construction was the rear suspension. Unlike
the splendid engineering of the cab, the rear suspension is not well done at
all. There are no positive connections between the various parts; as the worst
example, the rear axles fit vaguely somewhere between the ends of the pairs
of rear springs, but they are smaller in diameter than the space provided, and
won't touch on both top and bottom at the same time. On my first model, I messed
this 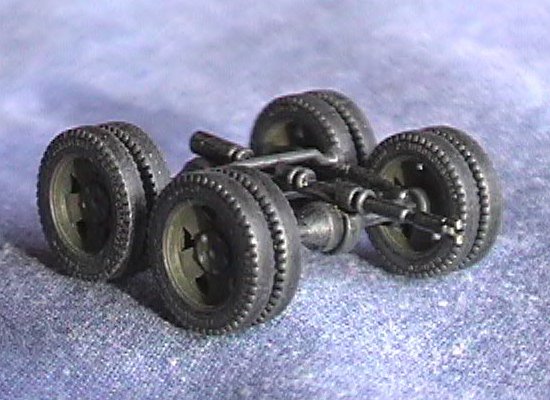 whole
assembly up and finally had to make some solid posts between the axles and the
frames. My second try, I built a nice jig to hold the wheels and axles in the
proper configuration while I built the rear suspension around them. I glued
some small blocks into the inside of the springs to fill the gap between them
and the axles. The suspension came out very well. Alas! It was all for nothing.
When I got Mr. Polikarpov's plans, I decided to build the AS-1 version, based
on the GAZ-AA, instead of the AS-2 based on the GAZ-AAA. This meant that I had
to break this nice assembly off and start over. The GAZ-AA has only a single
rear axle. The single axle rear suspension on the kit is not particularly better
than the dual rear axle assembly; it is simpler and that helps, but there are
still no real attachments between the springs and the axle. When I had built
up this assembly, a check of the model vehicle showed that the chassis was
whole
assembly up and finally had to make some solid posts between the axles and the
frames. My second try, I built a nice jig to hold the wheels and axles in the
proper configuration while I built the rear suspension around them. I glued
some small blocks into the inside of the springs to fill the gap between them
and the axles. The suspension came out very well. Alas! It was all for nothing.
When I got Mr. Polikarpov's plans, I decided to build the AS-1 version, based
on the GAZ-AA, instead of the AS-2 based on the GAZ-AAA. This meant that I had
to break this nice assembly off and start over. The GAZ-AA has only a single
rear axle. The single axle rear suspension on the kit is not particularly better
than the dual rear axle assembly; it is simpler and that helps, but there are
still no real attachments between the springs and the axle. When I had built
up this assembly, a check of the model vehicle showed that the chassis was 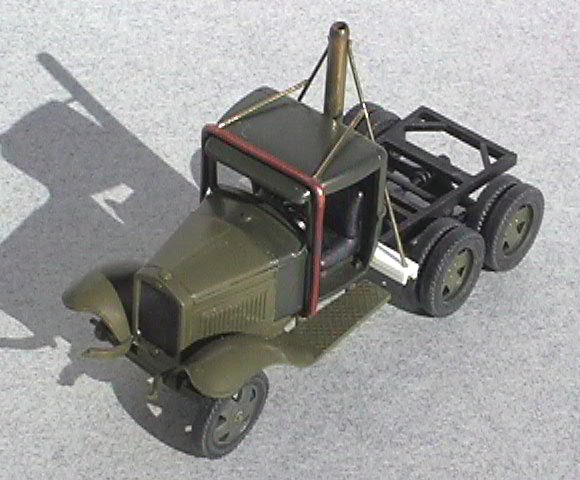 completely
level front-to-back. I had to break the rear axle off again and add some plastic
shims to lift the rear end, since the GAZ truck (like its father the Ford) has
a strong nose-down attitude. Still, it looked good when I finished with it.
completely
level front-to-back. I had to break the rear axle off again and add some plastic
shims to lift the rear end, since the GAZ truck (like its father the Ford) has
a strong nose-down attitude. Still, it looked good when I finished with it.
The wheels are made to spin like a toy. This was not a very worth-while feature,
and the hubs are much less accurate for it, so I got rid of it, and remade the
hubs. The front hubs were not too bad, but the rear hubs I covered with small
circles of plastic. I made up the nuts with tiny drops of Elmer's glue, which
I spaced fairly evenly. I'd like to do them better, but it is difficult in this
scale to do the really small details. My hands are just not accurate enough.
 Before
I made the front framing, I installed the headlights, since they are behind
the framing. I drilled out the headlights and glued a piece of aluminum foil
in each one. I filled them with superglue; I had used this before with success,
but this time the glue was so opaque when it dried that it was useless. I took
some advice from another modeller (my thanks to Bill Glinsky) and tried again
using epoxy; this came out quite well.
Before
I made the front framing, I installed the headlights, since they are behind
the framing. I drilled out the headlights and glued a piece of aluminum foil
in each one. I filled them with superglue; I had used this before with success,
but this time the glue was so opaque when it dried that it was useless. I took
some advice from another modeller (my thanks to Bill Glinsky) and tried again
using epoxy; this came out quite well.
As with the rear axle, I had to rip off a fair amount of my other work when
I saw that my home-made plans were inaccurate. I won't get into that, since
the construction methods were identical between the first and the second attempts.
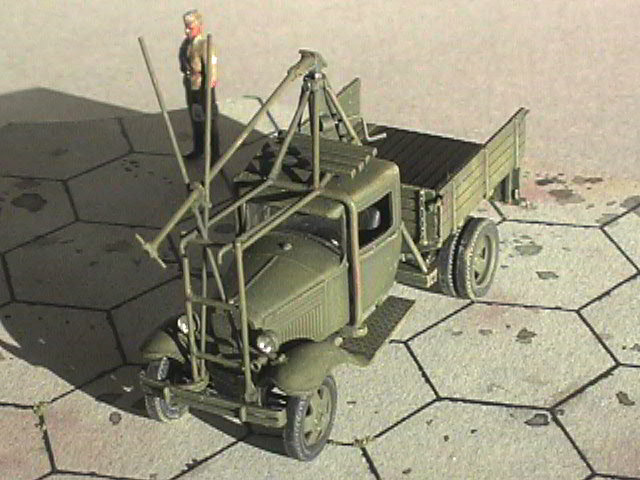
I started by making a 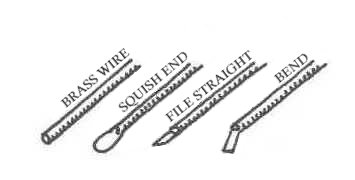 channel-iron
out of plastic strip. This is the base for everything and it runs horizontally
across between the cab and cargo bed. A brass tube was mounted vertically on
this for the main vertical member of the power takeoff. I made the side braces
out of fine brass wire. The bottom ends I just stuck into holes in the channel-iron,
slightly protruding to represent the nuts that hold the braces in place. The
top ends of the braces I attached to the vertical post. I could not duplicate
the actual connections here, so
channel-iron
out of plastic strip. This is the base for everything and it runs horizontally
across between the cab and cargo bed. A brass tube was mounted vertically on
this for the main vertical member of the power takeoff. I made the side braces
out of fine brass wire. The bottom ends I just stuck into holes in the channel-iron,
slightly protruding to represent the nuts that hold the braces in place. The
top ends of the braces I attached to the vertical post. I could not duplicate
the actual connections here, so  I
faked it; I made a tab on the end of each brace by crushing the end of the wire
with a pair of pliers. I filed it square, then bent it to conform with the angle
of the post. This formed a sufficiently strong joint; I would have preferred
a more authentic representation of the actual connection, but I couldn't manage
something that small. Likewise, other joints were "fudged" for the
same reason; I made them into butt joints. Most of the framing on the model
is brass wire, simply superglued in place. It is more fragile than soldiering,
but does not require me to learn a new skill. Some of the framing was a diameter
for which I had no brass wire of the right size, so I used plastic rod instead.
This was more fragile, of course, and broke several times.
I
faked it; I made a tab on the end of each brace by crushing the end of the wire
with a pair of pliers. I filed it square, then bent it to conform with the angle
of the post. This formed a sufficiently strong joint; I would have preferred
a more authentic representation of the actual connection, but I couldn't manage
something that small. Likewise, other joints were "fudged" for the
same reason; I made them into butt joints. Most of the framing on the model
is brass wire, simply superglued in place. It is more fragile than soldiering,
but does not require me to learn a new skill. Some of the framing was a diameter
for which I had no brass wire of the right size, so I used plastic rod instead.
This was more fragile, of course, and broke several times.
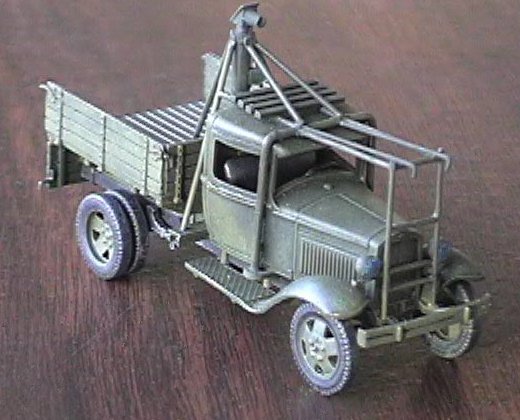 The
power takeoff gearboxes underneath the chassis were made up with small blocks
and bits of plastic. White glue makes up the nut and bolt heads. I had to fudge
a lot of this since the drawings don't show the bottom of the vehicle. I don't
think I have to worry about anyone at my local club telling me my work is inaccurate!
The
power takeoff gearboxes underneath the chassis were made up with small blocks
and bits of plastic. White glue makes up the nut and bolt heads. I had to fudge
a lot of this since the drawings don't show the bottom of the vehicle. I don't
think I have to worry about anyone at my local club telling me my work is inaccurate!
The bevel gearbox on the top of the vertical shaft was difficult, but I thought
things out in advance and it came out right the first try. The chief problem
on this is the difficulty of holding the tiny piece to work on it. First I made
a triangle of styrene the right size for the central box. Then I glued it onto
a thin piece of plastic for the cover; by making this much too big I produced
a 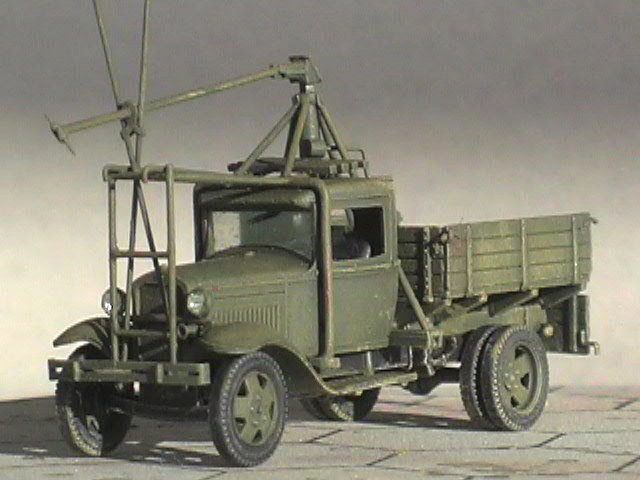 handle,
as it were, to give me something to hang on to. I drilled out the bottom of
the triangle to fit over the vertical shaft. I made a cone from a bit of stretched
sprue; the bits on the ends of the stretched sprue are tapered. Then I made
gussets for the sides, too large, and glued them on. I made them too large to
give me something to hold onto. After the glue was dry I trimmed them the right
size. I also drilled out the end of the cone for the horizontal drive shaft.
Then I trimmed the cover to the correct size. After it was in place, and the
horizontal drive shaft installed, I faked the universal joint out of four tiny
pieces of thin plastic sheet.
handle,
as it were, to give me something to hang on to. I drilled out the bottom of
the triangle to fit over the vertical shaft. I made a cone from a bit of stretched
sprue; the bits on the ends of the stretched sprue are tapered. Then I made
gussets for the sides, too large, and glued them on. I made them too large to
give me something to hold onto. After the glue was dry I trimmed them the right
size. I also drilled out the end of the cone for the horizontal drive shaft.
Then I trimmed the cover to the correct size. After it was in place, and the
horizontal drive shaft installed, I faked the universal joint out of four tiny
pieces of thin plastic sheet.
 The
fitting for the starter dog, on the end of the horizontal drive shaft, was made
out of a very small bit of plastic rod. I drilled it out lengthwise with a #80
bit and inserted my finest wire. Then this assembly was glued across the end
of the drive shaft.
The
fitting for the starter dog, on the end of the horizontal drive shaft, was made
out of a very small bit of plastic rod. I drilled it out lengthwise with a #80
bit and inserted my finest wire. Then this assembly was glued across the end
of the drive shaft.
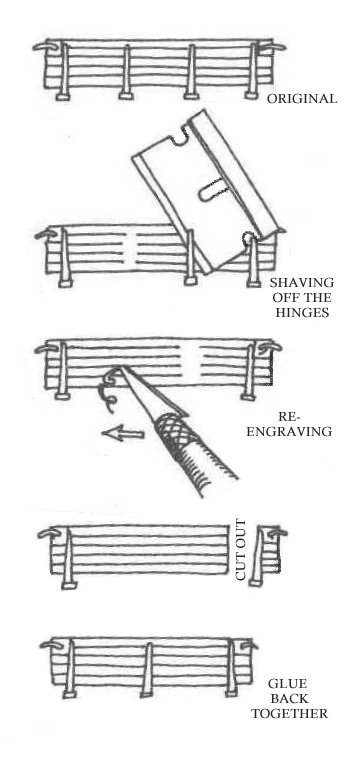 I
was doing quite well and I was nearly done when I discovered that the truckbed
was too long. It was in the plans, but I had not checked the truckbed details
out, and I only noticed it by accident. Apparently the single rear-axle GAZ-AA
has a smaller bed than the dual rear-axle GAZ-AAA, but the kit only comes with
one bed, the longer one. I tore the improper bed off and shortened it. I didn't
want to mess up the very fine detail on the latches at each upper corner of
the sides, so what I did was this; I shaved off the hinges except the ones on
either end. I cut the sides apart at a hinge, and then cut out a section to
make the right length. I glued them back together, then filled and rescribed
the boards, then glued the hinges back on. It was a bit difficult to do without
showing the cut on the inside, but I managed, and it was well worth-while.
I
was doing quite well and I was nearly done when I discovered that the truckbed
was too long. It was in the plans, but I had not checked the truckbed details
out, and I only noticed it by accident. Apparently the single rear-axle GAZ-AA
has a smaller bed than the dual rear-axle GAZ-AAA, but the kit only comes with
one bed, the longer one. I tore the improper bed off and shortened it. I didn't
want to mess up the very fine detail on the latches at each upper corner of
the sides, so what I did was this; I shaved off the hinges except the ones on
either end. I cut the sides apart at a hinge, and then cut out a section to
make the right length. I glued them back together, then filled and rescribed
the boards, then glued the hinges back on. It was a bit difficult to do without
showing the cut on the inside, but I managed, and it was well worth-while.
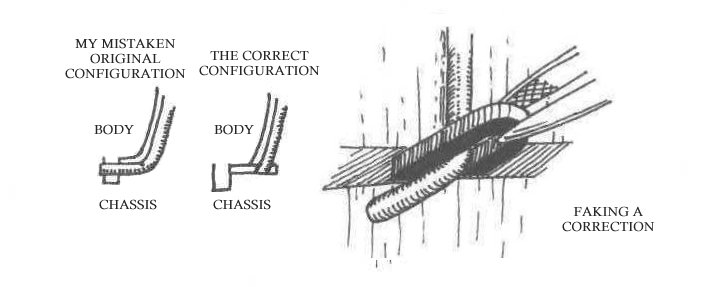 The
last re-work I did was on the bottom end of the main pipe framing; this is the
piece that goes around the whole front of the cab. I could not tell how this
was attached when I started, so I just bent the bottom ends (this part of the
frame was a bit of copper wire I salvaged from a garbage can at work) around
the bottom of the cab and stuck them in drilled holes in the chassis. Well,
of course Mr. Polikarpov's detailed drawings showed that this was wrong. Flat
plates stick out from the bottom of the cab and
The
last re-work I did was on the bottom end of the main pipe framing; this is the
piece that goes around the whole front of the cab. I could not tell how this
was attached when I started, so I just bent the bottom ends (this part of the
frame was a bit of copper wire I salvaged from a garbage can at work) around
the bottom of the cab and stuck them in drilled holes in the chassis. Well,
of course Mr. Polikarpov's detailed drawings showed that this was wrong. Flat
plates stick out from the bottom of the cab and 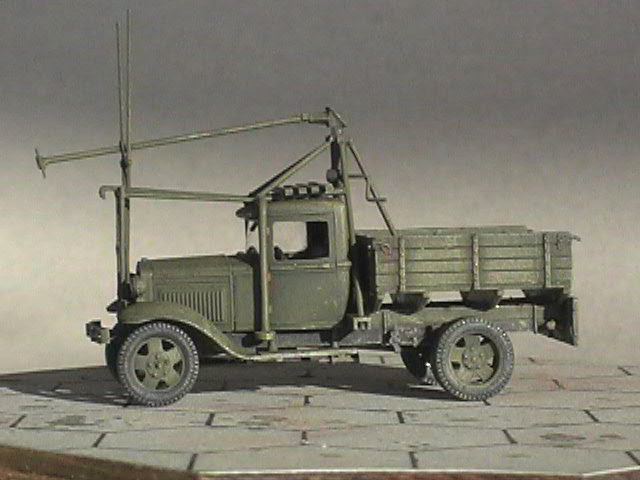 the
pipe is attached to these flat plates somehow. I didn't want to pull it out,
though, as it had taken a fair amount of time to bend to just the right shape,
and it had come out so well. In the end, I faked it; I cut a small u-shaped
piece of styrene and fit it over the bottom of the pipe. It is difficult to
see, even if you are looking for it, that this is not the correct assembly.
the
pipe is attached to these flat plates somehow. I didn't want to pull it out,
though, as it had taken a fair amount of time to bend to just the right shape,
and it had come out so well. In the end, I faked it; I cut a small u-shaped
piece of styrene and fit it over the bottom of the pipe. It is difficult to
see, even if you are looking for it, that this is not the correct assembly.
I am a paint-as-you-go kind of guy; even if I wasn't, it would be very difficult
to paint around the suspension on the bottom of the truck. The chassis and suspension
parts are black. The rest of the truck was two thin brush-coats of Humbrol 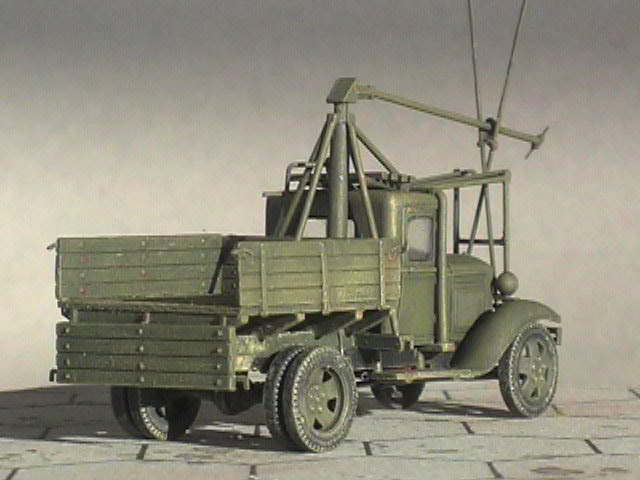 Deep
Bronze Green, heavily drybrushed over with Pactra (remember Pactra?) Light Olive
Drab. This provides much the same effect as a wash. Then I drybrushed again
with Humbrol German Panzer Yellow, for dirt and dust. This color is not so light
it is easy to mess up with, and makes things nicely but not overly grubby. Over
this I lightly drybrushed the Light Olive Drab again to tone down the effect
on sharp corners. Much the same effect was produced on the black chassis and
tires by the use of black, Pactra Hot Rod Primer, and the same Panzer Yellow.
Deep
Bronze Green, heavily drybrushed over with Pactra (remember Pactra?) Light Olive
Drab. This provides much the same effect as a wash. Then I drybrushed again
with Humbrol German Panzer Yellow, for dirt and dust. This color is not so light
it is easy to mess up with, and makes things nicely but not overly grubby. Over
this I lightly drybrushed the Light Olive Drab again to tone down the effect
on sharp corners. Much the same effect was produced on the black chassis and
tires by the use of black, Pactra Hot Rod Primer, and the same Panzer Yellow.
 After
painting and overcoating with a flat finish, I installed the windows, cut from
a shirt-collar reinforcement. A trick someone told me is to blacken the edges
of the clear plastic with a magic marker to make the edge invisible; the effect
is not perfect but it helps a lot.
After
painting and overcoating with a flat finish, I installed the windows, cut from
a shirt-collar reinforcement. A trick someone told me is to blacken the edges
of the clear plastic with a magic marker to make the edge invisible; the effect
is not perfect but it helps a lot.
It's done! There are a few deficiencies, many of which only I will notice.
Nevertheless I am pleased with it, and I don't have to worry about seeing four
more like it on the table at the next IPMS contest.