Pokryshkin`s
MIGs
Building the Classic Airframes 1/48 Scale MIG-3
By Peter Vill
Pokryshkin`s
MIGs
|
|
|
Some people might find this funny or even think me strange but there are certain aircraft that I really like, possibly even think are beautiful. Now the funny bit is that a number of these special aircraft (well to me at least) have not gone down in history as the greatest, in fact some have been the recipient of unkind remarks. For example I prefer the Hurricane to the Spitfire, Plafz to the Albatross and P39 to the P51; SAD ain`t it? Well the MIG-3 is one of those maligned but loved by me aircraft, a bit like the Plafz really, it looks like it should have performed better than has been reported.
But unlike the Plafz it must be remembered that the MIG bore the brunt for aerial responsibility in one of the greatest defence actions witnessed in the history of warfare MOSCOW 1941/42.
During the late 1930`s the Soviet supreme command recognised the threat posed by Adolf Hitler and Nazi Germany, they also came to accept that although having once led the world in fighter design they had allowed themselves to fall behind. The experience of meeting Bf 109`s in the later part of the Spanish civil war had driven home that most un-savoury morsel. The designers of 3 aircraft bureaus were thus charged with restoring the balance, if not the lead.
The aircraft design bureaus chosen to introduce modern aircraft to replace the VVS`s beloved I-16 were YAK, LaGG and MIG, on introduction to service they would be known as the YAK-1, LaGG-3 and MIG-1, though following orders for a number of modifications the MIG-1 was soon designated -3 . It is with the MIG-3 that this article is concerned, and the MIG-3`s of one particular pilot, A. Pokyshkin during that fateful winter and spring of 1941/42 when the future of Europe if not the world waited to be decided in the snows outside the Soviet Capital.
Such events were probably far from the minds of the two chief designers given the responsibility of designing one of the new generation of fighters when they first put pen to paper. Artyom Mikoyan (previously working in the Polikarpov design bureau) and Mikhall Gurevich took over a design which resulted in the I-200, and which would eventually combine the letters of their two names to become the MIG-3. It was also the birth of a name which would be linked to Soviet aircraft design for the next 70 years, and remains so to this day.
The airframe that would eventually become the MIG-3 started life with the designation I-200; this was changed to MIG-1 during December 1940. The new fighter had its fair share of problems, engine over-heat, lack of range, some reference books state that 112 modifications were recommended following state acceptance trails (I have been informed by Erik Pilawskii that the actual figure ran into the thousands, but it must me remembered that the modifications could be as major as requiring extra fuel tanks to something as minor as the wattage of the bulb fitted to a particular instrument). Now, this is where it becomes complicatedabout 100 airframes had been completed before the finally recommended modifications document was produced. At the same time, the Soviet government issued a new production order stating that all future airframes would incorporate these modifications, and that all airframes built to this new specification would be designated MIG-3. You would therefore think that from airframe number 101 all the modifications would have been included; this appears to not have been the case. We will never know if it was due to poor communications either from the state or within the production plants or simply due to a shortage of the necessary parts, but what is clear is that aircraft continued to be produced that did not conform with the MIG-3 specification, in fact Erik doubts that any airframe that was completed in the I-200 programme ever met the entire specification. It is very difficult to say with any certainty what is a 1 or an -3. What can be said is that by the time of the German attack the MIG was the most (numerically) available of the 3 modern fighter designs.
It might be prudent at this time to explain a few things about Soviet aircraft production. The Soviet Army and Navy were more interested in aircraft numbers produced than giving aircraft sub-type numbers. A good example of this is IL-2 production; to the VVS it was always just a plain simple IL-2, irrespective of whether it was a single or twin seat version. It is us, in the west, who invented the sub type suffix. Nothing was going to hold up production, so if all the required parts to carry out the modifications were not available as the airframe went down the line it was completed without them, but was still called a 3, none of this 1a or 2 rubbish.
The MIG was considered to be a difficult aircraft to master, but we must remember that this was in fact the first of a new generation of low wing mono-planes (true the I-16 was already in service but a large number of bi-planes were still on active strength), and that the aircrew were caught by the German attack just as they were changing over. This probably accounts for the fact that large numbers of MIG`s were apparently abandoned on the forward airfields as the pilots escaped in their older but better known bi-planes. Pokryshkin is quoted as describing the MIG thus:- A highly strung race horse that under a skilful rider will rush along like an arrow, but when you lost control you could end up beneath its hoofs.
The MIG-3 was intended to be used as a high altitude interceptor; unfortunately it did not often get the chance to fight at the heights intended, and its armament could best be described as light even in 1941. However, it must be stated that during the Soviet retreat and the subsequent defence of Moscow the MIG was the mostly widespread fighter within the VVS, and that of the 8,278 German sorties against Moscow only 207 bombers got through. When called on to operate at its design altitude it was a very nasty surprise to the German reconnaissance flights, pilot B. Pirozhkov of the 124th fighter regiment intercepted such a flight on the 28th September 1941 at an altitude of 26,250 feet (8,000 metres), continuing to attack the intruder and finally shooting it down at 32,000 feet (10,000 metres). In fact, no reconnaissance aircraft was safe from the MIG`s guns below 36,000 feet.
MIG-3 production was brought to an end as the factory involved in its production
(No.1) received orders to evacuate, and upon relocation to commence production
of other aircraft types deemed to be better and in more urgent need (like the
IL-2). The story ends with the proposal to re-engine the 3 with the Shvetsov
M-82 radial; this airframe was to be called the MIG-9. Construction took place
at Kuibyshev during the end of 1941 under extremely difficult conditions, no
roof on the factory for a start. When the order was given to move the factory
it also contained the death warrant of the MIG , production would recommence
upon relocation not on the MIG but with the IL-2 Confirmation of the order,
Stalin.
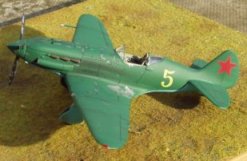
Aleksandr Ivanovich Pokryshkin was born in Novosibirsk on March the 6th 1913. He began what would turn out to be a spectacular military career during 1932, attending an aircraft mechanics school in 1933. Having qualified he was posted to 55 IAP in 1936, he soon requested a transfer to pilot training and some 3 years later he passed his pilots examination at Kacha military flying school. When the war with Nazi Germany began Pokryshkin was again with 55 IAP who were equipped with MIG-3`s. His war did not start well as he mistook one of his own countrys aircraft for an enemy and forced down a Su-2 bomber on the first day of the conflict. He made up for his error the following day when he accounted for a Me-109 and 2 Hs-126s. At the end of 1941 he had 4 kills accredited to him, during this time he had not only had to endure a forced landing behind German lines (Flying the MIG-3 Yellow 5) from which he returned to his unit by walking but the order which required that his unit strip out the 12.7mm UB machine guns and return them to the factories, this resulted in the already light armament of the MIG being reduced to a pair of 7.62mm ShKAS machine guns.
A lesser man might well have given up but Sasha dedicated himself to the improvement of VVS tactics; in fact it appears that he never gave up analysing tactics, manoeuvres or the methods employed by the Germans. He was also very careful to ensure that all pilots within his unit benefited from his studies and a large number of future aces learnt the ropes under Pokryshkin, his 4 step attack principle standing them in good stead: Altitude, Speed, Manoeuvre, Fire. Pokryshkin himself becoming an expert at high-speed ambush attacks from above, making a single high speed run, closing in to point blank range before firing, then using the speed built up in the dive to clear the area and achieve the altitude required to make another run if need be. Pokryshkin would eventually exchange the MIG for the Bell P-39 Airacobra and would continue to master the invaders of his mother land until he was grounded at which time his personnel score was 59. He was awarded the Gold Star of Hero of the Soviet Union 3 times along with Orders of Lenin (6), October Revolution, Red Banner (4), Suvorov 2nd Class (2), Patriotic War 1st Class and the Red Banner (2). He continued to serve within the VVS after the war ended and held many high appointments until he retired in 1981. Sasha Pokryshkin passed away on November 13th 1985; he is buried in Moscows Novodyevichi Cemetery.
I would like to add a final comment on Aleksandr Ivanovich Pokryshkin. Here
was a man that was called to fight against the most combat experienced air force
in the world in an aircraft that was lightly armed, at an altitude that it was
not designed for, and then his own government in desperate need for weapons
to arm aircraft on the production lines then reduces his fire power by 33.3%.
Later on he is given an aircraft that the RAF did not want as it was considered
unsuitable for combat against the same enemy and he still destroys 59 (it is
believed that his real score is much higher) of his opponents. I can only say
that in my mind this makes Sasha Pokryshkin one of the greatest combat pilots
of all time.
The Models
All of the known MIG`s flown by Pokryshkin were of the earlier short nosed variant,
which means that the 1/48 scale modeller only really has one choice: Classic
Airframes / Flashback, and luckily the kit is a good one. The ICM kit is excellent
in its own right but it is of the later long nosed version, so even though they
include decals and a scheme for White / Yellow 5 (More about this later) its
the wrong version of this sleek looking fighter.
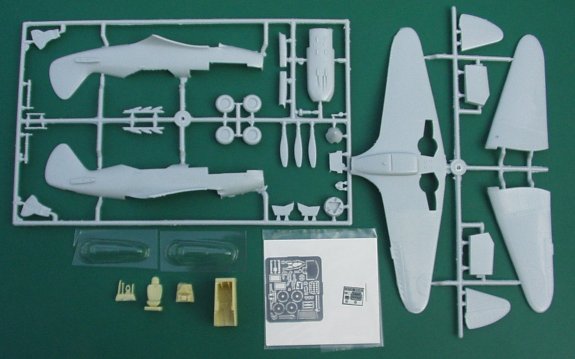
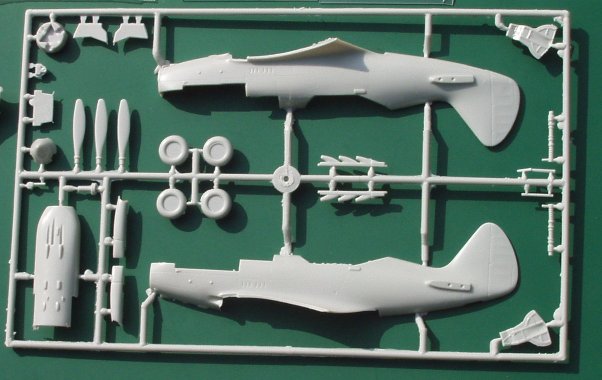
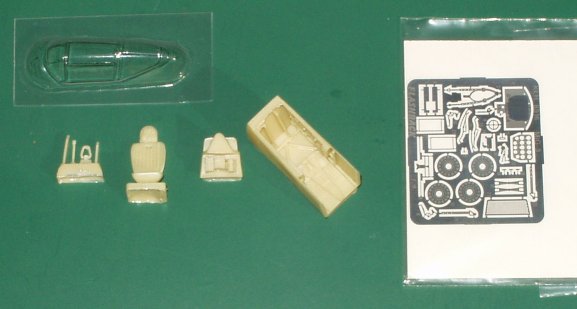
The kit we are to discus was originally released by Classic Airframes who then passed on the moulds to Flashback, the kits manufactured by Flashback differ only in that they have included some resin castings of the under wing gun pods sometimes fitted (I believe these to be applicable to long nosed aircraft), the box also proudly states that it includes a late model cowling well I have 3 of these kits and I cant find any such thing in any of the boxes. The Flashback kit is available from LSA Models priced at £14.95, which is very well priced as far as I am concerned when you consider just what you get. The answer to the question that leads on from that comment is this: 29 pieces moulded in a slightly hard light grey plastic, 7 in resin, 2 vac-formed canopies (I must state that in one of the 3 kits only had 1 canopy), photo negative instrument panel, a mass of photo etched brass detailing and finally decals for 2 machines (one of these reportedly flown by Pokryshkin, but more on that later).
WARNING if you intend to do this strengthening please be careful, you do not want the super glue to run out of any openings as this is likely to firmly fix your fingers to your model, which will be ruined. I do one side at a time and when I am happy that the whole joint has been covered I stand the assembly on that wing tip so that the remaining glue settles inside the wing tip.
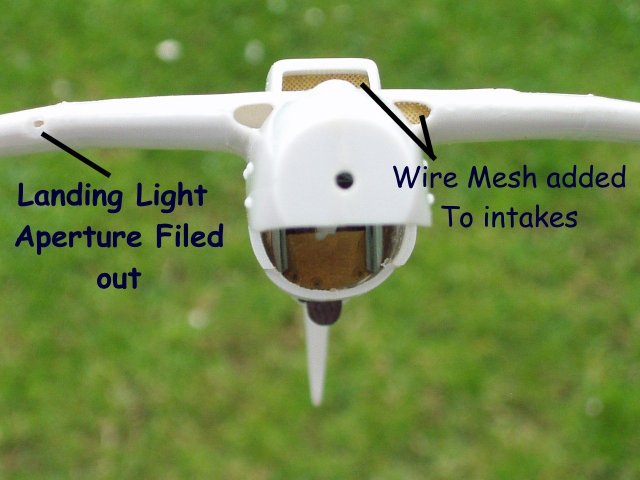
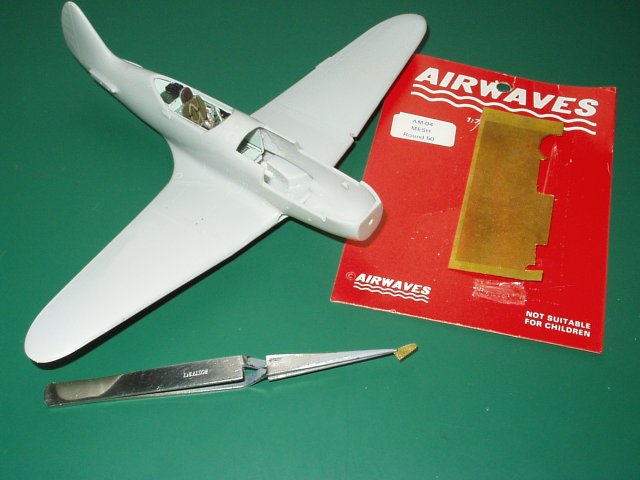
When both sides had been strengthened I fitted the engine cowling and took a round rat tailed file to the port wing and filed out the landing light, as this is represented by a circular panel line on the kit. Once done the lens is quite simply a piece of clear sprue heated over a candle and then pushed into place. The clear sprue will mould itself into the cut out and over the wing (dont bring the heated sprue into contact with the kit wing until it has cooled a littlecarry out some tests on old / scrap models first). Hold it there and allow to cool, cut off the un-wanted sprue, and you can then file/sand it to the correct size and shape (it is possible to make wing-tip lights in the same manner).
The two vac-formed closed canopies provided were carefully cut so that I would be able to make one open set. The front and rear sections were then fixed to the model and blended in as required, after which the whole model was washed.
The remaining parts were cleaned up as required and built into sub-assemblies ready for painting, prior to which everything was primed with Halfords Grey Plastic Primer. Any corrections that the act of priming identified were duly carried out.
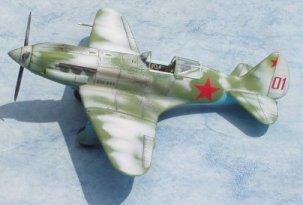
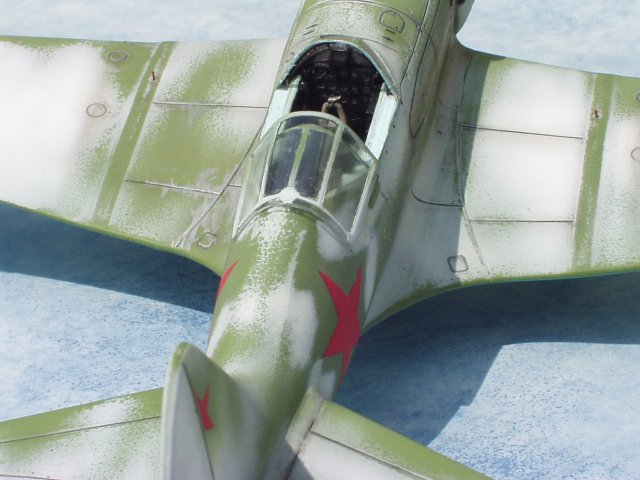
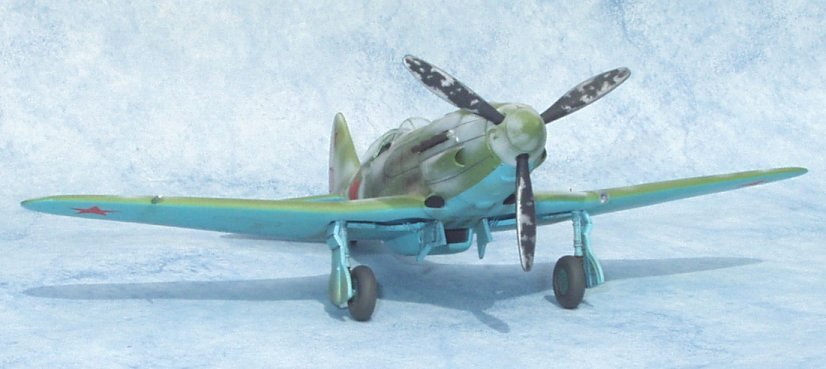
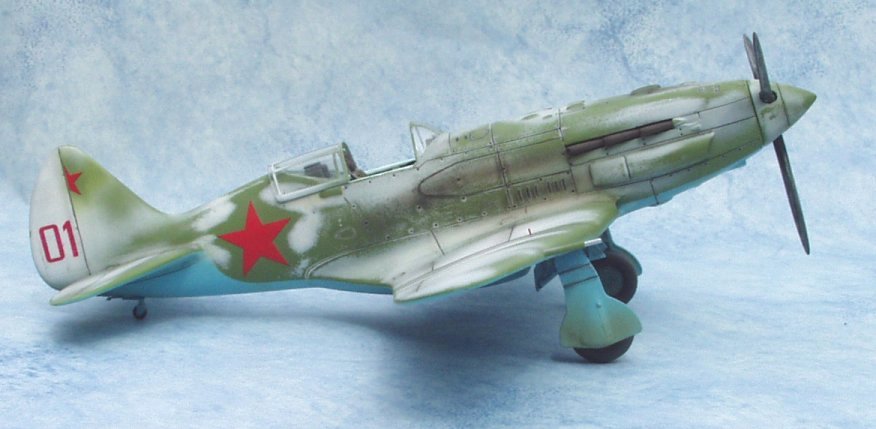
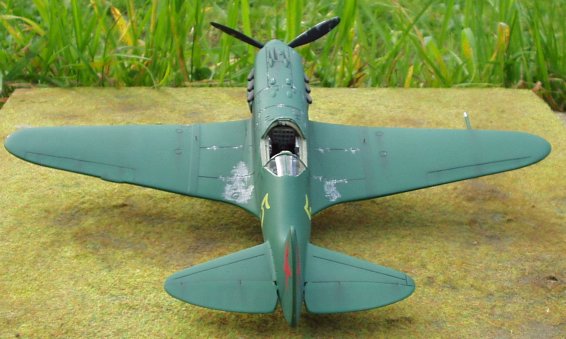
The two schemes chosen were Red 01 as it is likely to have looked during the spring of 1942, and Yellow 5 as it looked during June 1941. Both aircraft were flown by Pokryshkin while with 55 IAP prior to this unit being awarded the title of Guards Unit and being re-designated 16 GIAP. In fact, Red 01 appears to have been cleaned up at the time this honour was bestowed on 55 IAP as there is evidence that this aircraft acquired a red tip to the spinner, the Red 01 being moved to the fuselage side in front of the red star, a guards badge being applied just above the forward facing arm of the star and finally a larger red star that covered a large area of both fin and rudder.
Red 01 was the first to be painted and would be the most difficult of the two models. I have always admired the work of fellow modellers who can portray aircraft or armour in worn / weathered winter camouflage and now having experience the process I admire them even more now.
Having primed the model and all sub-assemblies I started by applying AII Blue to the under surface and any required sub-unit. This colour was mixed using Polly Scale USSR Underside Blue to which was added about 10 / 15 % White; this makes a very good match of this bright and beautiful colour. Unfortunately, I am told that Polly Scale have dropped this paint from their product line. When dry all the necessary masking was carried out using Tamiya Masking tape; these early MIG-3`s appear to have a hard demarcation line on the fuselage so this method is fine. Before applying Paint to the upper surface the masked off canopy parts were first sprayed with the interior colour. When dry the upper surface colour of AII Green (mixed and supplied by Erik Pilawskii) was applied.
When dry the model was given a coat of Halfords Gloss prior to placement of the various decals (in hind sight I would have applied the decals later, all will become clear as you read on). The decals were given a couple of days to dry out before washing the model to remove any trace of setting solution and applying another coat of gloss.
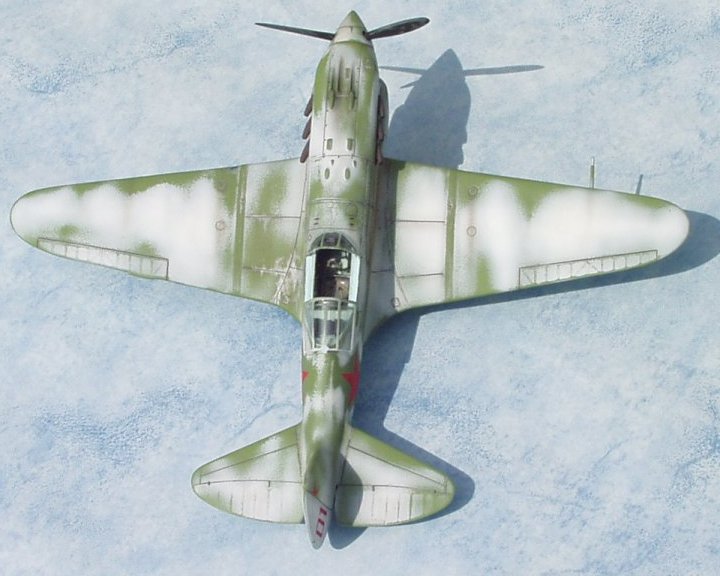
The location of the decals were roughly masked with Blue Tac and the whole topside was then sprayed white and allowed to dry out for a few days. Heart in hand I then took a piece of very fine wet & dry to the upper surface and slowly removed the white to reveal the green underneath, remembering to follow the direction of the airflow. To be honest if it had not been for two very good friends I would have given up an discarded the model into the rubbish binit did not look as I wanted it to until I completed the weathering (THANK you Erik and Bob). In between wanting to give up and final weathering, the model was matt coated.
Weathering was carried out in my usual method by mixing lighter and darker shades of the base coat and applying these shades to selected areas, I also favour a method of post shading by applying thinned black to the various panel lines using my airbrush. This method was complemented by the use of pastels, a final coat of matt being applied when happy . There she wasRed 01, the first of an intended 4; my personal tribute to Sasha.


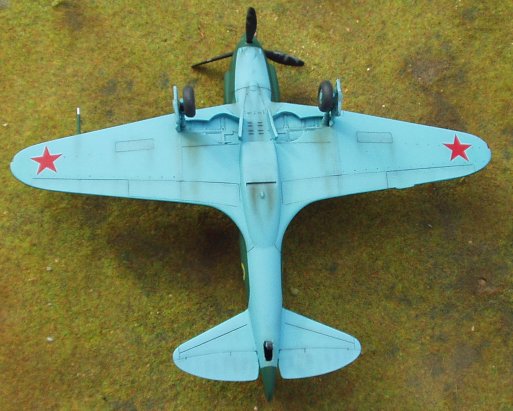
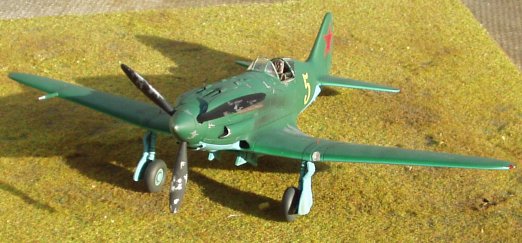
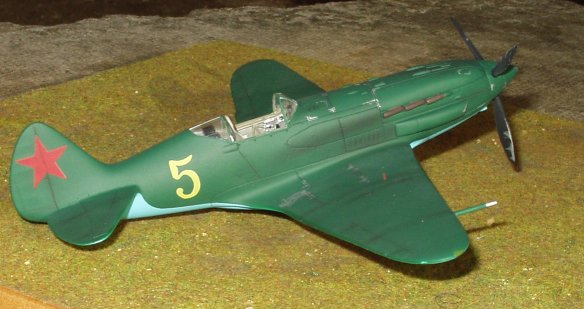
Next into the paint shop was Yellow 5. But surly that should read White 5, I hear people scream. I have had the good fortune to know Erik Pilawskii via the Internet and on a personal basis for some 3 years and I trust his judgement. Erik is of the belief that White 5 is in fact Yellow 5 and that the aircraft was finished in Factory Green.
Having been convinced that White 5 was in fact Yellow 5 and that she was finished in Factory Green I started to paint.
Having painted the under surface in AII Blue the upper surface colour of Factory Green was applied, now this colour was mixed by my very good friend Erik Pilawskii who uses the Liquitex brand of paints. This manufacturer has a very large colour range, but the paint does have one faulit can be murder to spray, and you have to dilute it with the correct amount of Comma Blue Screen Wash or it takes days to dry (rumour has it that a very large paint supplier to our hobby is to release a range of correct VVS colours, about time, I salute you Testors). I always leave a model that has been painted with Liquitex for a week. The whole model being then coated in Halfords Gloss before the application of decals made and supplied by Erik Pilawskii. The model was washed to remove any setting solution before matt coating. I started to weather both upper and lower surfaces using the method describe above.
When happy with the results the whole model was given a final coat of matt.
Yellow 5 now sits with Red 01, awaiting White 40 and the cleaned up Red 01 to join them. I have been told that this might be the first time that Yellow 5 has been depicted correctly.
 |
 |
 |
 |
 |
 |
 |
 |
 |
 |
 |
|
My thanks go to :
Erik Pilawskii
Bob Partridge
Antics Model Shop (Bristol)
E. D. Models (Birmingham)