Vector 1/48th La-5 Razorback
By Aleks Sekularac
Vector 1/48th La-5 RazorbackBy Aleks Sekularac |
|
La-5 was a major mid-war Soviet fighter plane design, one that practically saved Lavochkin Bureau from extinction, and subsequently fathered the most potent breed of radial engine air-superiority fighters. Aviators were keen on these machines for their combination of flying characteristics, robustness and firepower.
 In
2006 Vector company from Russia released 1/48 kits of the La-5 family in resin.
Simple in layout, well engineered and beautifully produced, these kits are to
date the best 3-D representations of Lavohckin fighters. La-5 and La-5F are
already available from Vector, and by the time you are reading this La-5FN may
be also making its premiere. For more information about the La-5 “Razorback”
kit, please refer to my in-box review on the VVS
site.
In
2006 Vector company from Russia released 1/48 kits of the La-5 family in resin.
Simple in layout, well engineered and beautifully produced, these kits are to
date the best 3-D representations of Lavohckin fighters. La-5 and La-5F are
already available from Vector, and by the time you are reading this La-5FN may
be also making its premiere. For more information about the La-5 “Razorback”
kit, please refer to my in-box review on the VVS
site.
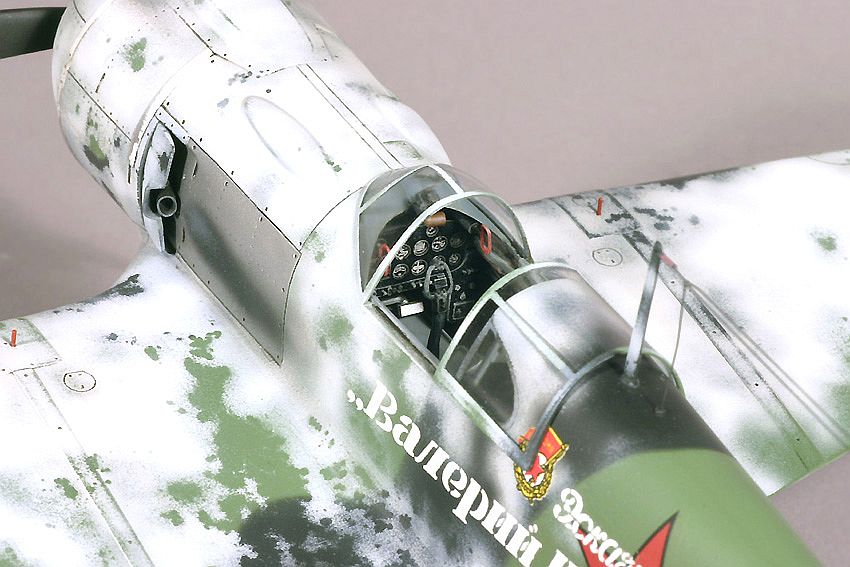
 Most
of the kit’s small parts are made for the interior. All that is provided
is authentic and accurate, so I added only few small control levers on the port
cockpit wall, from photo-etched leftovers, and back end of cannon assemblies
with handles for manual arming. Main instrument panel was also replaced with
Eduard photo-etch piece and acetate insert for instruments.
Most
of the kit’s small parts are made for the interior. All that is provided
is authentic and accurate, so I added only few small control levers on the port
cockpit wall, from photo-etched leftovers, and back end of cannon assemblies
with handles for manual arming. Main instrument panel was also replaced with
Eduard photo-etch piece and acetate insert for instruments.
Side glazing cutouts to the back of pilot’s seat were made from clear acetate, cut to exact size, and super-glued in position with Olba industrial CA glue. Olba, company from Holland, produces the best superglue I’ve ever used. It is very fast, super-strong, and most importantly there is virtually no frosting on the transparent parts when it cures.
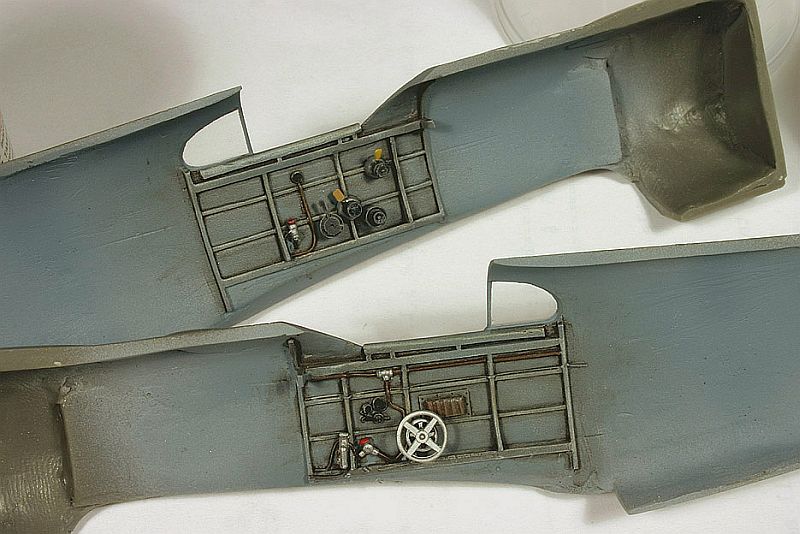 I
first sprayed inside fuselage surfaces with Surfacer 1000, then with “WUP”
(Wood Use Primer) from WEM line of VVS colors. Surfacer, among it’s others
advantages, helps with opacity of the subsequent layers of paint, so that WUP
can be sprayed very thin and therefore dries much faster. WEM paints are otherwise
known for long curing times.
I
first sprayed inside fuselage surfaces with Surfacer 1000, then with “WUP”
(Wood Use Primer) from WEM line of VVS colors. Surfacer, among it’s others
advantages, helps with opacity of the subsequent layers of paint, so that WUP
can be sprayed very thin and therefore dries much faster. WEM paints are otherwise
known for long curing times.
I hand-painted most of the molded-on details, then dry brushed them. Oil wash was the last step in producing a well-worn look. Same techniques were used on the cockpit floor, and pilot’s seat. All the separate small details were painted first and then attached in the appropriate place.
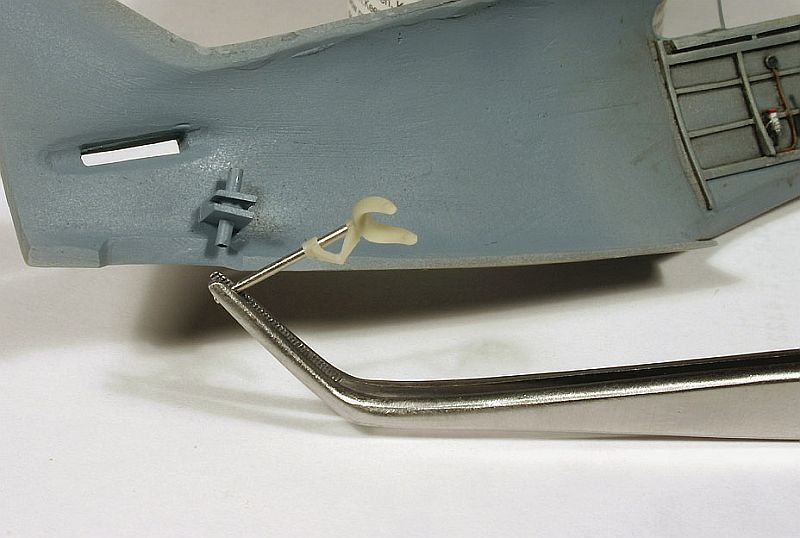 Light
sanding of mating surfaces on the two fuselage halves achieves better alignment
and bond. Before closing the fuselage, I made new tail wheel mount out of bits
of plastic and small metal tubing. Tail wheel strut was also replaced with steel
tubing.
Light
sanding of mating surfaces on the two fuselage halves achieves better alignment
and bond. Before closing the fuselage, I made new tail wheel mount out of bits
of plastic and small metal tubing. Tail wheel strut was also replaced with steel
tubing.
 I
used slow curing two-component epoxy for the fuselage, as well as other major
components of this kit, to give enough time for alignment of resin parts. Additional
advantage is that any excess glue coming out of the seam can be simply cleaned
with moistened Q-tip.
I
used slow curing two-component epoxy for the fuselage, as well as other major
components of this kit, to give enough time for alignment of resin parts. Additional
advantage is that any excess glue coming out of the seam can be simply cleaned
with moistened Q-tip.
To allow for spinning propeller, I constructed simple bearing system for the
propeller shaft. It consists of coaxial plastic tubing with wide enough clearance
to allow for the low friction rotation  and
two plastic plugs on both sides to close it off and prevent axial movement of
the shaft. Shaft itself was recruited from my syringe needle stash. All this
goes directly through a pre-drilled hole in the center of the front fuselage
bulkhead and into the spinner. Aligning everything along the main fuselage axes
is paramount.
and
two plastic plugs on both sides to close it off and prevent axial movement of
the shaft. Shaft itself was recruited from my syringe needle stash. All this
goes directly through a pre-drilled hole in the center of the front fuselage
bulkhead and into the spinner. Aligning everything along the main fuselage axes
is paramount.
Main antenna mast and Pitot-tube are missing in the kit, so I formed them out of scraps of plastic and syringe tubing. I added a small antenna connector on the tip of vertical fin. This is a photo-etched bit from Eduard’s very useful “Wire Stretchers & Controlhorns” set.
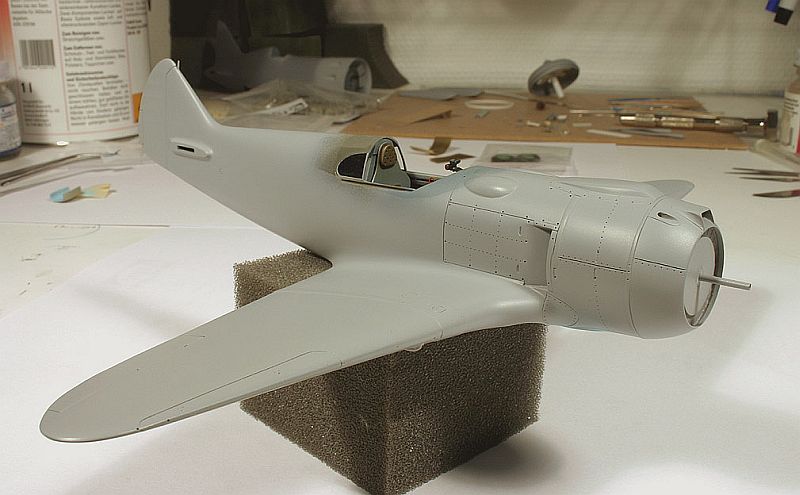
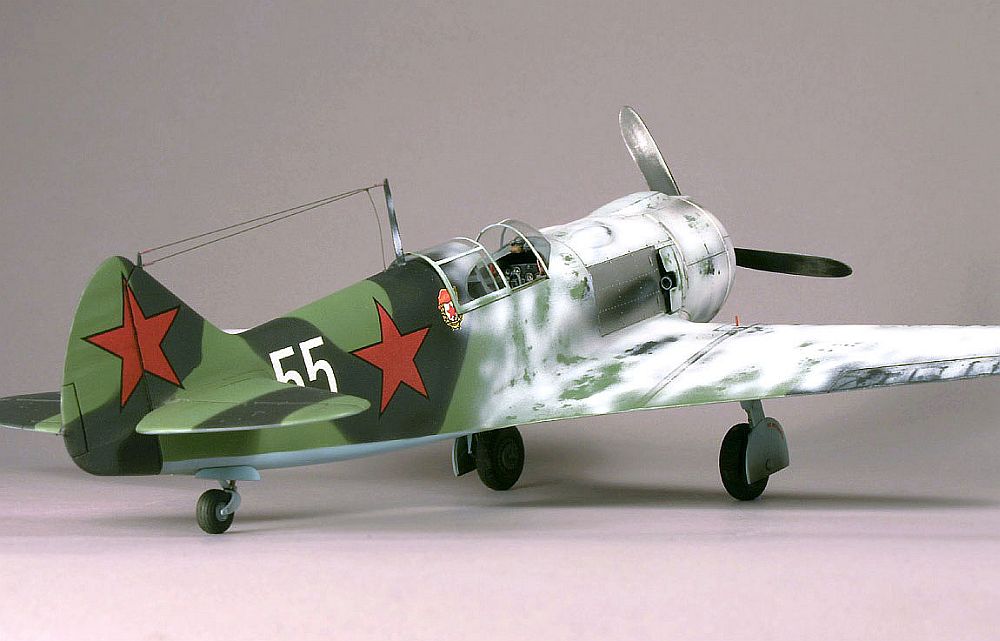
Two alternative vacu-formed windshields are supplied in the kit. La-5 variant that I wanted to model had the early “aerodynamic” windshield, without front armored glass.
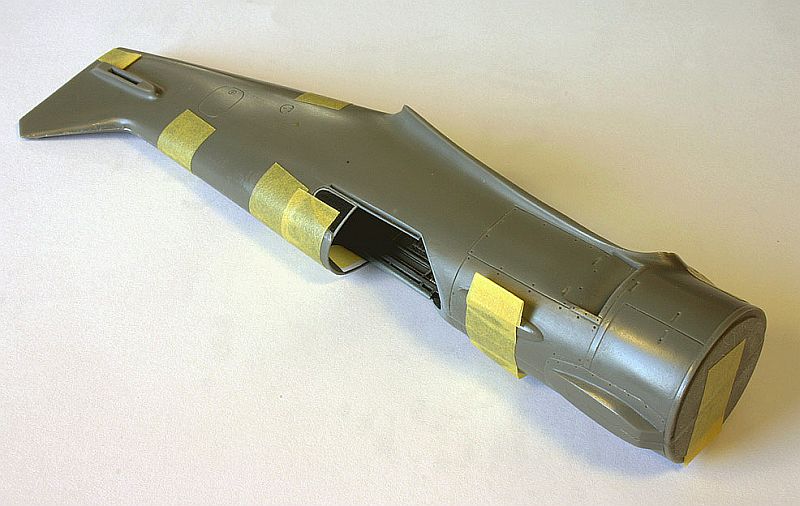
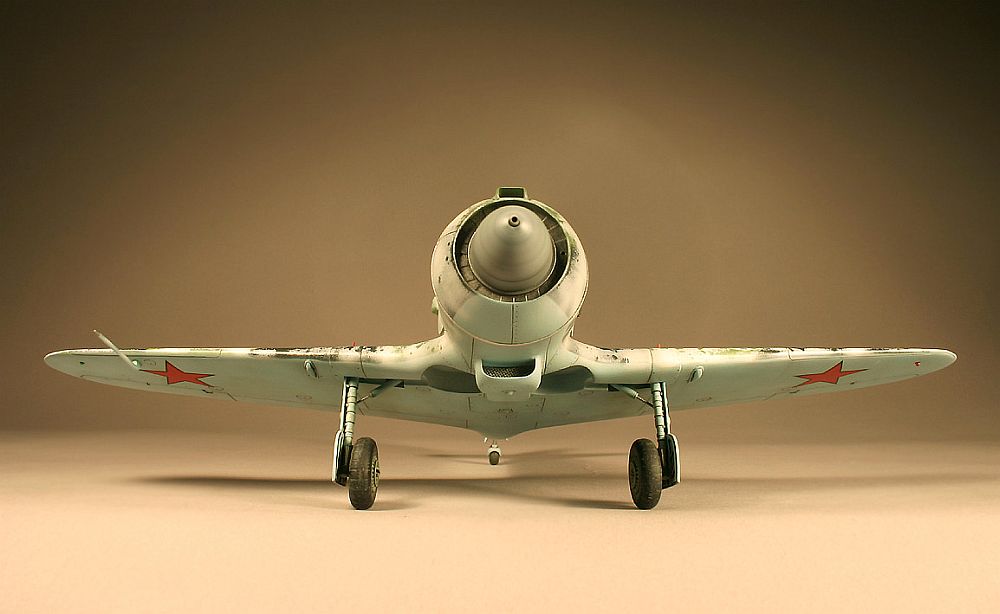
Wing is a beautifully cast in one piece, with all appropriate details, correct dihedral, sharp and straight trailing edge. It goes together with the fuselage in pleasant harmony.
 After
sanding the joint between wing and fuselage, I placed the chin oil-cooler. Here
I added a fine metal mesh to an otherwise faceless heat exchanger. Rows of rivets
around the cowling were made using compass needle in a pin vise. Not wanting
to clutter the model with every existing rivet of the real plane, I opted for
more elegant approach, only suggesting the lines of rivets in appropriate places,
to differentiate metal from wooden parts of the airframe. For me this produces
well-balanced final look of the model in this scale.
After
sanding the joint between wing and fuselage, I placed the chin oil-cooler. Here
I added a fine metal mesh to an otherwise faceless heat exchanger. Rows of rivets
around the cowling were made using compass needle in a pin vise. Not wanting
to clutter the model with every existing rivet of the real plane, I opted for
more elegant approach, only suggesting the lines of rivets in appropriate places,
to differentiate metal from wooden parts of the airframe. For me this produces
well-balanced final look of the model in this scale.
Tail surfaces presented no problem at all. I was deliberating if to cut and reposition the horizontal stabilizers. Many photos of the real aircraft at rest show control surfaces without any offset, so I decided to let them be.
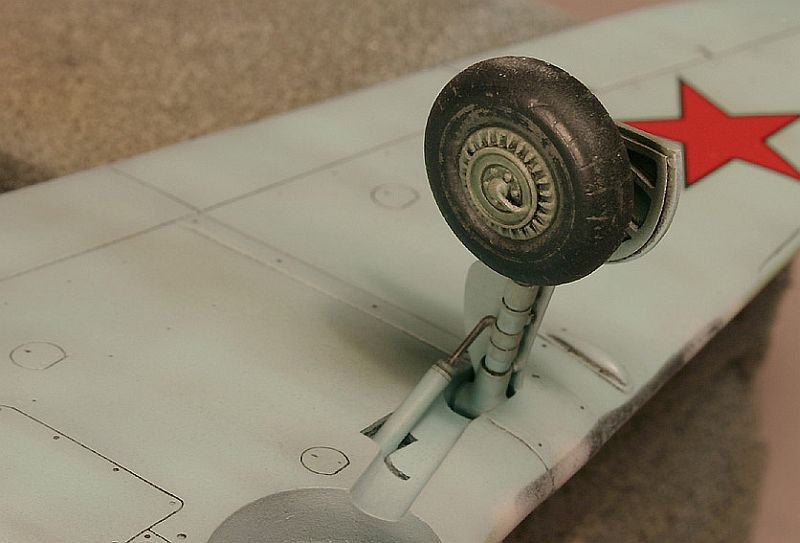 Main
landing gear was used without to many changes as well. I’ve only replaced
the actuator rod with a piece of steel wire. Main leg oleo was covered in Bare
Metal Foil. The upper part of the leg cover is far to long as given in the kit.
I think it was meant to go into the landing gear bay recess, alongside the main
leg, but there is simply no space for this. I’ve cut the upper part of
this cover until it allowed for the wheel fairing to fit properly. Kit supplied
Equipage rubber wheels & resin hubs were used to their advantage. Despite
shortcomings of the rubber wheels, they lend themselves to weathering, and also
offer opportunity to work on the hubs separately. I like this concept.
Main
landing gear was used without to many changes as well. I’ve only replaced
the actuator rod with a piece of steel wire. Main leg oleo was covered in Bare
Metal Foil. The upper part of the leg cover is far to long as given in the kit.
I think it was meant to go into the landing gear bay recess, alongside the main
leg, but there is simply no space for this. I’ve cut the upper part of
this cover until it allowed for the wheel fairing to fit properly. Kit supplied
Equipage rubber wheels & resin hubs were used to their advantage. Despite
shortcomings of the rubber wheels, they lend themselves to weathering, and also
offer opportunity to work on the hubs separately. I like this concept.
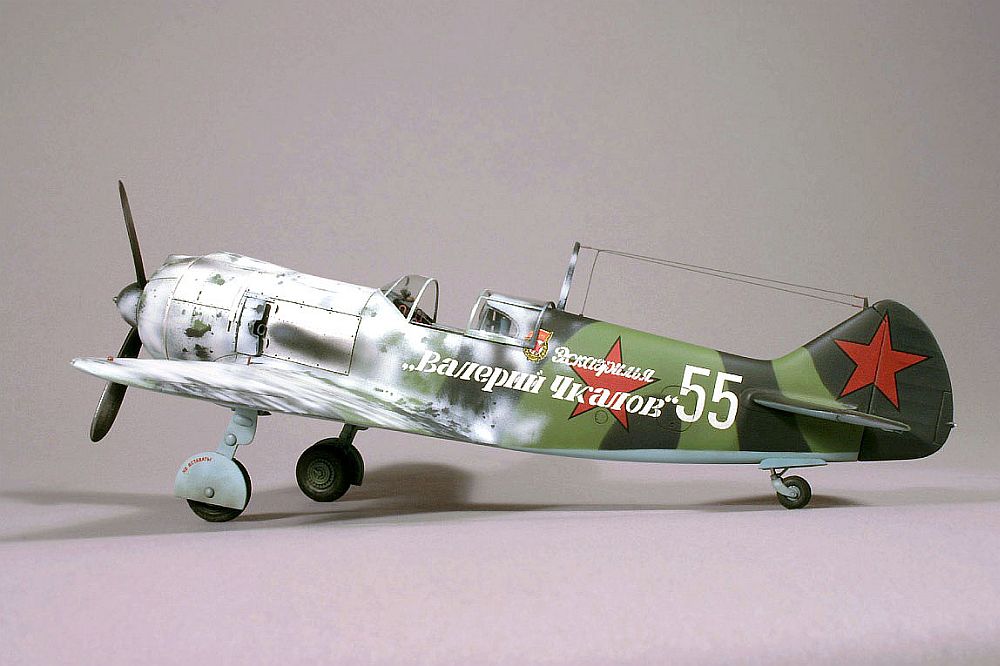
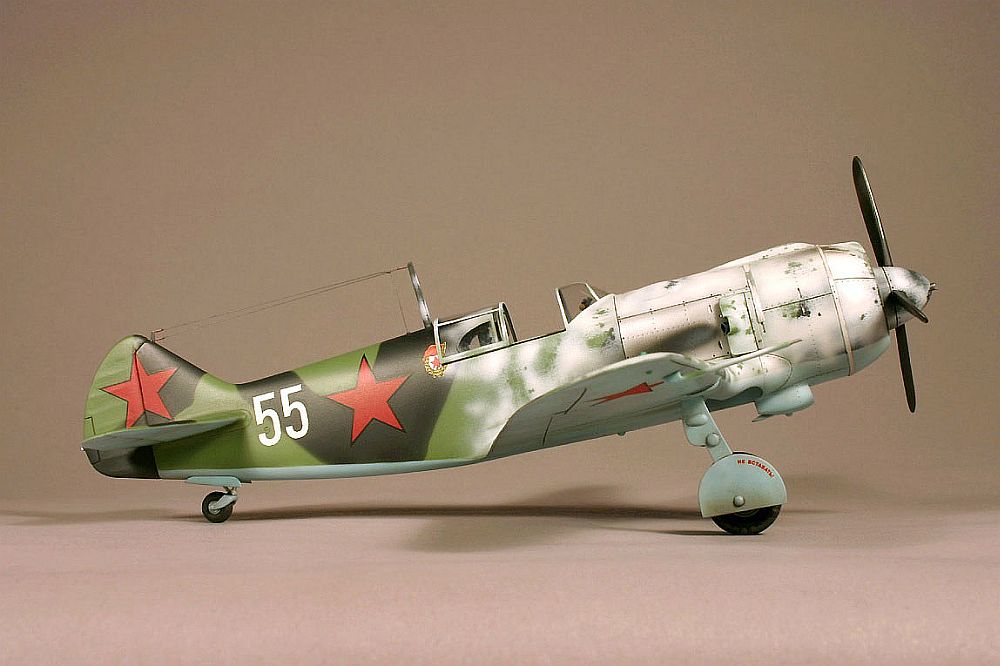
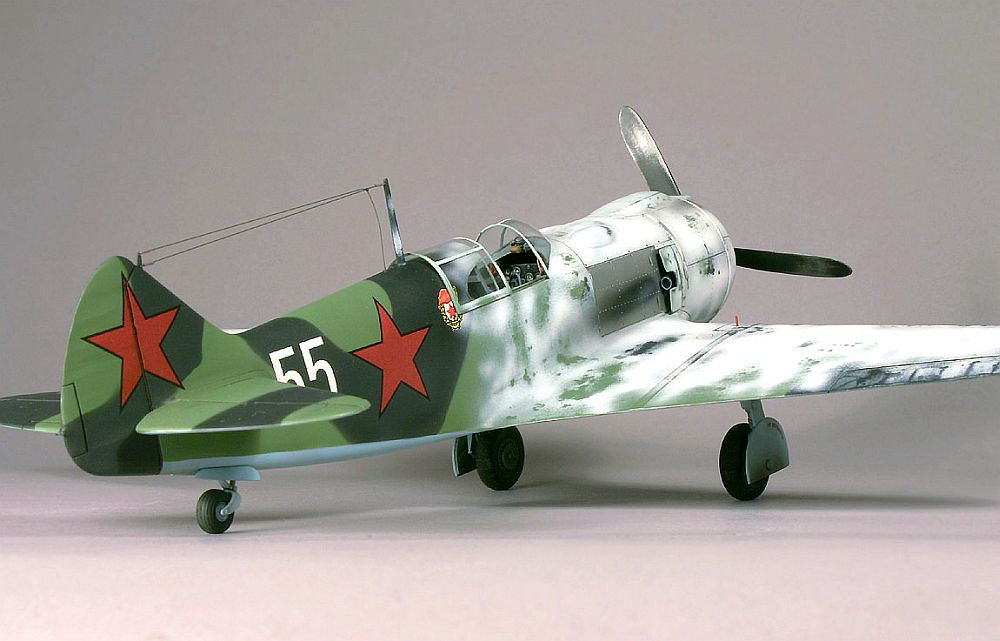
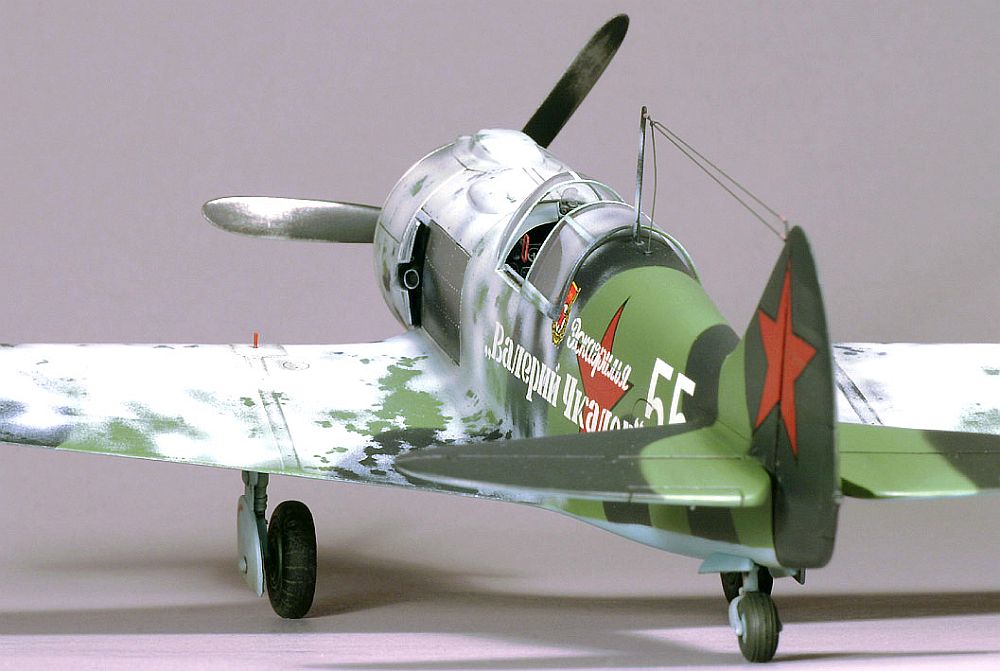
Early box cover for Vector La-5 (the image was changed on newer kits) shows profile of “White 55” from famous “Eskadrila Valerii Chkalov”, 4th GIAP. Aircraft is wearing staple period camouflage of green and black “meander pattern”, but the whole front section of the fuselage and upper wing is covered in heavily weathered white distemper for winter use. This one was my favorite from the start.
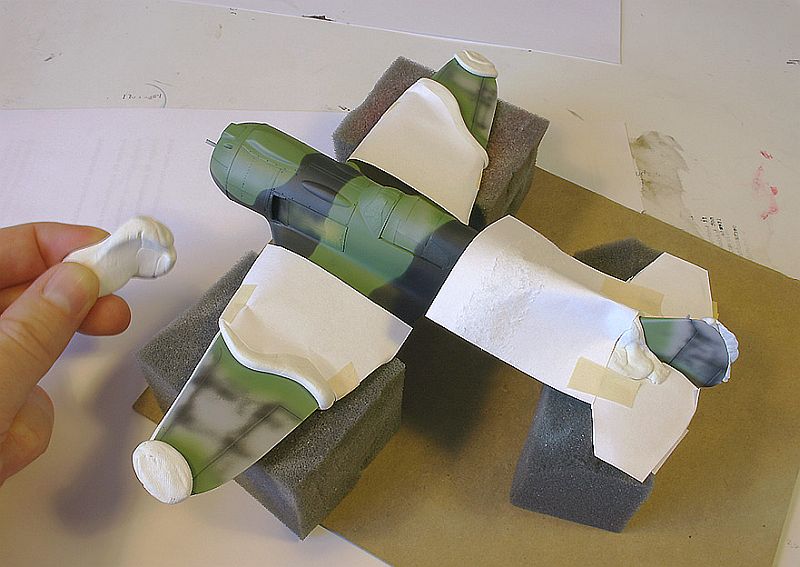 After
priming the whole model with Surfacer 1000, I continued with selection of WEM
VVS enamels. For the black areas I used 50% mix of flat black and RLM-70, black-green,
to lower the contrast in scale. I wanted very little diffusion between colors,
but at the same time I didn’t want to have absolutely sharp demarcation
lines. For this purpose I used masks made out of “plasteline”, a
sort of reusable sculpting clay. To achieve best possible consistency of color
diffusion, I tried to always spray perpendicular to the masked border.
After
priming the whole model with Surfacer 1000, I continued with selection of WEM
VVS enamels. For the black areas I used 50% mix of flat black and RLM-70, black-green,
to lower the contrast in scale. I wanted very little diffusion between colors,
but at the same time I didn’t want to have absolutely sharp demarcation
lines. For this purpose I used masks made out of “plasteline”, a
sort of reusable sculpting clay. To achieve best possible consistency of color
diffusion, I tried to always spray perpendicular to the masked border.
After the basic camouflage of green, and black was fully dry, I sprayed a coat of “Future” floor polish thinned with alcohol, to seal everything before white distemper is applied. Ah yes, now was the time to apply metal cowling rings as well, made from strips of “Bare Metal Foil”.
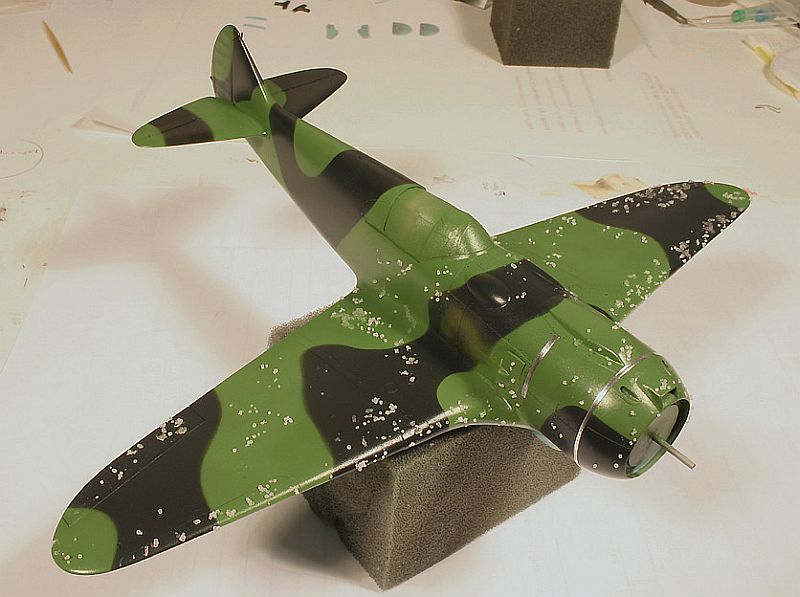 To
make partial, semi-opaque, and heavily weathered white winter distemper I used
the “salt technique”. Basically, a slush of fine salt mixed with
small amount of water is applied over the area where heavy chipping should occur,
and when this is dry, white distemper is sprayed, taking care that coverage
is not complete, and that underlying paint is showing through in places. Instead
of using pure white paint, I added a drop of black, once more to lower the contrast.
After paint dries to the touch salt can be removed, exposing camouflage beneath.
To break the pattern of salt grains I followed with light sanding/polishing
of the white paint. This has to be done very subtly, so that only a minimal
amount of paint is taken away. I used 2500 and subsequently 6000 grit.
To
make partial, semi-opaque, and heavily weathered white winter distemper I used
the “salt technique”. Basically, a slush of fine salt mixed with
small amount of water is applied over the area where heavy chipping should occur,
and when this is dry, white distemper is sprayed, taking care that coverage
is not complete, and that underlying paint is showing through in places. Instead
of using pure white paint, I added a drop of black, once more to lower the contrast.
After paint dries to the touch salt can be removed, exposing camouflage beneath.
To break the pattern of salt grains I followed with light sanding/polishing
of the white paint. This has to be done very subtly, so that only a minimal
amount of paint is taken away. I used 2500 and subsequently 6000 grit.
 Kit
supplied “Begemot” (“Hippo” in English) decals performed
very well. They are thin and, after a light application of Micro Sol, conform
to all the curves and crevices. On the negative side I noticed slight lack of
opacity in the national stars. They changed their red hue depending on the surface
color underneath. Further, the decal carrier film is a bit yellowish and this
can also show when applied over pale base surface.
Kit
supplied “Begemot” (“Hippo” in English) decals performed
very well. They are thin and, after a light application of Micro Sol, conform
to all the curves and crevices. On the negative side I noticed slight lack of
opacity in the national stars. They changed their red hue depending on the surface
color underneath. Further, the decal carrier film is a bit yellowish and this
can also show when applied over pale base surface.
Another coat of Future followed, and after it was dry I applied wash of oil paints (dark-gray/brown) diluted with turpentine.
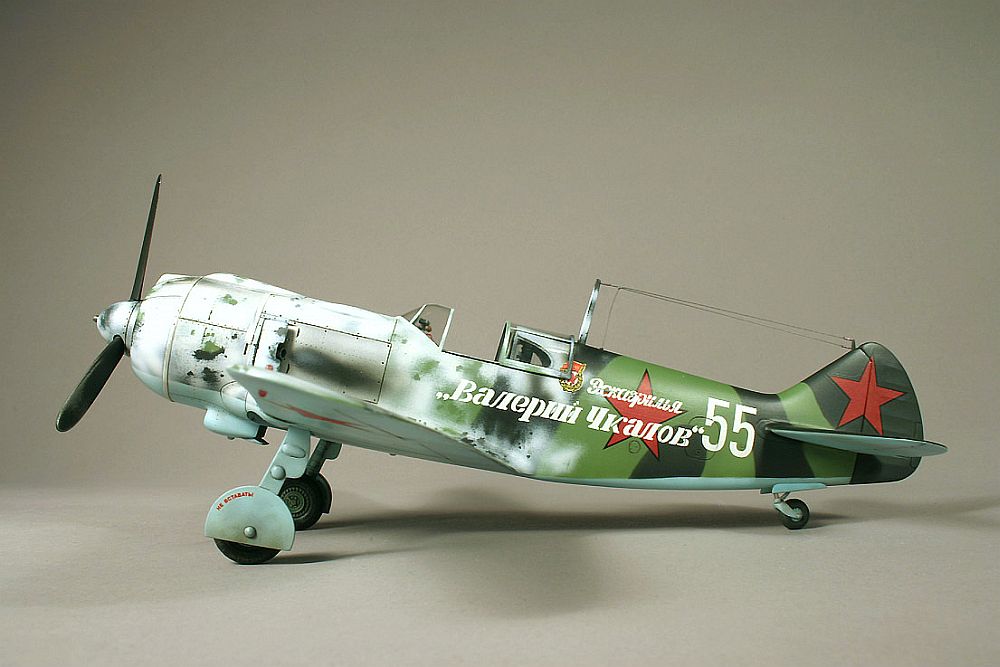 The
whole airframe received then a coat of Model Master Clear Matt. Exhaust and
cannon-blast stains were sprayed with thin mixture of black and brown and then
Tamiya Smoke.
The
whole airframe received then a coat of Model Master Clear Matt. Exhaust and
cannon-blast stains were sprayed with thin mixture of black and brown and then
Tamiya Smoke.
Formation lights were made from small bits of stretched sprue and then painted with “transparent” colors, red and green. There is also one clear light on the ruder.
 Overall,
this was a very smooth and enjoyable build. And it was my first full resin kit!
If I hadn’t use epoxy glue, and smelled some resin dust, I wouldn’t
even notice the difference. I must tip my hat once more to Vector for producing
this fine kit. Bravo Sergey, keep’em comin’!
Overall,
this was a very smooth and enjoyable build. And it was my first full resin kit!
If I hadn’t use epoxy glue, and smelled some resin dust, I wouldn’t
even notice the difference. I must tip my hat once more to Vector for producing
this fine kit. Bravo Sergey, keep’em comin’!
And now, if you excuse me, I need to go back and work on one 1/32 Mosca that I’ve started few seasons ago…
 |
 |
 |
 |
 |
|