| Lots
of Alterations, Gradual Gestation
--or-- Building the LTD LaGG-3 By Peter Vill |
 |
| Lots
of Alterations, Gradual Gestation
--or-- Building the LTD LaGG-3 By Peter Vill |
|
I wanted to add a LaGG-3 to my collection of VVS aircraft. I had given up on
manufacturers like Eduard producing one, so when I was given the LTD kit by
Sean Walsh of the Avon IPMS I was quite a happy chap. Little did I know what
I had let myself in for, and that this would be the model that nearly caused
me to go back to modelling armour full time, or even to take up beer mat collecting.
The kit was manufactured some years ago by LTD and it is a limited run model in almost every sense of the term. But, praise where it's due--they are the only people that I know of to produce a model of this important aircraft in 1/48. The kit comes in a relatively flimsy card box more like those you would expect to find Eastern European models in. Decals are included to allow the modeller to finish the model as a VVS aircraft flown by Yuri Shchipov, or a captured example operated by the Finnish air force (but beware, as out of the box I believe the model to be incorrect for either aircraft).
Included with the copious flash are some nicely detailed parts alongside some more chunky articles you would expect to find in a limited run kit of this type. There are two sets of vacformed canopies. The example that I was given had badly formed wheels of which there were two sets, one being loaded; these would have to be replaced.
Having opened the box I dragged out all the information I had on this aircraft type that included a nice set of plans supplied by my good friend Erik Pilawskii . It soon became apparent that LTD had performed a mix-and-match job on the model. It has some attributes found on both the late and early production airframes and so it appears that you can not make an accurate LaGG from the box. Oh well... never mind, I thought Ill modify it as required. I had now picked up the gauntlet that the kit had tossed down at my feet.
At this point it might be a good idea to take an overview look at the LaGG-3, as this might help explain some of the points raised later on.
The LaGG-3 was chosen along with the YAK-1 and MIG-3 to be at the forefront of Soviet VVS modernisation during the early 1940`s when the VVS accepted that the lead they had enjoyed with the introduction of the I-16 had been lost. The construction was typical for Soviet designs of that time, metal where necessary the rest specially treated wood-laminate. I think it is fair to say that the LaGG-3 was not the best regarded aircraft in the world at the time. In fact, I have read that VVS pilots said that LaGG stood for some thing like Guaranteed Varnished Wooden Coffin! To be fair, the losses they suffered in the early days were probably due more to the official tactics they had to follow than anything else. The LaGG-3 was the subject of many alterations that were made to improve not only flight characteristics but also to save weight and to improve build quality, which had suffered during the rush to replace lost aircraft, and during the forced factory relocations.
Erik Pilawskii tells me that type number so quoted by us in the West is in fact a reference to the contract number and that we should forget the Western approach and belief that all airframes of the batch would be the same. Erik informs me that this just did not happen. In fact it appears that the resident staffs of the two Zavods producing the LaGG did not get on, and so they would not share ideas. Or, if one suggested some modification, the other would go away and try to do his own thing and thereby show the other up for the fools they were. You cant help but love these people, who still have room for rivalry when your country is fighting for its life. The LaGG-3 produced a number of high scoring pilots, and was there when it was needed--a bit like the P-39 or P-40. Unlike these two American machines, however, it would develop into one of the best airframes of the conflict--the La-5, and thus into the La-7.
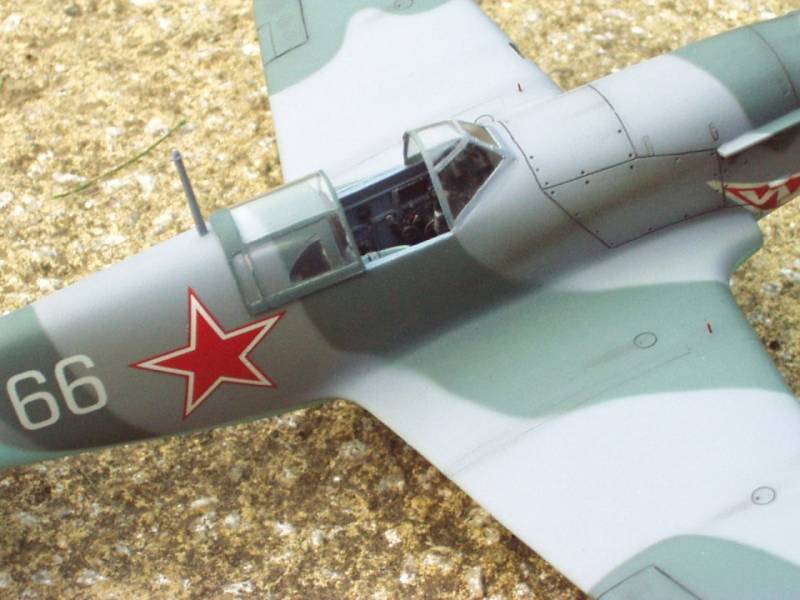
Oh well time to get back to the kit. The drawings I had seemed to indicate something was wrong. The drawings supplied by Erik confirmed it--the kit seems to have the nose and exhaust system of a late production type married up to the rear fuselage of an early type. Photographs uphold this view (ignore all this "Type 66" and such like stuff).
The early production airframes radiator had a large open outlet which can clearly be seen in both drawings and photos as a cut-out/break in the lower fuselage line. Later production airframes do not show this break in the lower fuselage line, and drawings indicate that the outlet had a control flap that matched up with a flat section on the lower fuselage which acted as an in-fill to the previously open hole (the drawings show this panel as being similar to half a ice lolly stick- straight sides with a rounded end). The outcome of this revelation is that to model a late production aircraft--which is the easier of the two choices--the hole has got to go.
Early aircraft had great bulges on top of the cowling which covered machine guns not fitted on later models. The kit does not have these. Add to this the difference in exhaust pattern along with the shape of the oil cooler mounted on the chin. As well, there was a difference in cowling panel lines and other bumps OK, OK I hear you say, 'we get the idea'....
Sorry, but I've started, so I will finish.... The wheel well is incorrect for every type I have been able to get information on. It should be wheel wells, each being a separate item and not the one piece open bay affair supplied in the kit. For more about this, and other stuff, look for items in bold type--these are the CORRECTIONS. By now I was beginning to get an idea of what I had taken on, and was heard every night asking the God of Modelling [Ed Note: Deus Modelictum] to give Eduard, Roden, Tamiya, Airfix (et al) a flash of inspiration about the need for an accurate LaGG-3.
Now, let us take a look inside the cockpit [ I dont want to nurse, Shut up Vill, call yourself a modeller ]. The seat is quite nice, and so is the instrument panel; side wall detail is good for a limited run kit. It may be a little basic, but you can work with it. The cockpit floor--just bin it. The control stick needs thinning down and the rudder pedals are best replaced.
The wings are not too bad. Mine had a really bad dose of warp, but this was simply overcome with a little warm water followed by a cold dip. The landing light will need to be detailed, and the trailing edge has the scale thickness of a pill box (the concrete version, not the one that holds aspirin). I should know--I was taking enough by now. The landing legs are a little chunky, but can be refined and used. The undercarriage doors will need checking, as will be explained later, and are really better replaced with items made from plastic card.
The propeller comes in two parts, with the blades as part of the rearward section of the spinner. Careful cleaning up will allow them to be used.
The Vac-formed canopy is quite good, but to be honest I used part from the kit, and part from the Falcon set.
 When
intending to model an aircraft I have not done before, I tend to spend a long
time looking at all the drawings / photos I have available (And Still Get It
Wrong, Well Some Times) [ Ed Note: "Asgiwwst" is a well-known
Welsh term for modelling hardships]. The start of this 6 month long project
began this way. The drawings show that the LaGG did not have a wall-to-wall
floor, but had a central section with gaps on each side, the floor being
supported on cross members / wing spars. So, out with the plastic card, and
a few minutes later I had 3 cross members and the basic floor. The floor had
attached to it rudder pedals, control stick and what looks like an inspection
or filler point in the drawings. Later on, after painting, the armoured back
plate and seat, complete with belts, would be added, both of these major items
being refined kit parts.
When
intending to model an aircraft I have not done before, I tend to spend a long
time looking at all the drawings / photos I have available (And Still Get It
Wrong, Well Some Times) [ Ed Note: "Asgiwwst" is a well-known
Welsh term for modelling hardships]. The start of this 6 month long project
began this way. The drawings show that the LaGG did not have a wall-to-wall
floor, but had a central section with gaps on each side, the floor being
supported on cross members / wing spars. So, out with the plastic card, and
a few minutes later I had 3 cross members and the basic floor. The floor had
attached to it rudder pedals, control stick and what looks like an inspection
or filler point in the drawings. Later on, after painting, the armoured back
plate and seat, complete with belts, would be added, both of these major items
being refined kit parts.
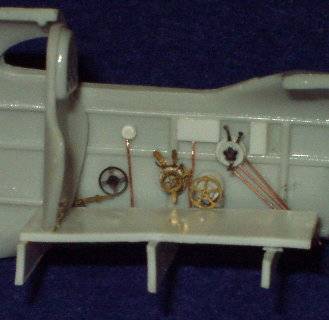
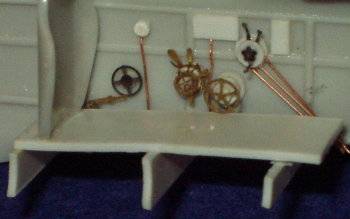
 It
was now time to detail the side walls of the cockpit, and again reference
was made to photographs and the drawings. These show that the LaGG-3 should
have flown 'Chinese fashion' (One wing low) as most (if not all) of the controls
and wheels are apparently located on the port side. The heavy and detail-less
kit items that should have represented the cluster of control levers and wheels
were made from plastic card, and of spare bits of photo-etched brass that all
modellers seem to gather around them. The only items fitted to the starboard
side were replacement oxygen gauges, as the framework representation of the
manufacturer is more than satisfactory, as is the instrument panel. I did add
an oxygen bottle behind the armoured seat backing complete with pipework, but
now that the model is complete you have to have it pointed out to you to see
it.
It
was now time to detail the side walls of the cockpit, and again reference
was made to photographs and the drawings. These show that the LaGG-3 should
have flown 'Chinese fashion' (One wing low) as most (if not all) of the controls
and wheels are apparently located on the port side. The heavy and detail-less
kit items that should have represented the cluster of control levers and wheels
were made from plastic card, and of spare bits of photo-etched brass that all
modellers seem to gather around them. The only items fitted to the starboard
side were replacement oxygen gauges, as the framework representation of the
manufacturer is more than satisfactory, as is the instrument panel. I did add
an oxygen bottle behind the armoured seat backing complete with pipework, but
now that the model is complete you have to have it pointed out to you to see
it.
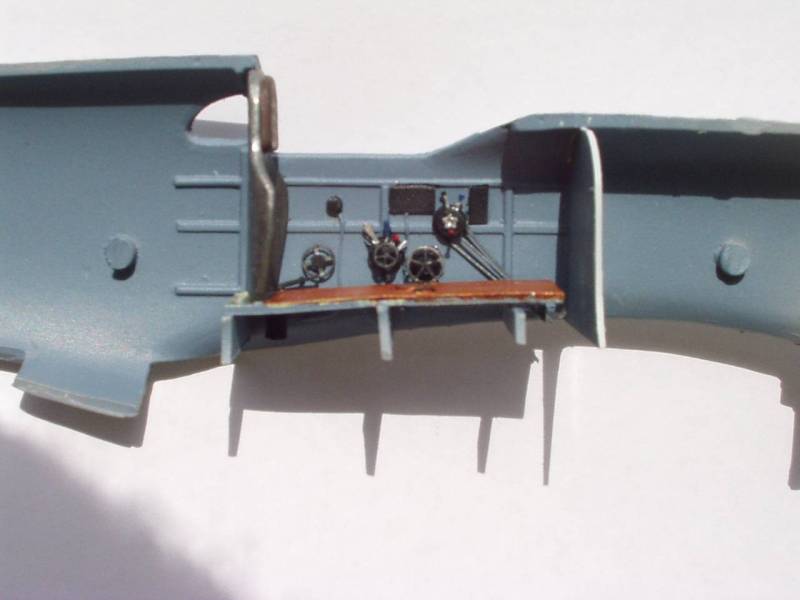 The
whole interior, except the floor, was primed and painted in Wood Aerolak,
after which detail painting took place. This was followed by a couple of coats
of Klear. When the Klear had dried, I carried out my normal practice of
running very thinned-down black paint around the edges of any raised detail
just to bring the area to life. When this is dry, any excess that is not required
can be gently polished away while still leaving a darkened shadow around the
raised section. Once happy, the interior side wall were matt coated. The floor
was primed and painted in Polly-Scale Doped Linen, which when dry was over-painted
with oil paints to represent wood; detail painting being carried out after the
oils had dried and been coated with matte to prevent damage by handling. The
cockpit was then assembled into one side of the fuselage, and when checked and
adjusted for fit, the two fuselage sides were cemented together and put to one
side to dry.
The
whole interior, except the floor, was primed and painted in Wood Aerolak,
after which detail painting took place. This was followed by a couple of coats
of Klear. When the Klear had dried, I carried out my normal practice of
running very thinned-down black paint around the edges of any raised detail
just to bring the area to life. When this is dry, any excess that is not required
can be gently polished away while still leaving a darkened shadow around the
raised section. Once happy, the interior side wall were matt coated. The floor
was primed and painted in Polly-Scale Doped Linen, which when dry was over-painted
with oil paints to represent wood; detail painting being carried out after the
oils had dried and been coated with matte to prevent damage by handling. The
cockpit was then assembled into one side of the fuselage, and when checked and
adjusted for fit, the two fuselage sides were cemented together and put to one
side to dry.
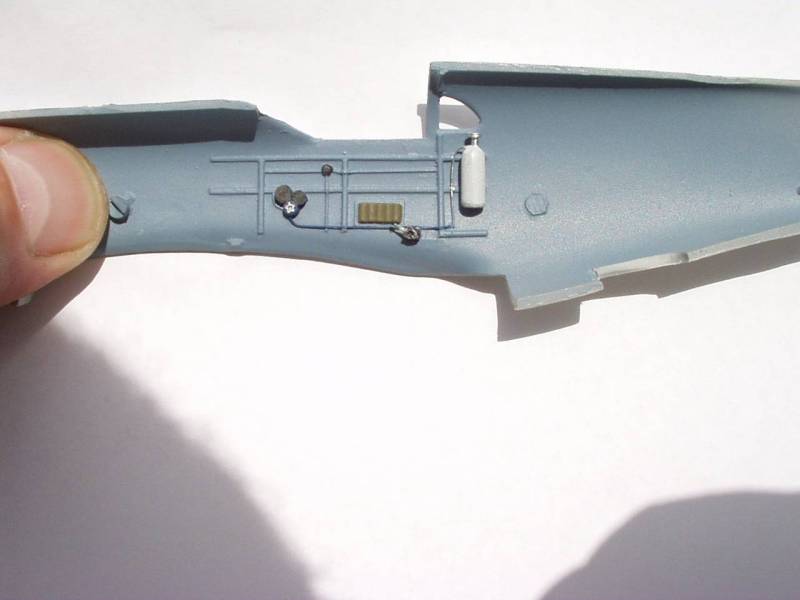
The next stage was to fill in the early airframe radiator outlet. This was achieved by transferring the shape from the scale plans to the model, and marking out the area with a permanent pen. A correspondingly shaped piece of 40 'thou plastic card was prepared, and the marked-out area on the model removed and filed in until the pre-shaped plastic card fit. The card in-fill was left a little proud so as to allow final shaping and blending in. The fuselage panel lines, which are very well done, were a little shallow for my liking and painting technique; a few gentle passes with a Squadron re-scribing tool put that right. The final acts on the fuselage at this stage were to replace the tail radio lead mast with a item made from brass rod, drill out the cowling mounted gun blast tube, and to thin down the exhaust anti-glare shields (kit items) and fit same.
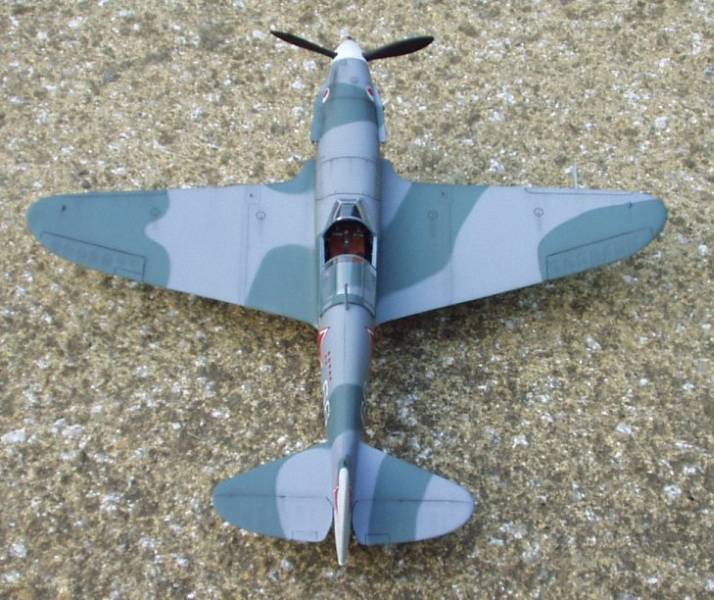
It was during operation Wing that the model counter-attacked. The wing as supplied was as straight as a dogs hind leg, and with the plastic being quite hard and possibly brittle it took several attempts (and layers of skin) with hot water to get either half to meet at any point for more than a few millimetres. Before putting upper and lower sections together, it was time to tackle those wheel wells. A visit to Antics Hobby shop in Bristol supplied the former required, a section of 5/8th inch Round Brass Stock. The brass tube would be used to form circular wheel wells from 15 'thou strips of plastic card. A quick calculation using math--taught me more decades ago than I care to admit--gave me the length of plastic card required (diameter of wheel well required times itself, the resultant figure being x3.142). I wrapped the card around the brass tube, held in place with elastic bands and then dipped into water that has just gone off boiling. It was then removed and run with plastic card still in place under cold water. The resulting circles of plastic card were fixed into place and the rest of the undercarriage bay walls made from straight plastic card. Before adding the roof to each (now separate wheel bays), the height was checked to ensure that the wing upper half would not foul the fit, and prevent the now relatively straight contact areas from meeting.
It was at this time that I noticed just how thick those trailing edges were. Lots of sanding and scraping later, I had reduced them to something like what I wanted, but decided that final reduction would take place after the wing had been assembled. Having put the wing sections together, I further reduced the trailing edges by sanding the wing surface. This resulted in all detail being lost, but what the hell--were modellers, arent we? The filler hatch panels would be simply re-scribed using Eduard template sets. The wing joint strap would be replaced with Tamiya masking tape cut to the correct width. The joint at the leading edge was made from filler with Halfords grey primer applied quite heavily in that area and sanded down later on in build. The control surface detail-- now that made me think about what I had done in my quest for thinner trailing edges--- DOLT!
Not only had I removed the wing control surface detail (such as it was), but I had also removed the navigation light blisters (of which there had been four). I was beginning to think that the kit had a life and mind of its own. To replace the light blisters I simply got a piece of aerofoil shaped plastic strip the same width as the length required and sanded to a blister shape, cut it off when done, and attached to the wing with Plastic Weld. I remarked the locations of all the removed hatches and control surfaces, taking the measurements straight from the scale plans available to me. These would then be re-scribed, taking care to build in an undercut on the control-surface-to-wing hinge line. The control surface detail was drawn onto a piece of Tamiya masking tape, and the gaps between the ribs cut out with a new scalpel blade. When done the remaining masking tape was transferred to the wing's control surface. During the priming stage, several coats would be applied over the new control surface detail; a gentle rub down between coats rounds off the sharp edges gradually. Continue until satisfied with the effect, and remember to pay attention to the joint line between the upper and lower surfaces at the trailing edge, filling any gap with primer. A new pitot tube and mounting was produced from some plastic card and a length of tube.
The last thing that I did to the wing was to fit a light lens into the landing light cut-out. Here I used one of the excellent lenses manufactured by M.V. Products prior to fitting the clear vac-formed cover.
The wing-to-fuselage joint was pretty well spot-on, requiring only the smallest
amount of cleaning up to achieve a very tight joint. Tail surfaces also only
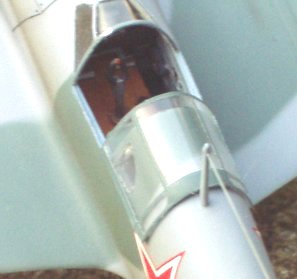
required a small amount of tidying up before fitting. The canopy glazing was
a straightforward and painless job, the gun sight being scratch built and fitted
before the forward canopy section was cemented into place. I was now convinced
that I had won--the kit's resistance had been smashed.
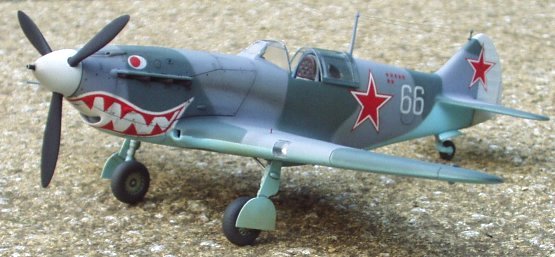
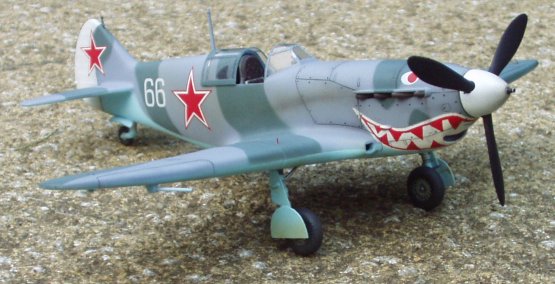
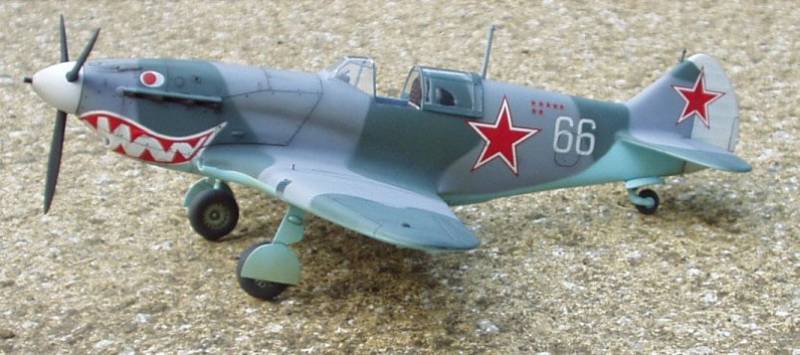
While all of this had been going on, Erik had supplied me with information concerning a late production aircraft that had an extremely artistic shark's mouth and eyes applied to it. As a late production aircraft, it was also finished in the later paints AMT-11 Light Grey/AMT-12 Dark Grey, over AMT-7 Blue. The scheme was finished off with a white rudder and numerals, Kremlin Star national markings, along with several Kill stars.
Having primed the model and cleaned up any faults that became apparent, the area of the shark's mouth was painted white, the rudder being painted at the same time. The next step was to mask off the areas of the mouth that I wanted to remain in white (yes it did take more than a few seconds), the rudder also being masked. The now masked-off mouth was over-painted with red, left to dry for a day or so, and then the red areas were themselves masked off before applying a light coat of grey primer. Now, before anybody asks about the eyes, yes I did forget to paint them, and yes Erik did come to my help by including them with the other ALPS printed decals he did for me.
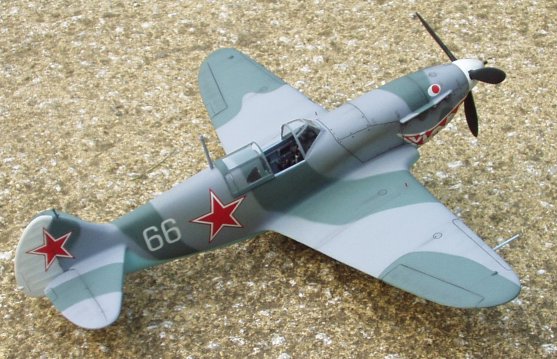
The rest of the paint job was a straightforward affair. Demarcation lines on all colours were made soft edged by using Blue Tac as a boundary mask. I weathered the model in my usual method, post shading and applying lightened / darken shades of the base colour over the model. After this has taken place, I glossed the whole model before applying the decals. As I have already stated, Erik prepared and printed the decals that I could not acquire commercially (isnt it a shame that you can get decals for almost every Messerschmitt built, but VVS aircraft are still under-represented in the hobby after-market?). Eyes, Kill Markings and the White 66 numerals were appled. Having applied the decals and washed the model to remove any staining that might be left from the decal setting solution, I matte coated the model before final weathering. This final touch is applied by using a combination of artists pencils, pastels and the spray gun. When all is done, I always apply a coat of matte to lock it all in before final assembly. The final assembly usually consists of undercarriage, canopy sliding section and radio wires.
At this stage in the game, the kit launched its last counter-attack. The landing gear covers would not fit correctly! I had mounted the landing gear at the angle shown in my drawings, but the kit items were designed to fit and cover the legs at a different angle. Also, the relation of the lower gear cover line compared to the ground was incorrect.
I had no option but to replace them with items made from plastic card. This, of course, resulted in me having to start the painting and weather process for these items all over again. Oh yes--I had better tell you that the wheels were replaced from items taken from the ICM YAK-7B kit (the one that includes skis).
Veni, Vidi, Vici.
 |
 |
 |
 |
 |
 |
 |
 |
My thanks go to-
Erik Pilawskii
Antics of Bristol
Bob Partridge (Who assured me that it would be worth it in the end)
Sean Walsh (Who gave me the kit)
I am glad that I have at last added a LaGG-3 to my collection but I still hope that a mainstream manufacturer will consider releasing their own (Roden, ICM, Eduard or Tamiya, et al) in 1/48 scale.