Stalin's Cobra -- A VVS P-39
By Peter Vill

Stalin's Cobra -- A VVS P-39By Peter Vill |
|
Well, when I heard that Eduard were going to release a model of the P-39/-400 I decided that I would make the old Monogram version first and then compare it to the new model.
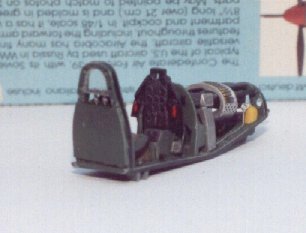
The Monogram 1/48 scale P-39 was first released some time in the 60`s and since then has been re-issued on several occasions. It has the typical raised panel lines of the kits produced at that time, but this one also has some engraved lines. It features the little extras that Monogram were known for: on this kit you can leave panels off to show the engine and weapons as well as being able to show the finished kit with one of the cockpit doors open.
I have usually decided on the particular aircraft I am going to model before I open the box, but this one would break that rule, as I will explain later. On one of my frequent visits to E. D. Models, I picked up a copy of the In Detail book on the P39 which to be honest is a must have for any one who wants to build a P-39 Airacobra or P-63 Kingcobra. At the same time I purchased a set of Aero Master decals for P-39s flown by the VVS (Red Army Air force), intending to model N. I. Protenkov`s "Yellow 46" or the aircraft flown by V. F. Sirotin (this has an Eagle diving onto an aircraft and ship painted on the side).
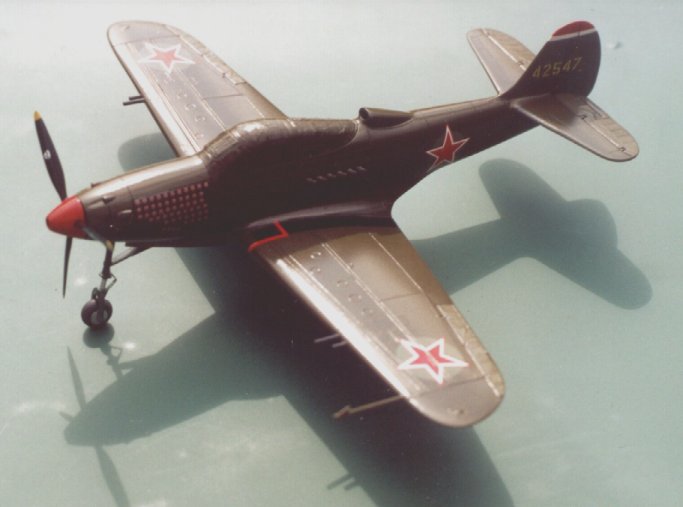
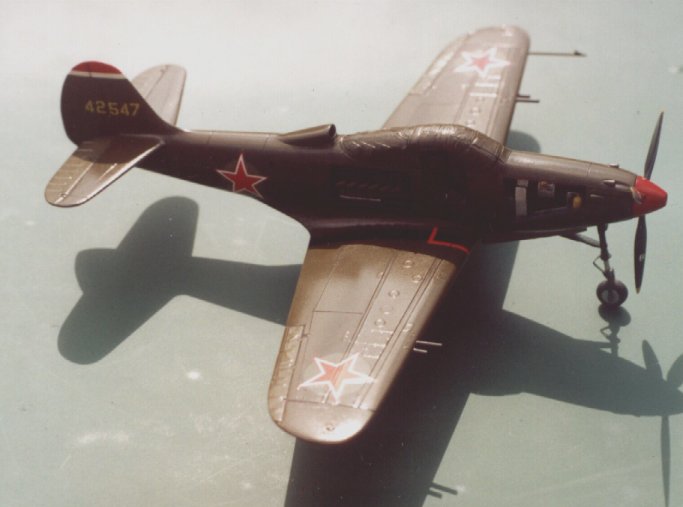
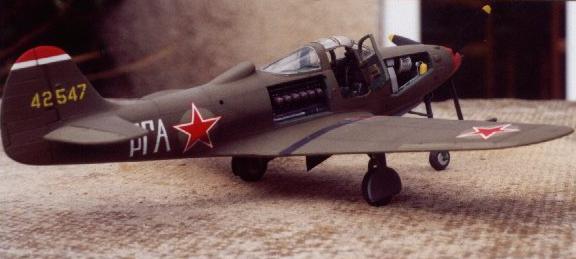
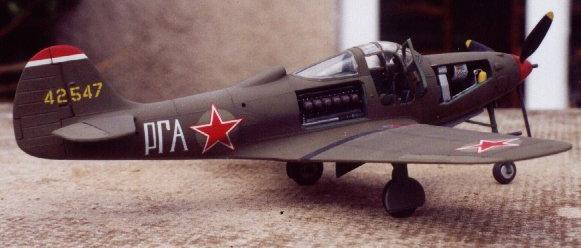
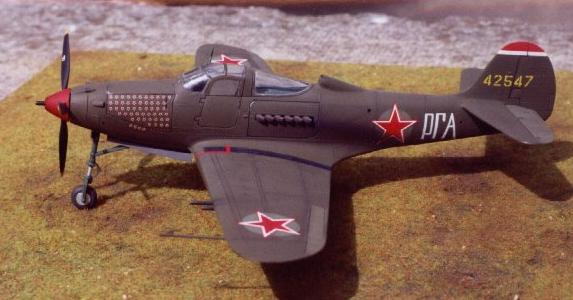
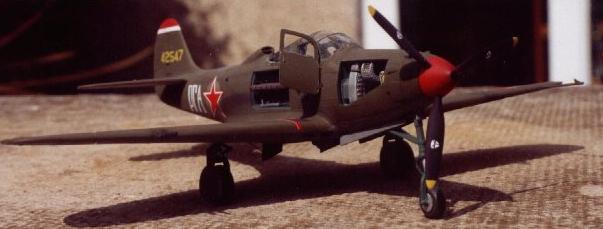
I went home and started to read up on P-39s used by the VVS and on flicking through one of my books I found a photo of the third highest scoring allied ace of the war. The photo shows A.I.Pokryshkin filling out his logbook on the wing of what most people believe is his P-39. Some captions state that this P-39 is a Q version but if you look at the photo you will see the shadows of wing mounted guns, the Q version did not carry wing mounted guns. The photo shows the aircraft is fitted with the low profile tyre on the nose wheel as well as the extra weapons bay vents, this shows that the aircraft is an L, M or N version. As the Soviet Union took delivery of more N`s than either of the other versions, I would think that this Aircraft was a P-39N.
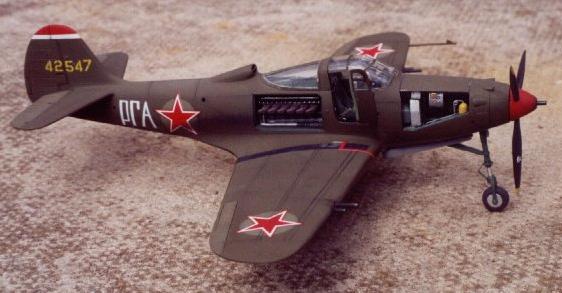
So I decided to model this Aircraft, I managed to beg the decals off a friend in the Avon I. P. M. S. And so, that was that-- or so I thought. During an exchange of e-mail with Erik Pilawski who along with Matt Bittner runs the excellent Modeling the VVS web site I found out that all was not as it first appeared. These two gentlemen have access to a large amount of unseen photos and documents via their contacts in the former USSR. Erik informed me that the un-cropped photo from the Moscow archive shows Pokryshkin all right but he is not leaning on his Aircraft. Pokryshkin flew "White 100", the aircraft in the photo is "42547" the mount of the second highest scoring Ace G.A.Rechalov. It appears that on the day of the photo shoot the press chaps did not think that the battle scared and worn "White 100" portrayed the image that they wanted to show the folks back home, so they got Pokryshkin to stand next to Rechalov`s "42547". Although the decals might have proved to be a problem particularly the three Russian letters aft of the fuselage red star I decided to model this aircraft.
Now it appears that Rechalov was one of those larger than life types and not always for the right reason. It is reported that he would abandon his wingman in pursuit of a personal victory as well as aborting the mission at hand if he saw the chance of a kill. He is alleged to have had little respect for authority to have enjoyed the odd drink or ten, as well as having an eye for the ladies. I have been told that it was this latter vice that lead to him leaving the VVS during the 50`s, reportedly having some thing to do with a 23 year old secretary. Sounds like an outstanding fellow(!)...
He was promoted three times as well as being demoted twice, but all said he was recognized as one of the best aerial shots in the VVS, if not the best, as his combat record shows.
I think that almost every one will know that the P-39 was not the most highly rated aircraft (I believe that the RAF only flew one operational mission with theirs before giving them to the VVS) but this was more as a result of the U.S.A.A.F. specification. Bell Aircraft had wanted to fit a supercharger/turbocharger to the engine, but the USAAF saw no need and prevented Bell from fitting such a device. This resulted in the complaint that the P-39 lacked performance at high altitude. Having said this, when America entered W.W.II the P-39 served them well and a number of pilots became aces while flying the type. It was definitely a case of avoiding a situation that exposed the aircraft's weaknesses while making full use of its strengths. The P-39 served in all theatres from the frozen Aleutians islands to North Africa and the Pacific.
The largest user of the P-39 was the VVS (Red Army Air Force) and they appear
to have liked the aircraft. The fact that the high altitude performance was
below par did not seem to bother them, as normal combat altitude on the Eastern
Front was a lot lower than in other areas of the conflict.
Judging by the number of high scoring Soviet Airmen who flew the P-39, it was
in the hands of a skilled pilot able to hold its own at low to medium altitudes
against the aircraft of the Luftwaffe.
Because of its armament, nose mounted 20mm or 37mm cannon supported with 2 x .50 calibre machine guns, along with 4 x .303 calibre machine guns mounted in the wings the P-39N was often deployed on tank busting missions.
|
|
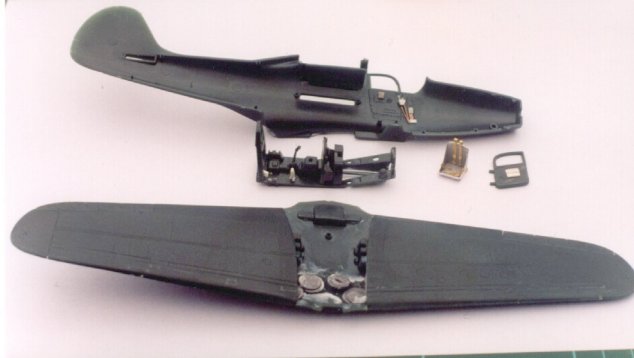
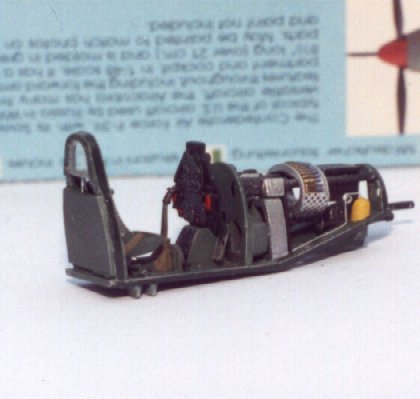
The kit I had purchased was moulded it dark green and came with decals that had best be put straight in the bin. The first area to receive attention was the cockpit assembly. I made a new seat that would be more of a scale thickness out of printer's litho sheet, to this I added seat belts from the excellent re-heat range. I continued with the cockpit area by referring to the In Detail book and added the knobs and levers that are missing. These were made from copper wire, parts from the spares box and plastic card etc. Rudder pedals again came from the Re-Heat range.
A first aid box was added to the left hand door and the throttle quadrant that is moulded on the left hand side but is to far forward was replaced with an item made from plastic card, this item should intrude into the door opening. The map case on the right hand door was also replaced with an item made from plastic card.
I next turned my attention to the weapons bay as I intended to have this open to view along with the engine. Very little work is required in this area; the oxygen bottle was removed as all my photos show this item being upright on the 'N' version and not horizontal as moulded. Having removed the bottle it was replaced a bit of sprue from the kit that was the correct shape, the supply pipe was then made from copper wire.
The Cannon ammunition feed has a perforated guide shown in all the photos,
I was fortunate to notice on a visit to E. D. Models that their Airwaves range
of etched brass has a number of perforated sheets.
I used a section cut from sheet number AM-02 to detail the cannon feed. The
battery box was replaced with an off cut of resin (mould block) and the machine
gun rear mounts were made from plastic rod.
The cockpit area and weapons bay were then sprayed with the nearest match to Bell Green that I could find, Miniature Paints Deep Bronze Green. The next step was to apply the normal washes and dry brushing to bring out the detail. Detail painting of all the little bits I had added was then carried out in the respective colours.
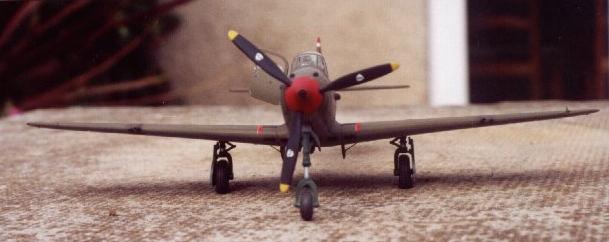
The nose wheel and gear needs a little work to convert it to the type used on the L, M, N versions and to get the nose up sit correct. Firstly, I cut off the torque link and then removed the oleo as the kit item appears to model this fully or near fully compressed, I replaced this with a section of polished Aluminum tube. The torque link was then replaced with some bits of etched brass that I found in the spares box, having referred to the photos in Detail and Scale. On the L version of the P-39 Bell introduced a low profile tyre but to keep the overall size the same they increased the size of the wheel. To represent this I simply cut two discs of plastic card (10 thou) and glued them to the sides of the kit wheel.
Before the wing halves were assembled I super glued lead shot along the leading edge of the lower section, putting as much in as possible but staying in front of the wing landing leg-mounting points. This was done, as I did not think that I would get the required weight into the forward nose section to prevent the finished model sitting on its tail. As things turned out I was correct and without this weight it would have sat tail down. The forward area of the nose was also loaded with lead shot and the fuselage was then put together. Please note that a radio box was not added to the rear decking behind the cockpit, as photos of the aircraft I have modeled do not show one.
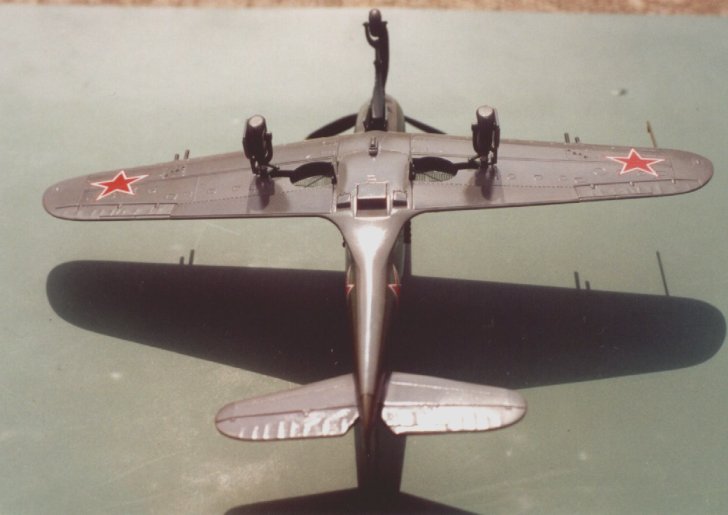
Having filled and sanded down the joint line I re-scribed any of the raised lines that had been removed, I must say that the fit of this kit is so good that very little work was required to restore lost detail. The wing assembly was then fixed into place and the same action carried out. I removed the moulded wing mounted machine guns; these were replaced with sections of brass tube at a later stage. I had been given a brass etched set from the Pro-Modeller version of this kit and from this I used the additional nose vents found on the L model onwards, it would be just as easy to make these from plastic card.
Assembly then followed the kit instructions and it must be said that the fit is generally excellent. Do not forget to add a splitter plate in the air intake for the engine, you will also have to add a flap to the central radiator, this is found on the underside of the wing and as supplied has a small hole in it. The kit instructions tell you to place a rod of clear plastic into this hole to prevent the finished kit from sitting up and begging.
The whole kit was then primed in Halfords Grey Primer and any errors that the paint exposed were corrected.
|
|
These Lend-Lease Aircraft were delivered in standard U.S.A.A.F. colours, in the P-39`s case Olive Drab over Neutral Grey. Quite often they would carry what is referred to as delivery markings; this is simply a Red five-pointed star within a white circle. A number of decal manufactures supply these delivery markings and indicate that the aircraft used them in service. To be honest I have not seen a photo yet that shows a front line aircraft that has retained the white circle, all the photos that I have show that the white was over painted with the nearest thing the Soviets had to Olive Drab/Neutral Grey. If anyone doubts this last statement just check the photo on page 62 of Red Stars, you will see that the circle is not white and I do not think it to be blue as some people would have us believe. It should also be noted that the serial numbers painted onto the tail plane were quite often left intact.
The underside of the model was painted with Aero Master Neutral Grey, I then carried out my usual practice of applying a lightened shade of this base colour to selected panels (Fabric covered items such as elevators), this is followed up with a darken shade again applied to selected panels. At this point I apply a glaze of very well thinned black sprayed along the panel lines, the whole lot is then blended in by over spraying a thin glaze of the original base colour. Before turning my attention to the upper surface I masked out the area where the Delivery marking circle would have been, this was then sprayed with the darker of the two Aero Master VVS top surface greys.
The top surface was to be sprayed in Olive Drab but at this time I had run out of this Aero Master paint. I fell back onto the good old Tamiya Range, but their Olive Drab XF-62 is to my eye too green, to correct this I mixed it with equal parts of XF-4 Yellow Green. The same weathering technique used on the under surface being applied, the delivery marking circles this time being masked off on both wing and fuselage and sprayed Aero Master Russian Topside Green.
|
|
Detail painting and assembly was then carried out before a coat of Halfords Gloss varnish was applied. Please note that according to the Detail and Scale book the exposed engine is very accurate, the real aircraft appears to have had panels that went right up to the engine from the fuselage sides with only a very small gap.
Having applied a coat of gloss varnish I applied red stars from the spare box to the six positions that I had masked and sprayed. On this aircraft the red stars had a white/red outline and this outline protruded from the area of the original delivery marking, so slightly oversized Victory stars were used. The yellow serial numbers came from the Aero Master range and were supplied by a very good friend and excellent modeler, thank you John Evans. Now this is where the comradeship of modeling came into effect, how was I to produce the three Russian letters found aft of the fuselage red star. Erik Pilawski of Modeling the VVS web site fame offered to produce them on his ALPS printer, yes please, thanks Erik. The kill Makings came from the Aero Master set number 48-089.
The model was then given a coat of Aero Master matt varnish and final weathering carried out with an artist silver pencil and pastels. These were used to represent various stains and blowback from the nose cannon and wing armament.
What can I say to end, only this, I enjoyed making this kit, the research, the help I received from modelers around the World and finally, just because its old does not mean that its no good. Eduard will have to pull out the stops to better this grand old kit.
References / Thanks: -
Detail and Scale P39
Red Stars
Erik Pilawski Modeling the VVS (Web Site)
John Evans, Avon I.P.M.S.
E. D. Models