Stalins Cobras - Part 2
By Peter Vill

Stalins Cobras - Part 2By Peter Vill |
|
 Some
months ago when I heard of the impending release of the Eduard P39 series I
decided to make the old Monogram kit that was collecting dust on my shelf. Having
completed the kit I commented that I believed Eduard would have to pull out
the stops to better the venerable Monogram offering, well I must say that Eduard
have done it.
Some
months ago when I heard of the impending release of the Eduard P39 series I
decided to make the old Monogram kit that was collecting dust on my shelf. Having
completed the kit I commented that I believed Eduard would have to pull out
the stops to better the venerable Monogram offering, well I must say that Eduard
have done it.
The
Eduard kit was first released as the P400 version, other versions of the P39
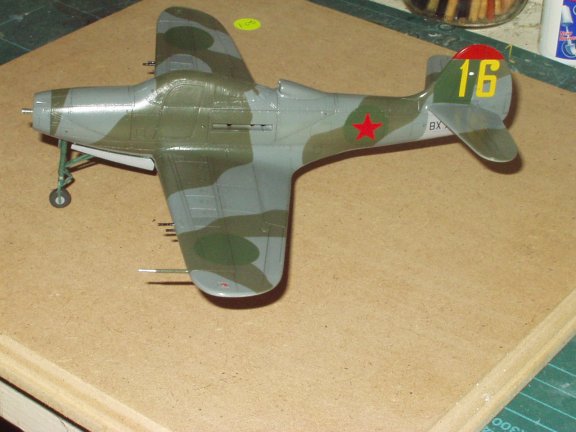
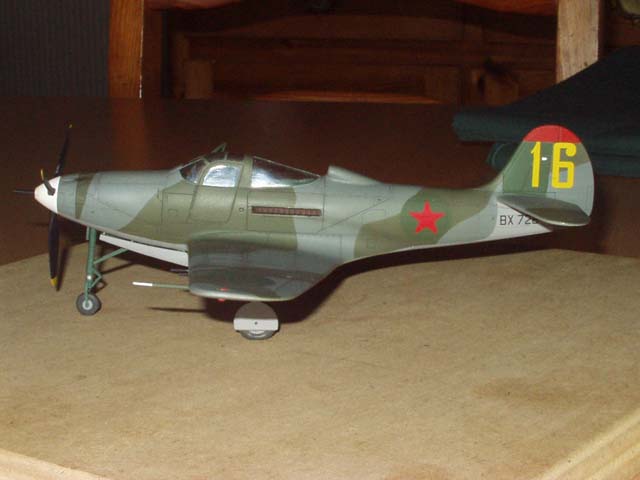
Airacobra soon followed. I purchased the P400 version and decided to model Yellow
16 reportedly flown by Capt. I. V. Bochkov of 19 Gv. IAP in East Carelia
during 1942. There is a photograph of both pilot and aircraft on page 65 of
Red Stars, but more about this later.
Ivan Vasilyevich Bochkov was born in 1915, entered the Soviet army in
1937 completing his flying school training in 1939. He won the Za Otvagu 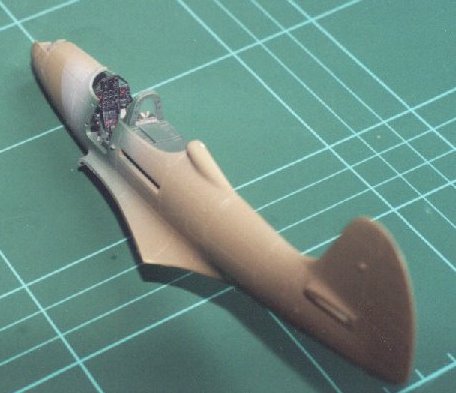 (For
Valour) Medal during the Russo-Finnish war of 1939/40. He was a member of 145
IAP prior to the commencement of hostilities with Nazi Germany but did not score
until his unit had been converted to P400 Airacobras. His first of 8 personal
and 31-shared victories came on May 15th 1942 hen he shot down a Bf109, claiming
another the next day along with a Ju88. On June 15th he claimed another Ju88
and a Bf110, he was killed on April 4th 1943 having been bounced by Bf109 fighters,
going down with his aircraft, he is buried in a common grave in Shonguj. He
was awarded the Gold Star of Hero of the Soviet Union posthumously on May 1st
1943, his other awards included Order of Lenin (2) Red Banner and Patriotic
War 1st Class.
(For
Valour) Medal during the Russo-Finnish war of 1939/40. He was a member of 145
IAP prior to the commencement of hostilities with Nazi Germany but did not score
until his unit had been converted to P400 Airacobras. His first of 8 personal
and 31-shared victories came on May 15th 1942 hen he shot down a Bf109, claiming
another the next day along with a Ju88. On June 15th he claimed another Ju88
and a Bf110, he was killed on April 4th 1943 having been bounced by Bf109 fighters,
going down with his aircraft, he is buried in a common grave in Shonguj. He
was awarded the Gold Star of Hero of the Soviet Union posthumously on May 1st
1943, his other awards included Order of Lenin (2) Red Banner and Patriotic
War 1st Class.
 Well
what do you get for your hard earned cash, well the truth is everything you
need to build any version of the P400/P39, (The kit costs around £15.00
for the non Profi-pack Version) well the truth is everything you need to make
any version of the Airacobra apart from the Q. To understand where the parts
not required for the P400 are fitted on the latter versions you will need to
sneak a glance at the later versions of this kits instructions. To make the
P400 you get 101 finely moulded parts in green plastic including a choice of
weighted or non weighted tyres, 6 clear plastic parts including the cabin doors,
a set of Eduard Express masks, a metal nose weight and finally decal options
for 2 aircraft flown by the U. S. Army in New Guinea.
Well
what do you get for your hard earned cash, well the truth is everything you
need to build any version of the P400/P39, (The kit costs around £15.00
for the non Profi-pack Version) well the truth is everything you need to make
any version of the Airacobra apart from the Q. To understand where the parts
not required for the P400 are fitted on the latter versions you will need to
sneak a glance at the later versions of this kits instructions. To make the
P400 you get 101 finely moulded parts in green plastic including a choice of
weighted or non weighted tyres, 6 clear plastic parts including the cabin doors,
a set of Eduard Express masks, a metal nose weight and finally decal options
for 2 aircraft flown by the U. S. Army in New Guinea.
 Well
what can I say about the standard of Eduard's mouldings that has not been said
before, nothing, they are first class, excellent. The fit of parts is typical
of what we have come to expect from this company, the whole kit was constructed
with very little filler.
Well
what can I say about the standard of Eduard's mouldings that has not been said
before, nothing, they are first class, excellent. The fit of parts is typical
of what we have come to expect from this company, the whole kit was constructed
with very little filler.
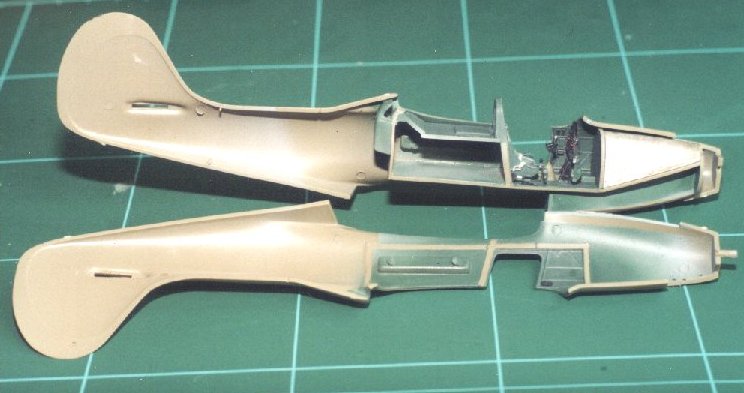
The cockpit/cabin was constructed first as per the instructions, which I must
say leave nothing to chance, all of the little details I had had to make for
the Monogram kit are included. The only thing that is required are a set of
seat belts, I used the Eduard RAF etched set number 48-247, the purist might
also want to add the breaches of the nose mounted machine guns along 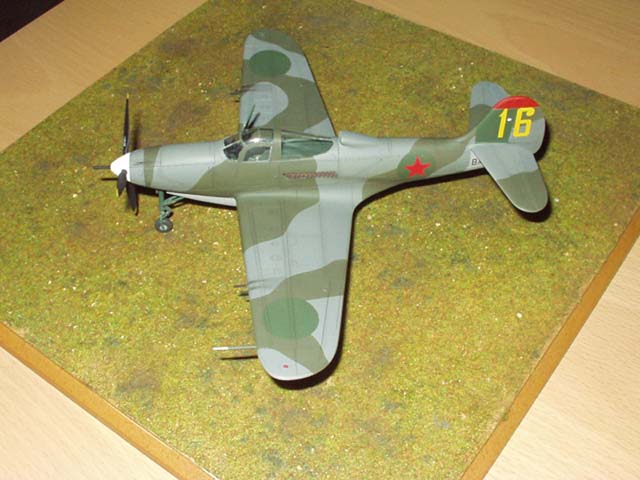 the
cocking mechanism. The modeler will have to decide if fitting the radio is correct
for the aircraft in question, a lot of VVS aircraft appear not to have had radios
at this stage in the G.P.W.
the
cocking mechanism. The modeler will have to decide if fitting the radio is correct
for the aircraft in question, a lot of VVS aircraft appear not to have had radios
at this stage in the G.P.W.
The front wheel bay that is fitted to the front of the cockpit/cabin assembly
is highly detailed, the fuse box is even moulded in, the metal nose weight forms
the top of the wheel bay (A very nice touch Eduard, prevents the modeler having
to load lead shot in all over the place as in the Monogram kit). The cockpit/cabin
and wheel well assembly was now primed and then sprayed with the closest thing
I have found to Bell Green
(Yes it does appear that Bell had their own interior colour, this was used to
paint not only the cockpit/cabin but wheel wells etc) this is Miniature Paints
Deep Bronze Green. After this the small details where picked out by painting
them their individual colours. When the painting was finished I 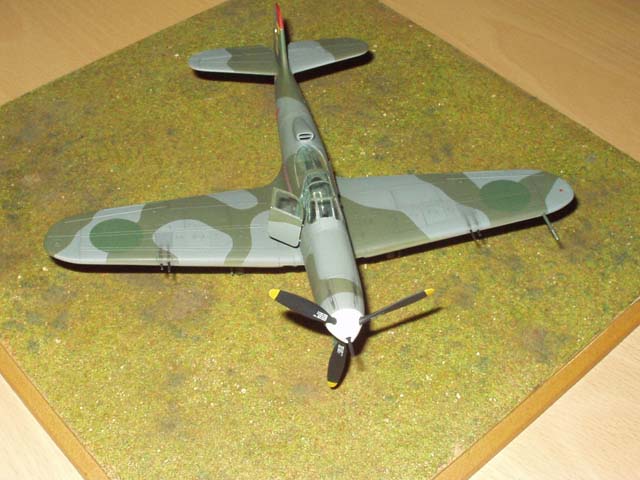 gloss
coated the entire assembly with Halfords Gloss, when dry I applied a thinned
wash of black paint (Acrylic) to bring out the detail and recesses, when dry
the assembly is matte coated.
gloss
coated the entire assembly with Halfords Gloss, when dry I applied a thinned
wash of black paint (Acrylic) to bring out the detail and recesses, when dry
the assembly is matte coated.
Before fitting the cockpit/cabin assembly into the fuselage halves I will give
you a tip which I learnt the hard way, decide if you are going to model the
kit with both cockpit/cabin access doors open. Now the modeler must remember
that the port (Left) side door was not usually used by the pilot as the throttle
quadrant pokes out into the aperture, it was quite common for the ground crew
to tape up this door and thus reduce drafts, (There
are a number of photos that show this form of wind proofing) but again it is
not universal. If you decide to model the aircraft with the Port door shut then
you will have to space/pack out the throttle quadrant (Part number C17) from
the interior of the fuselage, if not the door will not fit in the closed position,
lots of dry test fitting recommended, believe me its a lot harder to do when
you have fitted it and stuck the fuselage together (Wife claims lots of muttering
and gnashing of teeth). At this point you might also want to add the missing
splitter plate to the engine air intake, look at the box art and you will see
what I am talking about.
 The
kit gives you the option of external stores, a drop tank or bomb, to fit these
the modeler will have to open the holes that are flashed over in the bottom
wing section, (Part number B20) again refer to any photographs you can find
of the particular aircraft you are representing to see if such external stores
were carried. The trailing edge of the main wing needs to be thinned down as
from the box it is too thick but this is not a major job.
The
kit gives you the option of external stores, a drop tank or bomb, to fit these
the modeler will have to open the holes that are flashed over in the bottom
wing section, (Part number B20) again refer to any photographs you can find
of the particular aircraft you are representing to see if such external stores
were carried. The trailing edge of the main wing needs to be thinned down as
from the box it is too thick but this is not a major job.
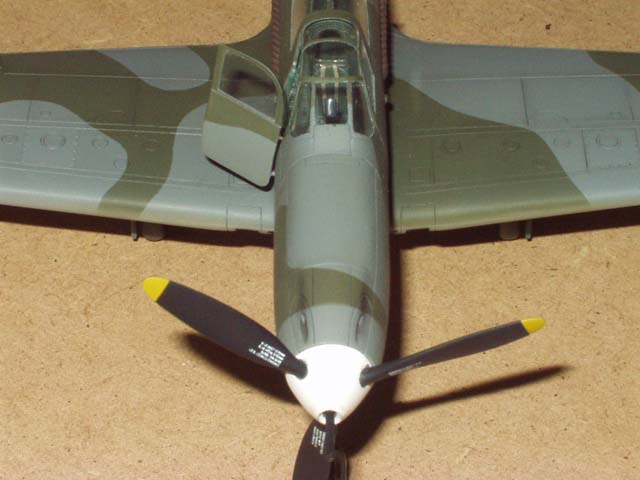
When the wing had been fitted to the fuselage and all joint lines cleaned up I chose to replace the wing mounted machine guns as well as the pitot tube with brass tube, not vital but I now prefer to do this with small items that can easily be broken off . The modeler is given the choice of positioning the outlet vents in the rear fuselage section in the open or closed position which is one of those nice touches we have come to expect of Eduard.
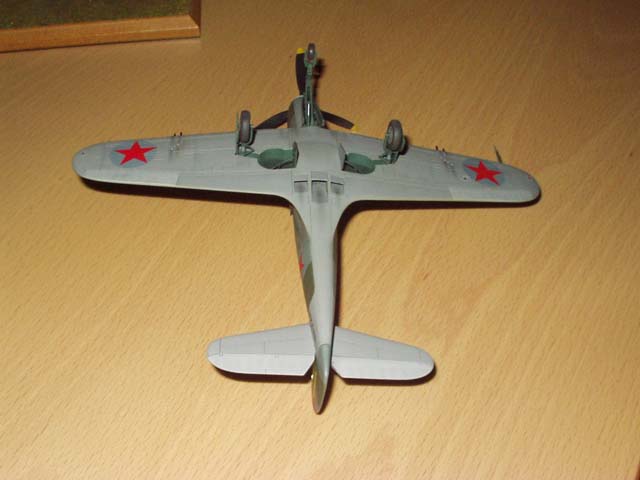 The
under carriage is well detailed and the only thing that could be added
is brake pipes, I built mine up as sub-units which were added after painting
and decaling had been carried out, these units are again finished in Deep Bronze
Green as are the insides of the under carriage doors.
The
under carriage is well detailed and the only thing that could be added
is brake pipes, I built mine up as sub-units which were added after painting
and decaling had been carried out, these units are again finished in Deep Bronze
Green as are the insides of the under carriage doors.
The cockpit/cabin doors were painted inside first (Deep Bronze Green) with details such as the release handles painted afterwards, prior to painting the Express Masks supplied for the purpose of masking the window were attached, if modeling the aircraft with the Port door closed do not forget to remove the interior mask before attaching it as it would be the devils job to do afterwards. The model was now ready to prime and paint, this is were I had my only area of complaint, the canopy Express Masks would not stay down tight, in the end I replaced some with masking tape. Having applied a coat of Halfords Grey Primer the model was checked for any imperfections, when happy my mind turned to the paint scheme.
 I
was to model Capt. I. V. Bochkov`s P400, the decals being produced by Aero Master
on their sheet number 48-092, once again I question the information supplied
to Aero-Master when preparing the sheet and instruction leaflet. Aero-Master
state that this aircraft (Ex RAF or built for the RAF, serial number BX 728)
was finished in Dark Earth/ Dark Green over Sky. I do not think this was the
case looking at the (poor) photograph in Red Starts. Even allowing for a difference
in Soviet film the contrast between the two upper surface colours is unlike
that normally seen when the above-mentioned colours have been used, the contrast
is more typical of Dark Green/ Ocean Grey over Medium Sea Grey (Erik Pilawskii,
please come to my defense). With the colour scheme that Aero-Master claim it
was usual for the aircraft to have had a
I
was to model Capt. I. V. Bochkov`s P400, the decals being produced by Aero Master
on their sheet number 48-092, once again I question the information supplied
to Aero-Master when preparing the sheet and instruction leaflet. Aero-Master
state that this aircraft (Ex RAF or built for the RAF, serial number BX 728)
was finished in Dark Earth/ Dark Green over Sky. I do not think this was the
case looking at the (poor) photograph in Red Starts. Even allowing for a difference
in Soviet film the contrast between the two upper surface colours is unlike
that normally seen when the above-mentioned colours have been used, the contrast
is more typical of Dark Green/ Ocean Grey over Medium Sea Grey (Erik Pilawskii,
please come to my defense). With the colour scheme that Aero-Master claim it
was usual for the aircraft to have had a 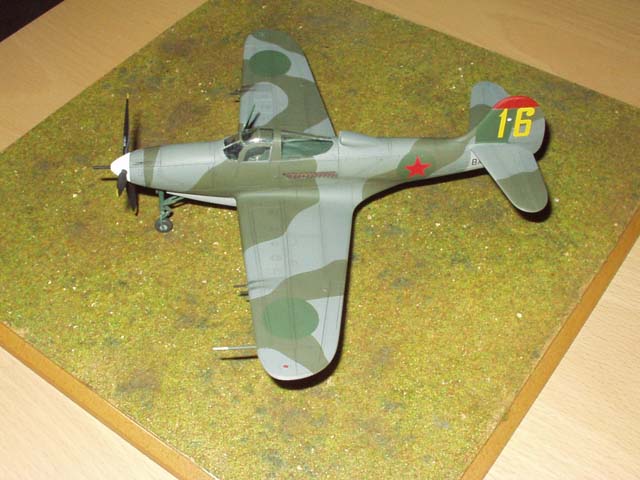 sky
band around the rear on the fuselage, on the photo there is no such band and
nor does it appear to have been over painted. The other point of complaint with
the Aero-Master decal sheet is the camouflage scheme shown is incorrect, it
appears to not only to have the colours reversed but the pattern is wrong, if
you do not believe me just check out the photo in Red Stars and you will see
my point. The aircraft appears to have had roundels and fin flashes at some
time as one would expect with an aircraft built for or used by the RAF and these
have been over painted, this can be seen in the photo. With all that chest beating
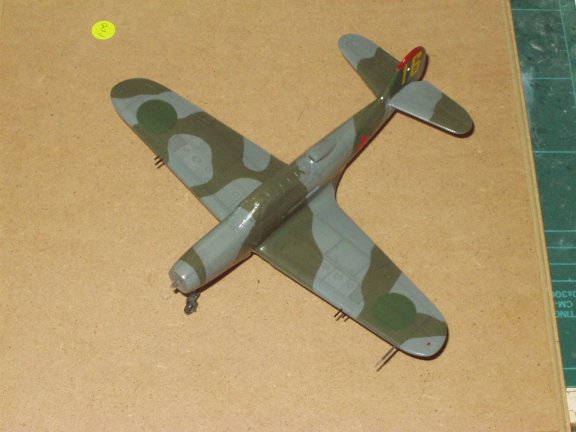
out of the way the model was painted in the following scheme, Dark Green/ Ocean
Grey over Medium Sea Grey, the over painted roundels were represented by spraying
circles of W.U.P (Wood Use Primer) on the under-surface and on the fuselage
side were the roundel had been on a mostly grey area, the fin flashes and remaining
roundel areas were represented by spraying circles of AMT4 Green. The
propeller spinner could be white or sky, I went with White, the red fin flash
is there on the photo so that was applied.
sky
band around the rear on the fuselage, on the photo there is no such band and
nor does it appear to have been over painted. The other point of complaint with
the Aero-Master decal sheet is the camouflage scheme shown is incorrect, it
appears to not only to have the colours reversed but the pattern is wrong, if
you do not believe me just check out the photo in Red Stars and you will see
my point. The aircraft appears to have had roundels and fin flashes at some
time as one would expect with an aircraft built for or used by the RAF and these
have been over painted, this can be seen in the photo. With all that chest beating
out of the way the model was painted in the following scheme, Dark Green/ Ocean
Grey over Medium Sea Grey, the over painted roundels were represented by spraying
circles of W.U.P (Wood Use Primer) on the under-surface and on the fuselage
side were the roundel had been on a mostly grey area, the fin flashes and remaining
roundel areas were represented by spraying circles of AMT4 Green. The
propeller spinner could be white or sky, I went with White, the red fin flash
is there on the photo so that was applied.
 After
painting the whole model was gloss coated with Halfords Gloss, the decals as
usual from Aero-Master went on without any problem and pulled down skin tight.
The sub assemblies (under carriage and starboard door etc) were then fitted
and the model given 2 coats of matte coat, exhaust stains and blow back from
the guns being applied between coats.
After
painting the whole model was gloss coated with Halfords Gloss, the decals as
usual from Aero-Master went on without any problem and pulled down skin tight.
The sub assemblies (under carriage and starboard door etc) were then fitted
and the model given 2 coats of matte coat, exhaust stains and blow back from
the guns being applied between coats.
When you model a particular aircraft using a photograph as reference you are looking at a snap shot in time, with this in mind I left Yellow 16 clean as shown in the photo.
 Looking
at the model now I ask myself could I have done any thing better, the answer
is always yes, to be honest I am happy with the finished article but on the
next one ( I have 2 more waiting) I will lengthen the front oleo (chromed moving
compression section) to twice its length as it appears to be in the fully compressed
state and the model sits a little too level, but is that not what this hobby
is about, learning as we go on.
Looking
at the model now I ask myself could I have done any thing better, the answer
is always yes, to be honest I am happy with the finished article but on the
next one ( I have 2 more waiting) I will lengthen the front oleo (chromed moving
compression section) to twice its length as it appears to be in the fully compressed
state and the model sits a little too level, but is that not what this hobby
is about, learning as we go on.
My conclusion is that Eduard have done an excellent job and they have bettered
the old and trusted Monogram kit, credit must be given to the 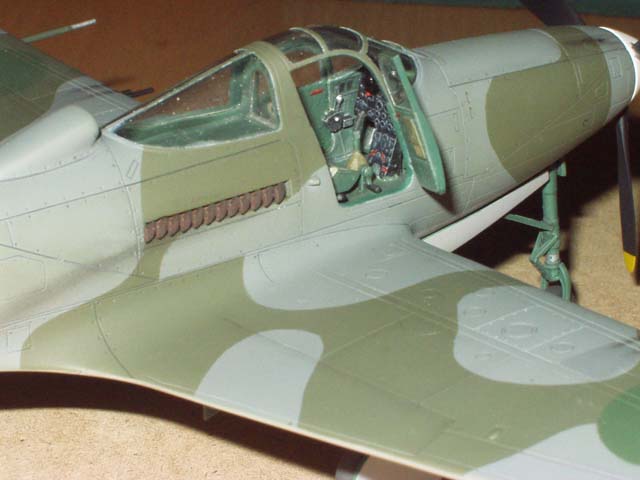 Monogram
kit as even when compared to this latest offering it stands up well and we must
remember that it is over 30 years since it was first released. Well-done Monogram
you were top dog for three decades, well-done Eduard you knew what you had to
beat and you pulled out the stops and did so. I recommend both kits to modelers
of the VVS.
Monogram
kit as even when compared to this latest offering it stands up well and we must
remember that it is over 30 years since it was first released. Well-done Monogram
you were top dog for three decades, well-done Eduard you knew what you had to
beat and you pulled out the stops and did so. I recommend both kits to modelers
of the VVS.
My thanks go to:
E. D. Models of Solihull, England for the kit
Antics of Bristol, England for the etched brass seat belts
Red Stars
Stalins Eagles
 Erik
Pilawskii for his unselfish help and the AMT4 paint
Erik
Pilawskii for his unselfish help and the AMT4 paint
My Wife who helped pick up the bits of broken model when I dropped it on the
floor and it broke up into its component parts (I didnt mention that did I,
Pilawskii it was your fault, you introduced me to ice cold Polish Vodka)
And YOU, YES YOU, FOR VISITING THE VVS WEB SITE.
MY WORK IS DEDICATED TO THE MEMORY OF ALL THOSE WHO FOUGHT AGAINST FASCISM IRRESPECTIVE OF NATIONALITY, COLOUR, CREED OR RELIGION.
 WE
OWE YOU MORE THAN WE CAN EVER PAY, AND THAT INCLUDES YOU DAD.
WE
OWE YOU MORE THAN WE CAN EVER PAY, AND THAT INCLUDES YOU DAD.
THANK YOU