by Lukasz Kedzierski
by Lukasz Kedzierski
Yak-11 was based on an excellent Yak-3, specifically on Yak-3U (never in production) a variant equipped with the radial ASh-82FN engine. The prototype was a modified Yak-3U, which was converted into a two-seater aircraft with ASh-21 engine and was designated Yak-3UTI. The basic wooden construction was not changed compared to its predecessor, but despite promising flight tests (in 1945) the aircraft was not introduced into production. A year later the Yakovlev OKB designed a fully metal airframe equipped with the same engine and designated Yak-11. The basic flight characteristics remained the same as Yak-3UTI, however, the aircraft was a bit heavier and as a consequence the top speed was 13 km/h lower than previously. By the end of 1947 Yak-11 reached first units and was used to train fighter pilots. In 1952 Czechoslovakia acquired the license and the production was undertaken in the LET factory in Kunovice under the designation LET C-11. Total production reached 3859 aircraft in the Soviet Union and 708 in Czechoslovakia. Apart from those two countries Yak-11 was used by air forces of Poland, Albania, Algeria, Austria, Afghanistan, Bulgaria, China, Egypt, Iraq, Yemen, North Korea, Mongolia, East Germany, Rumania, Syria, Hungary and Vietnam.
Polish AF was the second biggest (after the Soviet Union) user of Yak-11s and had a total of 192 aircraft in service (100 original Russian built Yak-11s and 92 Czechoslovakian C-11s). The first batch of 12 aircraft was delivered in 1949 followed by more deliveries in 1950-51 and 1954-55 and the LET built aircraft were delivered in 1955-56. Yak-11s were initially distributed to most of the fighter regiments followed by flying schools. They were used as a transition aircraft between Yak-18 and Mig-15UTI for all levels of flight training and as utility aircraft. An interesting episode during Yak-11s service in Poland was its use in chasing the reconnaissance and propaganda balloons violating the country's airspace, for example on 26 July 1961 Lt. Dyla from the 34 Naval Fighter Regiment shot down such a balloon while flying Yak-11. At the beginning of the 60s Yak-11s were being phased out from the service and replaced by Polish built trainer TS-8 Bies and by 1965 the aircraft were removed from the air force inventory.
Yak-11 is rather rare subject and as far as I know there was no 1:48 scale
kits of Yak-11. Therefore, RVHP product is the most welcome addition to the
quarter scale collection of Yakovlevs aircraft. It has been released with 3
different decal versions and I got the LETC-11 boxing featuring Polish and Czechoslovakian
markings. I have been waiting for Yak-11 kit for quite some time and at one
stage even contemplated the conversion of Eduards Yak-3 to a double seater
with a radial engine. Its feasible, but would take a lot of time and effort.
Before starting the construction its good to get some reference books and I
think that the best one available is a monograph published a few years ago in
Poland in a series Skrzydla w Minaturze (Wings in Miniature) and written by
Zbigniew Luranc. Text is in Polish throughout and the book features a very nice
selection of B&W as well as colour photographs covering in depth details
such as cockpits, undercarriage and external details as well as a plethora of
different aircraft mainly in Polish service. There are also detail drawings
of both cockpits, detail drawings of undercarriage, cutaway diagram and scale
plans in 1:48 as well as 1:72 scale. The colour side views cover aircraft in
Polish, Czechoslovakian, Russian, German, Austrian and Egyptian markings. The
book is divided into chapters dealing with history and development, use of Yak-11
by various air forces, use of Yak-11s in Poland, camouflage and markings and
technical description. The added bonus is the fact that the author flew the
type himself and he included some of his personal photos and comments on aircraft
handling characteristics in the book. I do also have a small booklet written
by the same author and published in a TBiU series (in Polish as well) some years
ago. This one may come handy if you decide to make your Yak-11 in one of the
very colourful markings sported by the Hungarian and Czechoslovakian aircraft,
however only side views are included.
The Model Kit
 RVHP
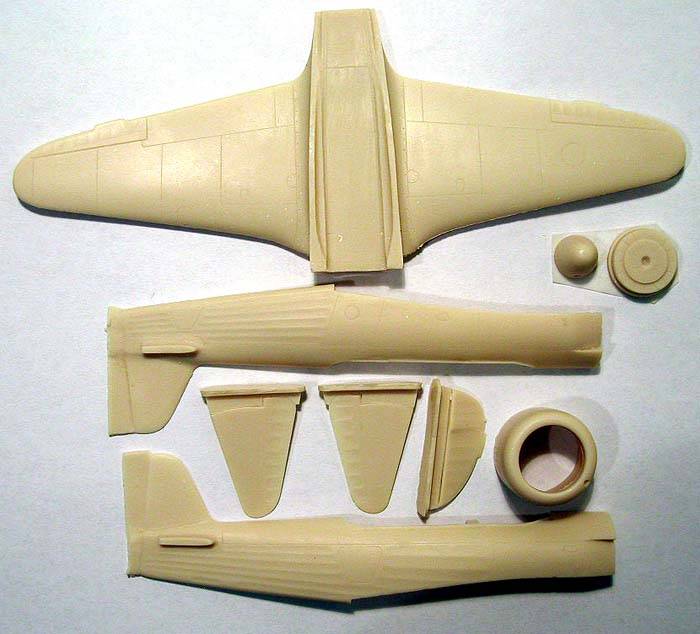
kit is a high quality resin kit featuring a vacuformed canopy and white metal
undercarriage legs and a tail wheel. The resin parts are pretty much devoid
of air bubbles with the exception of the leading edge of the wings, which in
my example was pretty badly done and required a lot of filling and sanding.
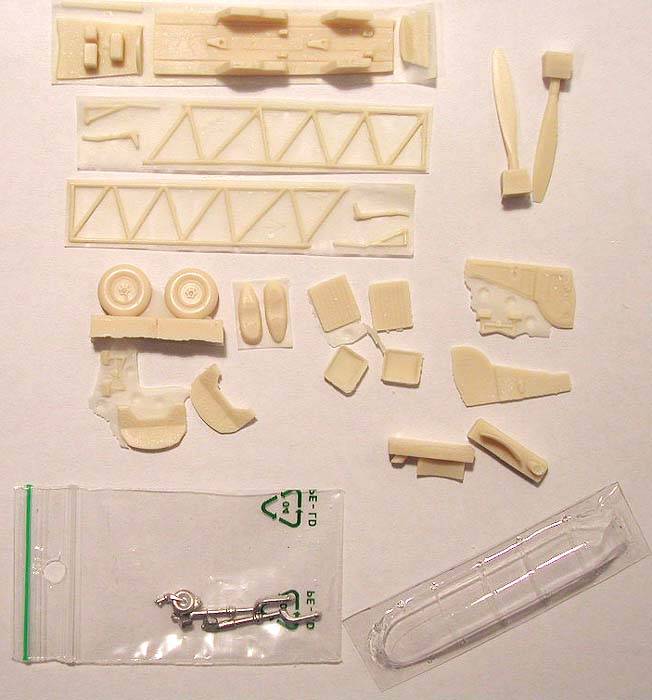
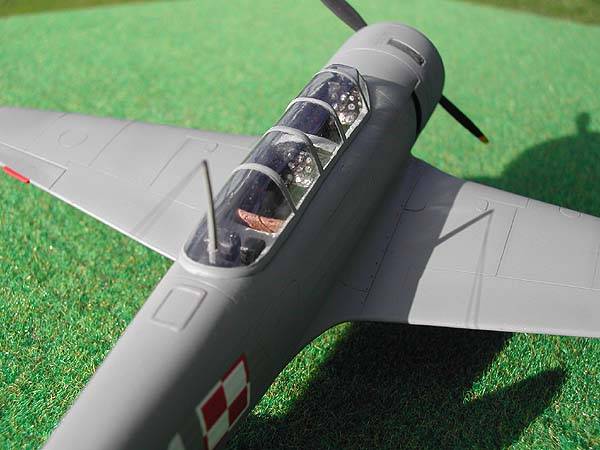
The surface detail is very nicely done and the cockpit interior is adequate,
but IMHO needs some improvements since the interior is going to be quite visible
through the long canopy. I decided to enhance the look of the cockpit using
various parts from spare photoetched PART frets designed for Yak-7B. New instrument
panels and side consoles were added as well as harness and floor coverings.
Other parts such as seats and a shelf with radio boxes came from the kit. I
also added a gunsight in a forward cockpit, which came from my spares box.
RVHP
kit is a high quality resin kit featuring a vacuformed canopy and white metal
undercarriage legs and a tail wheel. The resin parts are pretty much devoid
of air bubbles with the exception of the leading edge of the wings, which in
my example was pretty badly done and required a lot of filling and sanding.
The surface detail is very nicely done and the cockpit interior is adequate,
but IMHO needs some improvements since the interior is going to be quite visible
through the long canopy. I decided to enhance the look of the cockpit using
various parts from spare photoetched PART frets designed for Yak-7B. New instrument
panels and side consoles were added as well as harness and floor coverings.
Other parts such as seats and a shelf with radio boxes came from the kit. I
also added a gunsight in a forward cockpit, which came from my spares box.
After the cockpit has been completed just a few parts were left, which went
together without any problems. 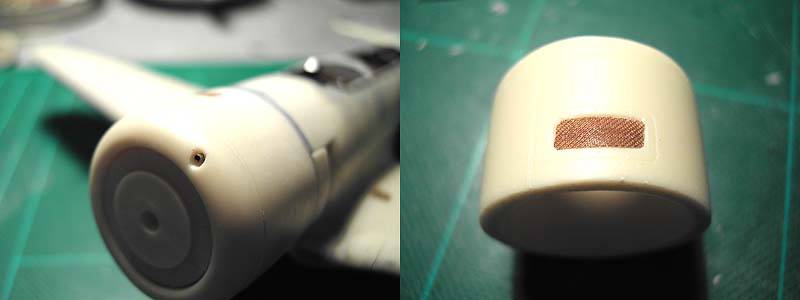 The
wing-fuselage joint is particularly nice and needed just a little bit of a gap
filling superglue. After the fuselage has been completed I turned my attention
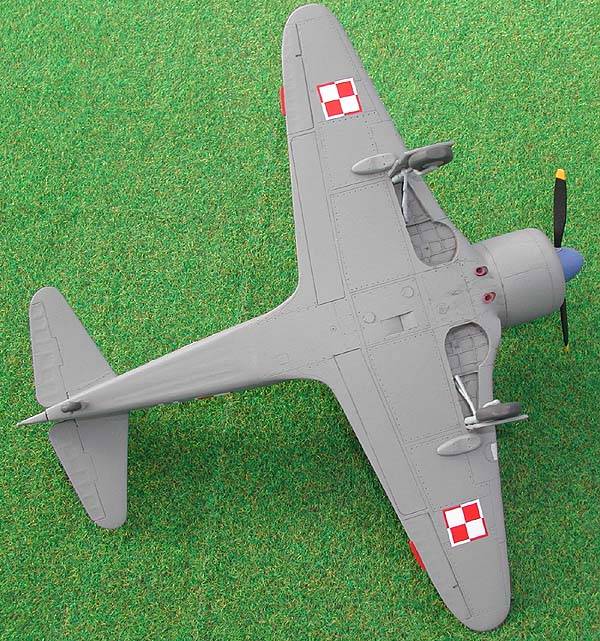
to the engine cowling and added a machine gun barrel and a mesh covering an
air filter in the intake on top of the cowling. Unfortunately, the cowling is
a little bit bigger in diameter than the fuselage and the joint needed some
filling and filing to get acceptable results.
The
wing-fuselage joint is particularly nice and needed just a little bit of a gap
filling superglue. After the fuselage has been completed I turned my attention
to the engine cowling and added a machine gun barrel and a mesh covering an
air filter in the intake on top of the cowling. Unfortunately, the cowling is
a little bit bigger in diameter than the fuselage and the joint needed some
filling and filing to get acceptable results.
The airframe was enhanced with a few photoetched covers that came from Yak-7 frets and the frame antenna on the fuselage just behind the canopy was cut out from the wine bottle foil (its featured as engrave detail, which was removed during sanding the fuselage seam line).
 I
was rather disappointed with the vacuform canopy (only one is supplied), which
had some blemishes and scratches and was a bit on the thick side of things (compared
to other vac canopies). The Future treatment enhanced its appearance considerably
and the fit was very good indeed (superglue was used to fix the canopy over
the cockpit opening), which compensated for the initial disappointment. The
white metal undercarriage legs were enhanced with oleo links, which again came
from the Yak-7 PE set. The legs are nicely done, but are way too long. This
became apparent after I added wheels and the model's nose was pointing upwards
giving it a very weird appearance. Comparison with scale drawings revealed that
the top of the engine cowling was sitting some 5 mm too high, which forced me
to shave about 4 mm from the landing gear legs and make wheels look more flattened
than they already were, the wheel covers also needed modifications. I suppose
these can be replaced by parts coming from either Yak-1 or Yak-3 kits.
I
was rather disappointed with the vacuform canopy (only one is supplied), which
had some blemishes and scratches and was a bit on the thick side of things (compared
to other vac canopies). The Future treatment enhanced its appearance considerably
and the fit was very good indeed (superglue was used to fix the canopy over
the cockpit opening), which compensated for the initial disappointment. The
white metal undercarriage legs were enhanced with oleo links, which again came
from the Yak-7 PE set. The legs are nicely done, but are way too long. This
became apparent after I added wheels and the model's nose was pointing upwards
giving it a very weird appearance. Comparison with scale drawings revealed that
the top of the engine cowling was sitting some 5 mm too high, which forced me
to shave about 4 mm from the landing gear legs and make wheels look more flattened
than they already were, the wheel covers also needed modifications. I suppose
these can be replaced by parts coming from either Yak-1 or Yak-3 kits.
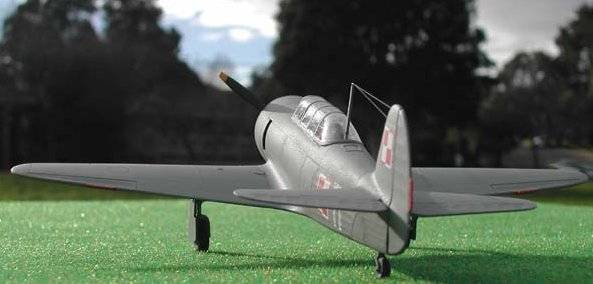
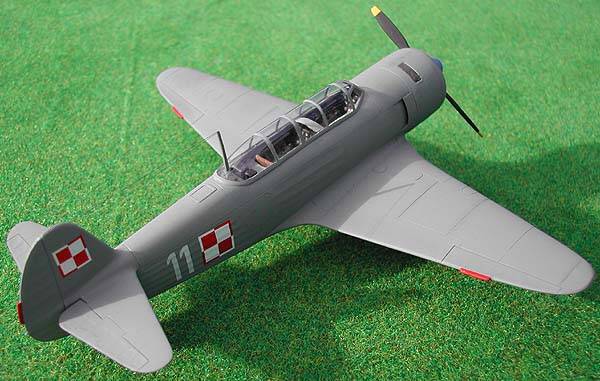
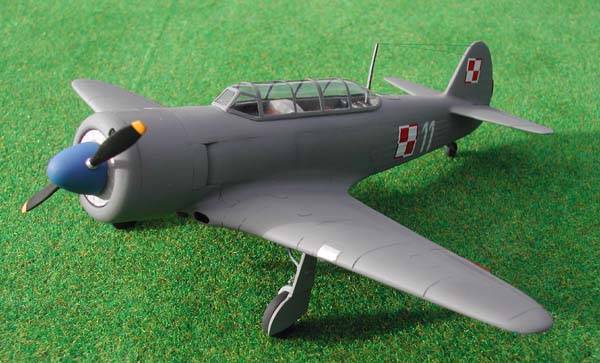
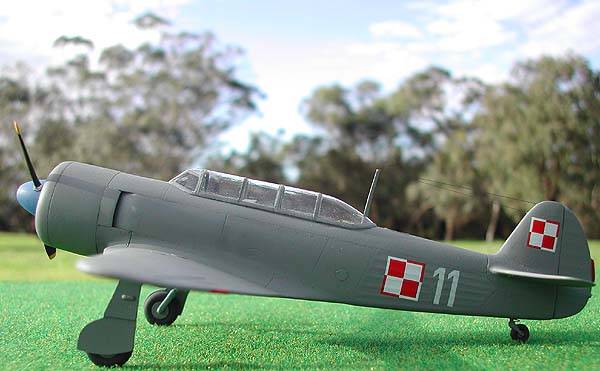
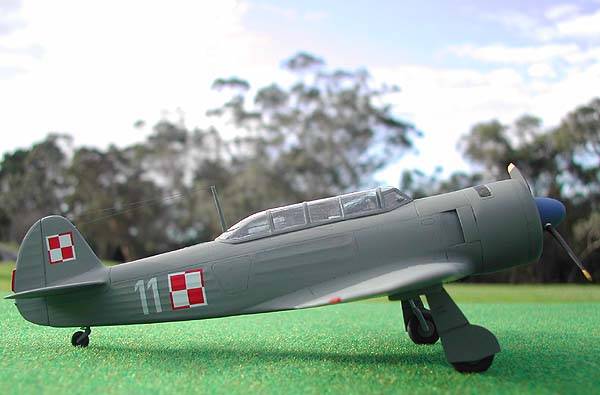
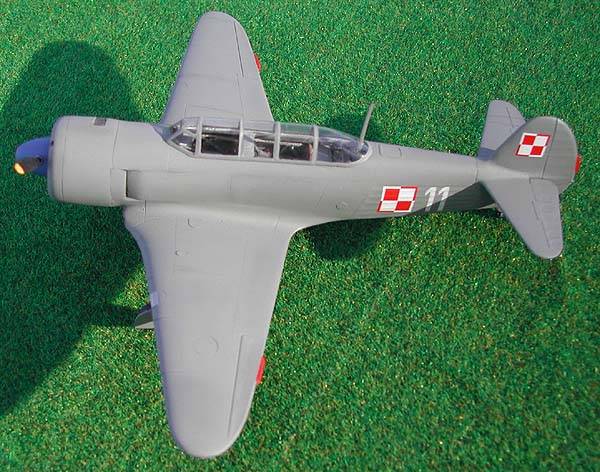
Most Yak-11 were painted overall grey regardless of the country using them
and according to the kits instructions and Yak-11 monograph the colour corresponds
to FS16165. My FS tables say that its Tamiya XF-22 or Humbrol 92, which are
rather dark in colour. I used XF-22 heavily lightened with white, but the colour
did not look right to me it was still too dark and had a greenish tint that
just looked wrong. Therefore, I decided to paint the model with Revell 47 mouse
grey with the addition of some white. This mix, to me at least looked right,
but I may be completely wrong here. The spinner was painted Humbrol French Blue.
The entire kit was coated with 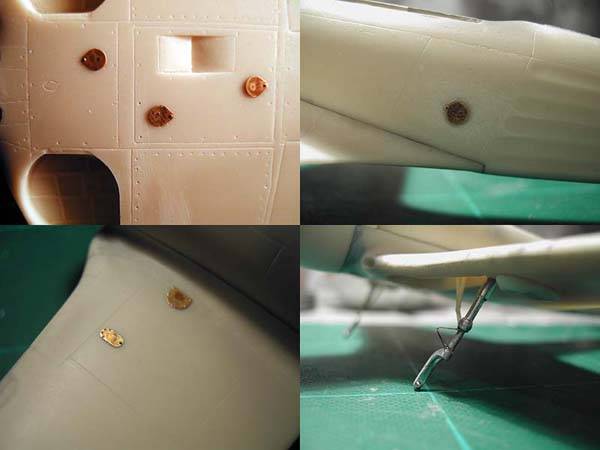 Future
and decals applied. The kit decals feature one Polish and two Czechoslovakian
options. The decal sheet appears to be printed on ALPS/OKI printer, but looked
quite good. I only used "White 11" from the sheet and replaced Polish national
insignia with spares from Techmod sheet, because the kits markings were too
small. The Polish checkers from the decal sheet were identical in size to those
featured in Skrzydla w Miniaturze colour side views, but that makes them slightly
underscaled at least according to the dimensions given in Camouflage and Markings
of Polish Air Force. The paint job was completed with a raw umber wash applied
to the undersides and wheel wells and I also experimented with chalk pastels,
but all the weathering kept disappearing underneath the coat of semigloss clear
and I finally gave up (only the darker grey colour used for panel line highlights
is visible, none of the lighter grey shows through).
Future
and decals applied. The kit decals feature one Polish and two Czechoslovakian
options. The decal sheet appears to be printed on ALPS/OKI printer, but looked
quite good. I only used "White 11" from the sheet and replaced Polish national
insignia with spares from Techmod sheet, because the kits markings were too
small. The Polish checkers from the decal sheet were identical in size to those
featured in Skrzydla w Miniaturze colour side views, but that makes them slightly
underscaled at least according to the dimensions given in Camouflage and Markings
of Polish Air Force. The paint job was completed with a raw umber wash applied
to the undersides and wheel wells and I also experimented with chalk pastels,
but all the weathering kept disappearing underneath the coat of semigloss clear
and I finally gave up (only the darker grey colour used for panel line highlights
is visible, none of the lighter grey shows through).
RVHP did a very good job with this kit and I am very pleased with the final product. And since I do not have to convert Yak-3 into Yak-11 anymore I think I will turn my attention to Yak-9V and use one of the ICM kits to make this variant of the Yakovlevs plane (there is something about two seaters that makes them irresistible to me).
 |
 |
 |
 |
 |
 |
 |
 |
|