Yak-1: The First of Many;
|
 |
The Kit
I am not a big enthusiast of limited-run kits. Well, I make them from time to time if nothing else from the subject area is available and is not expected.
For some time I was expecting Yak-1 from Dakoplast and paid little or no attention to the release of the Yak-1 early series by Amodel. Of course, I was following reviews of this kit and noted its positive and negative features as stated by fellow modelers.
 Several
months ago I got access to a marvelous photograph of a Yak-1 flown by
the Hero of the Soviet Union Georgiy Zhidov of the 123 IAP, Leningrad
Air Defense. Since it was of the same series that Amodel replicated
and the upcoming Yak from Dakoplast would represent a later machine,
my mind was set on this project. Despite all my reservations I decided
to give it a try. Being a superdetail edict I ordered some aftermarket
details designed for this kit (Part PE set) as well as those that could
be used for it with little (Moskit exhaust pipes) or no modifications
(Equipage wheels).
Several
months ago I got access to a marvelous photograph of a Yak-1 flown by
the Hero of the Soviet Union Georgiy Zhidov of the 123 IAP, Leningrad
Air Defense. Since it was of the same series that Amodel replicated
and the upcoming Yak from Dakoplast would represent a later machine,
my mind was set on this project. Despite all my reservations I decided
to give it a try. Being a superdetail edict I ordered some aftermarket
details designed for this kit (Part PE set) as well as those that could
be used for it with little (Moskit exhaust pipes) or no modifications
(Equipage wheels).
The first look in the box revealed well done major parts and an array of small details with some flash to clean (inevitable process for limited run). Plastic is rather thick but soft and easy to work with. Fabric effect on the aft fuselage and control surfaces is virtually invisible and could be observed only looking at the light source. This, actually, is one of the major complaints of the reviewers. The strongest point of the kit is the wheel wells, which are cleverly boxed. The way it is done should be an industry standard. Instructions are good and very clear to follow. However, references are always good to check as well (especially as it comes to the installation of the landing gear assembly).
Construction
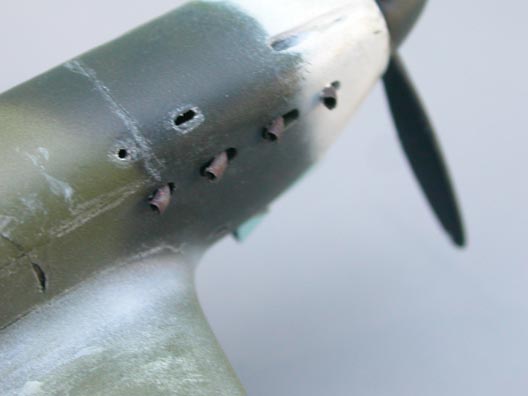
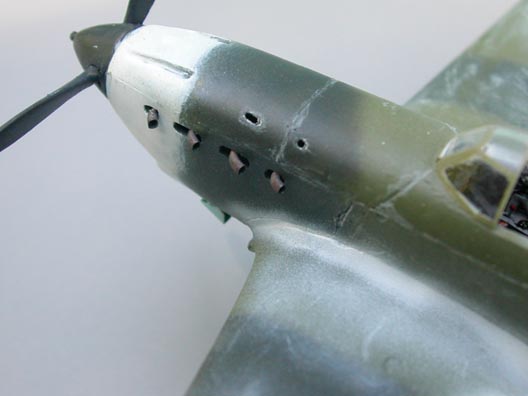
I started with the fuselage parts. First of all I took
care of the ejection ports on the cowling. In order to make them more
realistic I dremelled plastic from the inner part of the fuselage halves
and then drilled the holes. This way they  look
to scale and it is much easier to make the oval shape to them. I also
dremelled the area around the holes for exhaust stacks. As I mentioned
before I planned to use Moskit exhausts designed for Yak-9 model. However,
it has double stacks while Yak-1 and Yak-7 have single pipes visible
outside the cowling. The extra pipes were carefully removed by tweezers
and the stacks were fitted in the holes for future installation.
look
to scale and it is much easier to make the oval shape to them. I also
dremelled the area around the holes for exhaust stacks. As I mentioned
before I planned to use Moskit exhausts designed for Yak-9 model. However,
it has double stacks while Yak-1 and Yak-7 have single pipes visible
outside the cowling. The extra pipes were carefully removed by tweezers
and the stacks were fitted in the holes for future installation.
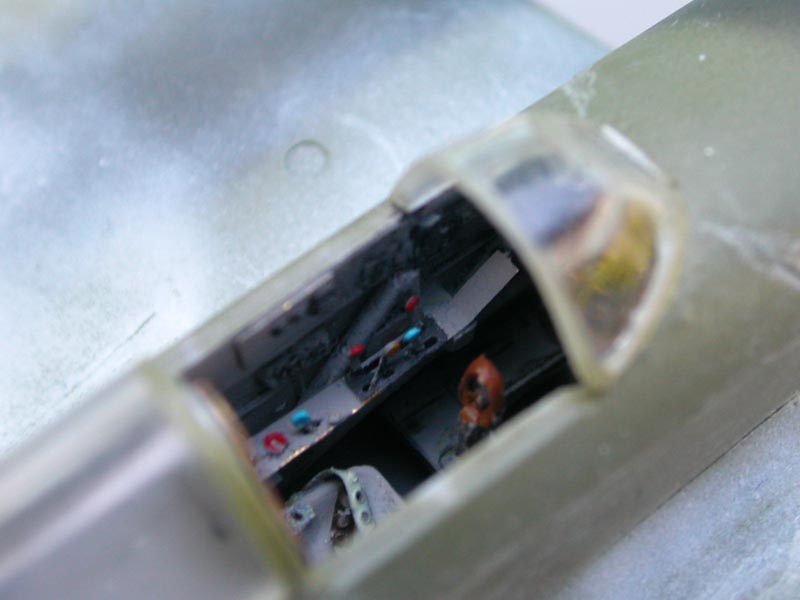
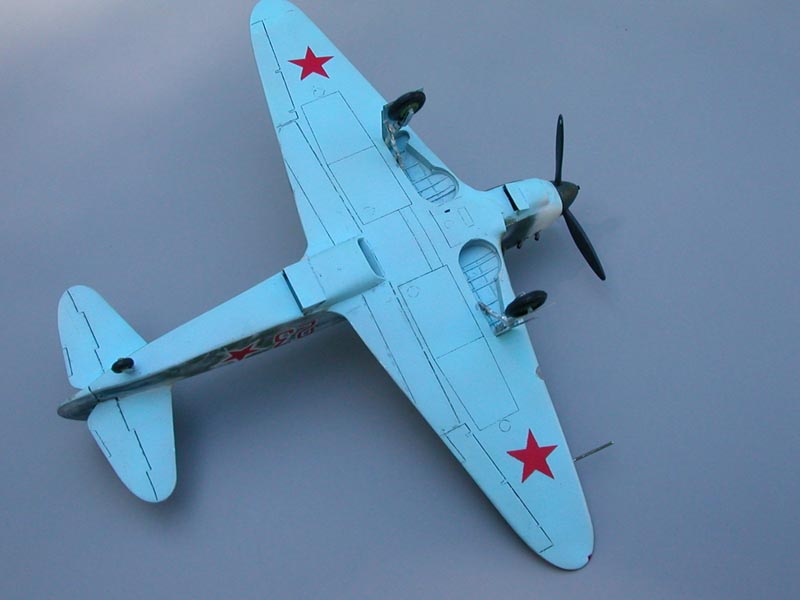
The cockpit interior came next. The kit includes excellent ribbing as separate parts. Side consoles and their detailing were used from the Part PE set. The sides were painted gray (I use Polyscale RAF medium sea gray) and washed. The floor is mounted on the center of the lower wing . It was also dressed with PE details and the pedals were mounted on it. The pedals' harnesses are given in PE set and were used at this point. The instrument panel from Part PE set was painted black, then the film was glued to its back side and painted white on the back. The panel was detailed with a white pencil to make it more realistic. The instrument panel and the shelf behind the pilot's seat were attached to one of the fuselage halves. The seat's backrest was used from the kit but supplemented with the photoetched counterpart. The seatbelts are also provided by Part in their excellent set. I cut a rectangular-shaped opening in the oil radiator to add a photoetched door.
 The
fuselage halves were glued together with very little or no fit problems.
The kit is very well engineered. The front part of the cowling comes
as a separate detail, which facilitates easy installation of the oil
radiator matrix. The latter was also provided by Part. At this point
I want to commend Amodel for the great job of making intake edges of
radiators thin to scale. Very little to no thinning is necessary for
these parts.. When the oil cooler matrix was installed the front upper
part of the cowling was glued and the seams taken care of.
The
fuselage halves were glued together with very little or no fit problems.
The kit is very well engineered. The front part of the cowling comes
as a separate detail, which facilitates easy installation of the oil
radiator matrix. The latter was also provided by Part. At this point
I want to commend Amodel for the great job of making intake edges of
radiators thin to scale. Very little to no thinning is necessary for
these parts.. When the oil cooler matrix was installed the front upper
part of the cowling was glued and the seams taken care of.
The next stage of the construction involved the lower
wing. Prior to its installation the water radiator door of the kit was
removed and substituted with the photoetched part. Radiator matrices
from the Part set were also installed. The radiator assembly is very
well designed and in assembled form makes a very convincing tunnel.
The wheel wells (the crown jewel of the kit) were also installed. I
opened the supercharger intake using a round file and hobby knife making
sure to keep the fit with the centerplain and at the same time to make
the walls of the intake as thin and sharp as possible.  The
lower wing assembly with parts of the floor structure was installed.
The fit is very reasonable. The upper wings were installed and a very
reasonable seam was treated with Zap-a-Gap ®. At this moment the
model started to look more and more convincing. Then the horizontal
stabilizers were installed. I did not like the gunsite provided by Part
as it is too big to fit under the canopy. I used one from my spare box
but it could be easily scratchbuilt as well. The canopy received a bath
of Future and the front and rear parts were installed. The fit was excellent
and required no corrections. The prototype I was copying had the sliding
canopy removed, which excused me from making one from PE part and film.
The
lower wing assembly with parts of the floor structure was installed.
The fit is very reasonable. The upper wings were installed and a very
reasonable seam was treated with Zap-a-Gap ®. At this moment the
model started to look more and more convincing. Then the horizontal
stabilizers were installed. I did not like the gunsite provided by Part
as it is too big to fit under the canopy. I used one from my spare box
but it could be easily scratchbuilt as well. The canopy received a bath
of Future and the front and rear parts were installed. The fit was excellent
and required no corrections. The prototype I was copying had the sliding
canopy removed, which excused me from making one from PE part and film.
Flash was cleaned from the landing gear (this was easier than I expected!) and installed. This installation is very similar to one of the original plane according to my references (Pervyj Yak - The First Yak - by Kuznecov). This book has excellent drawings besides the airplane's development and combat history. The landing gear doors were made from the Part PE set. Part provides these doors for early (my case) and later production series.
Propeller and spinner were cleaned from some flash and assembled. The airscrew is an excellent representation of the VISh-61 propeller and the spinner has a hucks tooth nicely done. I drilled a hole in the center of it.
Final Construction and Painting
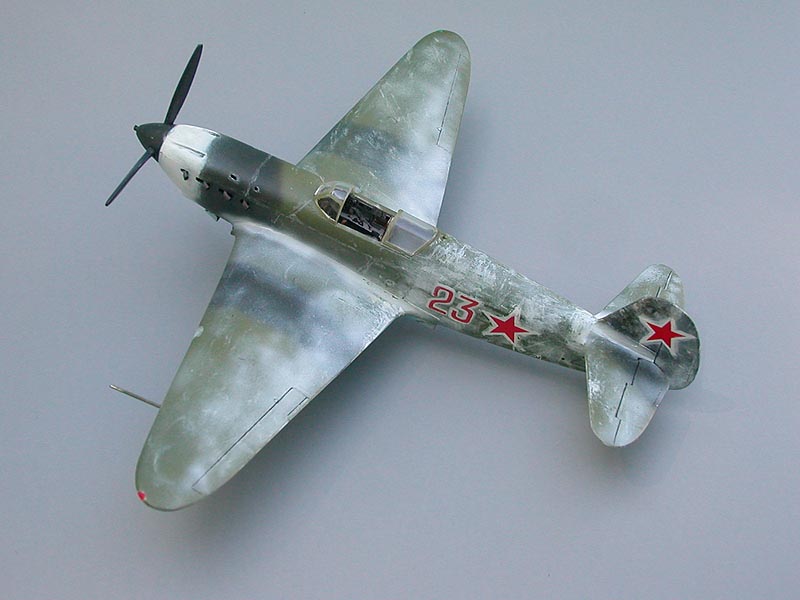
 Painting
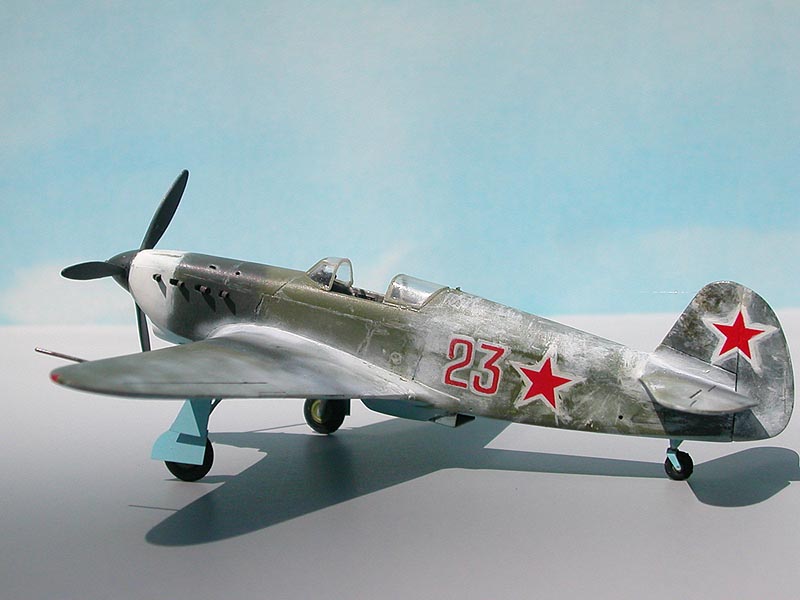
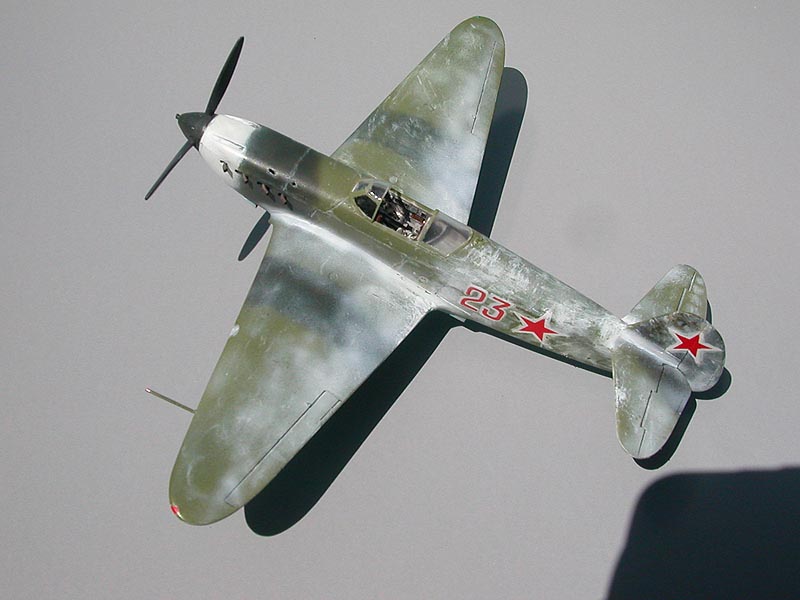
came next and at this stage the question was would it "make or
brake" the model as the technique of making the desired winter
scheme was unclear to me. I painted the model green (I use Gunze acrylics,
p03 paint, FS34102, which I consider to be a very good representation
for Russian AII- AMT series). The camouflage spots were painted in black-green
by Polyscale (it provides excellent scale effect for black camouflage
color). Than I airbrushed white areas around the wing fillets and stabilizer
and the area of the front cowling. The back of the fuselage, stabilizer,
fin, and wings received thin and sparse coats of semitransparent white.
I used an old thin brush and used a technique of drybrushing with a
semi-dry brush to replicate brush strokes of the original. The result
was rather convincing. I applied very fine sandpaper to smooth the brush
strokes and at that moment I gratefully observed how excellent and very
delicate ribbing/fabric effect was exposed. It looks very much to scale
and proves reservations of many modelers to be ungrounded. I also made
navigation lights from pieces of resin sprue from Aries navigation lights
set.
Painting
came next and at this stage the question was would it "make or
brake" the model as the technique of making the desired winter
scheme was unclear to me. I painted the model green (I use Gunze acrylics,
p03 paint, FS34102, which I consider to be a very good representation
for Russian AII- AMT series). The camouflage spots were painted in black-green
by Polyscale (it provides excellent scale effect for black camouflage
color). Than I airbrushed white areas around the wing fillets and stabilizer
and the area of the front cowling. The back of the fuselage, stabilizer,
fin, and wings received thin and sparse coats of semitransparent white.
I used an old thin brush and used a technique of drybrushing with a
semi-dry brush to replicate brush strokes of the original. The result
was rather convincing. I applied very fine sandpaper to smooth the brush
strokes and at that moment I gratefully observed how excellent and very
delicate ribbing/fabric effect was exposed. It looks very much to scale
and proves reservations of many modelers to be ungrounded. I also made
navigation lights from pieces of resin sprue from Aries navigation lights
set.
 The
model was coated with Future and the control surfaces as well as panel
lines on the lower wing were oil-washed.
The
model was coated with Future and the control surfaces as well as panel
lines on the lower wing were oil-washed.
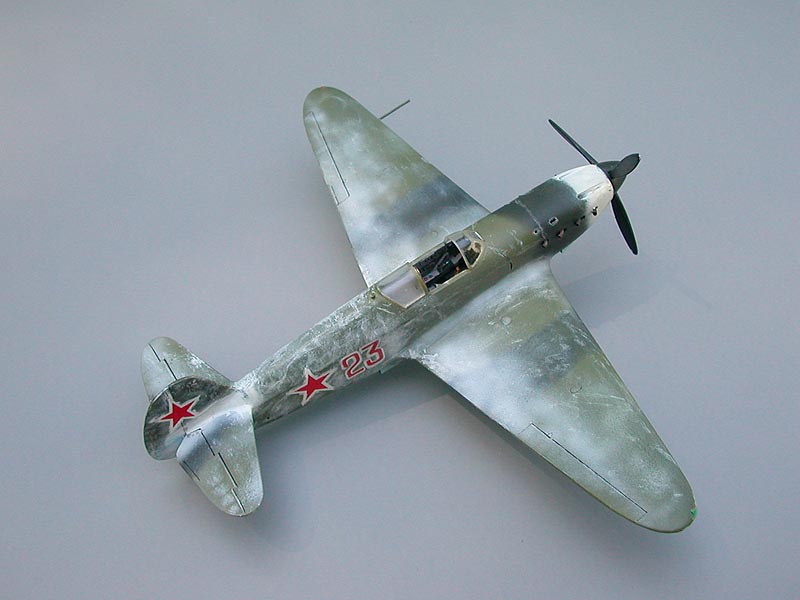
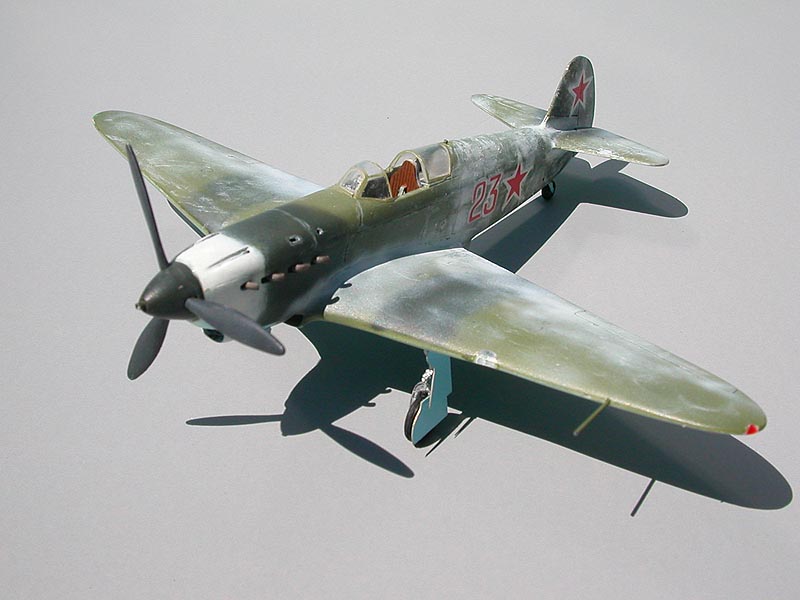
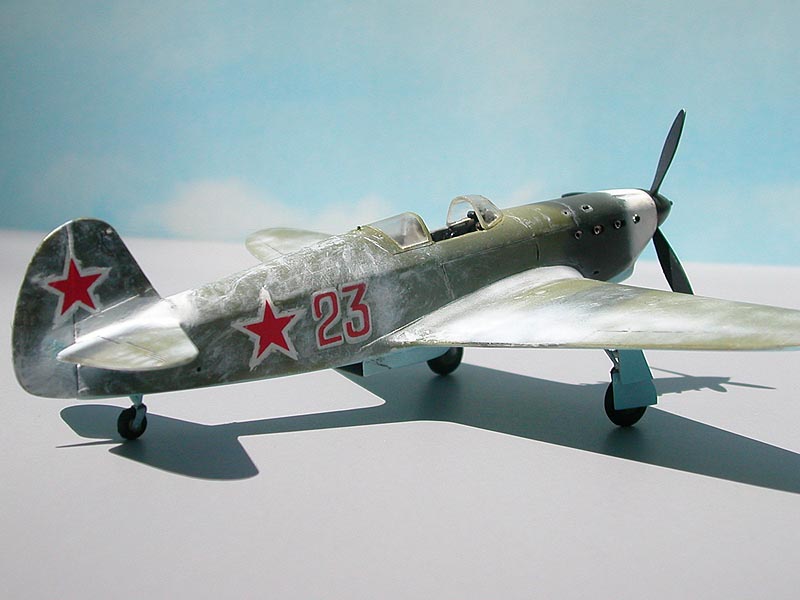
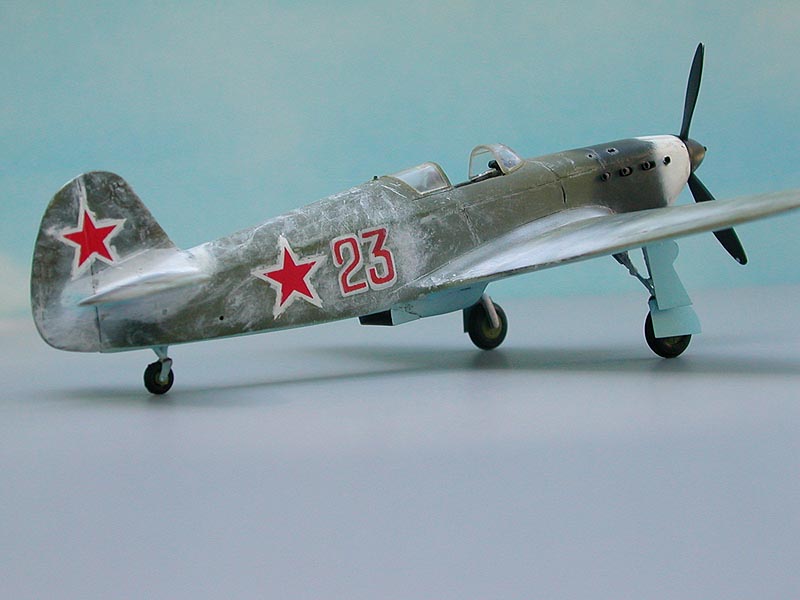
Decals (tactical numbers) were kindly made for me by Erik Pilawskii. They were successfully applied as well as the stars. The white outlines of the stars were treated with white paint to make them look realistically rubbed . The model was left to dry thoroughly and coated with flat. White cosmetic pencil was used to apply remains of white camouflage around panel lines of the cowling.
The landing gear and doors were installed and once again I was very impressed by their engineering and very accurate representation of the original landing gear kinematics. The wheels were used from Equipage excellent set with resin hubs and rubber tires. The tail wheel assembly was constructed from the kit's detail, PE bracket (provided in the Part set), and Equipage little rubber wheel.
Moskit exhaust were installed through the opening in the front before the spinner-propeller installation. The prop was installed and antenna wire from very thin synthetic thread was mounted (it took me well over an hour to hit the drilled holes in the fuselage and fin by the thread).
That concluded the assembly of the model and it was proudly displayed on my shelf among other models of the Red Air Force.
Conclusion
This is an excellent model of a very important fighter. The kit is very well engineered and such features as wheel wells should become an industry standard. The fit is generally good, the canopy fits very well. Ribbing effect on the aft fuselage is well done although it seems that it is not there. The model is well detailed with cockpit details provided although Part PE allows for much better alternative.
I am very impressed with this kit and would highly recommend it to experienced modelers (this is also what the manufacturer suggest). Part PE set is more than a welcomed addition to this model (a must in my opinion). At list at this point of my modeling experience I am satisfied with the painting job. It was fun to do it and I realized how a good airbrush can make a huge difference (prior to this project I used Paasche ® single-action airbrush and tested my new Iwata Eclipse ® for the first time).
Now I am anxiously expecting Dakoplast offering of a later-series of this "razorback" beauty (although you can also build it from the Amodel kit as well).
 |
 |
 |
 |
 |
 |